
| 일 | 월 | 화 | 수 | 목 | 금 | 토 |
|---|---|---|---|---|---|---|
| 1 | 2 | 3 | 4 | 5 | 6 | |
| 7 | 8 | 9 | 10 | 11 | 12 | 13 |
| 14 | 15 | 16 | 17 | 18 | 19 | 20 |
| 21 | 22 | 23 | 24 | 25 | 26 | 27 |
| 28 | 29 | 30 |
- 막내의막무가내 안드로이드
- Fragment
- 주엽역 생활맥주
- 막내의막무가내 안드로이드 에러 해결
- 안드로이드 sunflower
- 부스트코스
- 막무가내
- 막내의막무가내
- 막내의막무가내 안드로이드 코틀린
- 부스트코스에이스
- 안드로이드 Sunflower 스터디
- 주택가 잠실새내
- 프로그래머스 알고리즘
- 프래그먼트
- 막내의막무가내 플러터
- 막내의막무가내 목표 및 회고
- flutter network call
- 막내의막무가내 프로그래밍
- 막내의막무가내 코틀린
- 막내의막무가내 SQL
- 막내의 막무가내 알고리즘
- 막내의막무가내 rxjava
- 안드로이드
- 막내의막무가내 알고리즘
- 막내의 막무가내
- 2022년 6월 일상
- 막내의막무가내 코틀린 안드로이드
- 막내의막무가내 플러터 flutter
- 막내의막무가내 코볼 COBOL
- 막내의막무가내 일상
- Today
- Total
막내의 막무가내 프로그래밍 & 일상
[Flutter] Udemy 플러터 강의 섹션 13 학습 (Clima - Powering Your Flutter App with Live Web Data) 본문
[Flutter] Udemy 플러터 강의 섹션 13 학습 (Clima - Powering Your Flutter App with Live Web Data)
막무가내막내 2022. 4. 12. 21:09
[이전학습]
https://youngest-programming.tistory.com/685
[Flutter] Udemy 플러터 강의 섹션 12 학습 (BMI Calculator - Building Flutter for intermediates)
[이전학습] https://youngest-programming.tistory.com/682 [Flutter] Udemy 플러터 강의 섹션 11 학습 (섹션 11: Boss Level Challenge 2 - Destini) [이전학습] https://youngest-programming.tistory.com/624..
youngest-programming.tistory.com
[참고]
https://www.udemy.com/course/flutter-bootcamp-with-dart/
The Complete 2021 Flutter Development Bootcamp with Dart
Officially created in collaboration with the Google Flutter team.
www.udemy.com
https://github.com/mtjin/flutter-practice
GitHub - mtjin/flutter-practice: Learning About Flutter (플러터 공부)
Learning About Flutter (플러터 공부). Contribute to mtjin/flutter-practice development by creating an account on GitHub.
github.com
[139. Clima - A Modern Weather App]
실제 날씨 OPEN API 서버와 연동하여 날씨앱을 만들 예정입니다.
서버와 통신하는 방법에 대해 배울 것 같습니다.
[140. Getting Location Data From Across Platforms]
https://pub.dev/packages/geolocator
geolocator | Flutter Package
Geolocation plugin for Flutter. This plugin provides a cross-platform (iOS, Android) API for generic location (GPS etc.) functions.
pub.dev
플러터에서 지리좌표를 얻을 수 있는 라이브러리인 gelocator를 사용했다.
안드로이드에서는 위치정보를 얻는데 권한이 필요하므로
manifest에 따로 다음과 같이 사용권한을 추가해줘야한다.
<manifest xmlns:android="http://schemas.android.com/apk/res/android"
    package="co.appbrewery.clima">

    <uses-permission android:name="android.permission.ACCESS_FINE_LOCATION" />
    <uses-permission android:name="android.permission.ACCESS_COARSE_LOCATION" />
IOS도 마찬가지로 다음과 같이 같은 작업을 해준다.
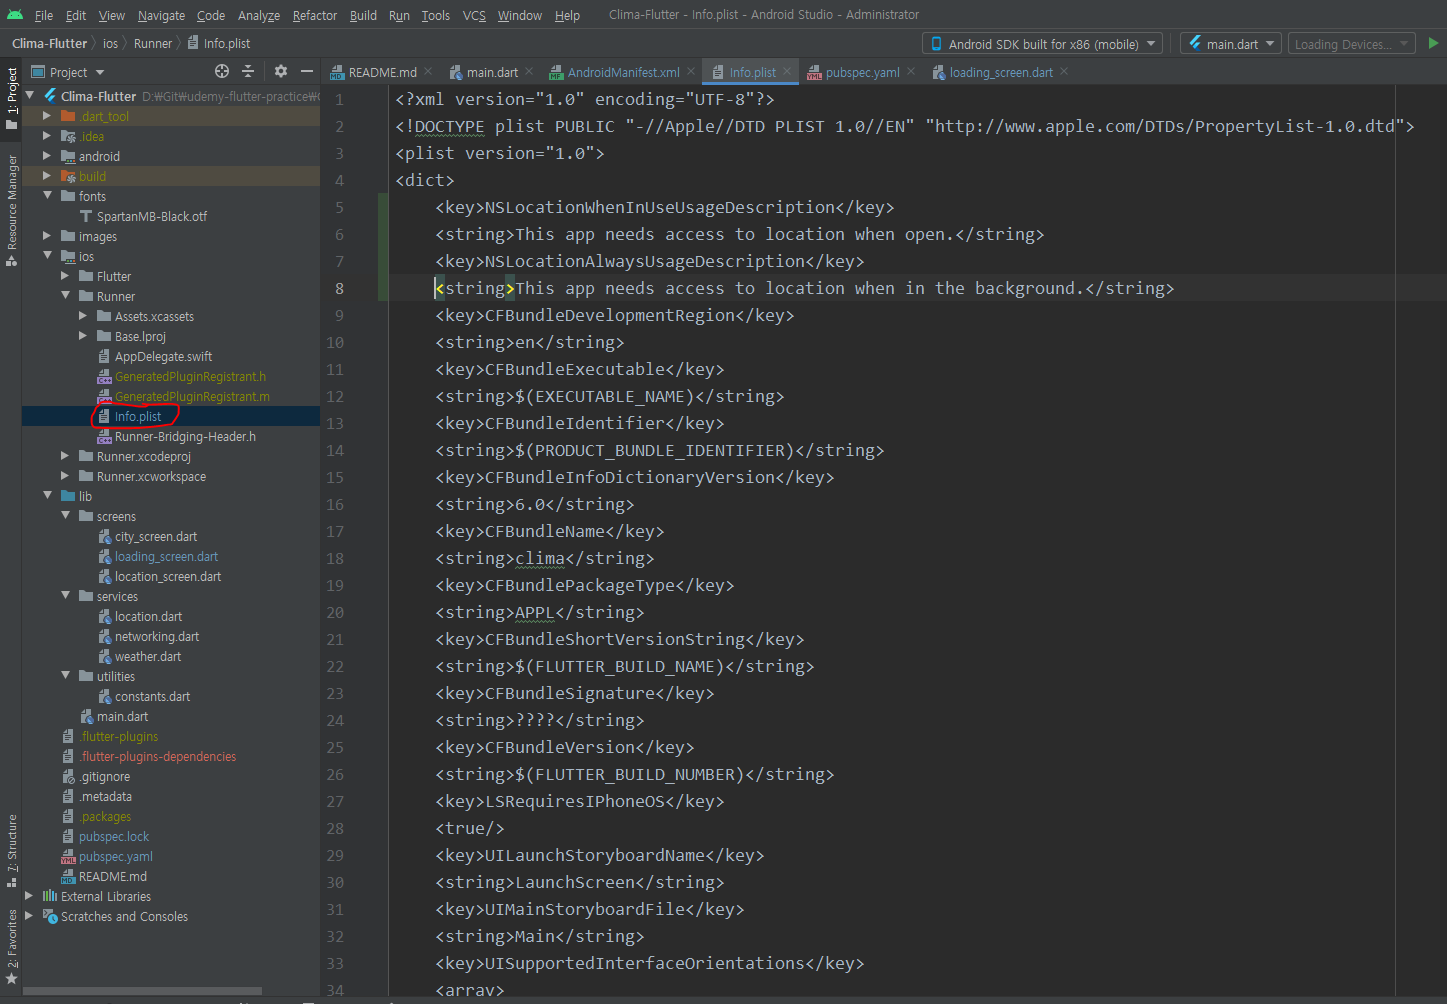
<key>NSLocationWhenInUseUsageDescription</key>
<string>This app needs access to location when open.</string>
<key>NSLocationAlwaysUsageDescription</key>
<string>This app needs access to location when in the background.</string>
async는 네트워크 작업과 같이 오래걸릴 수 있는 작업을 비동기로 실행시켜주는 거라고 보면 된다.
뒤에서 더 자세히 배울 것 같다.
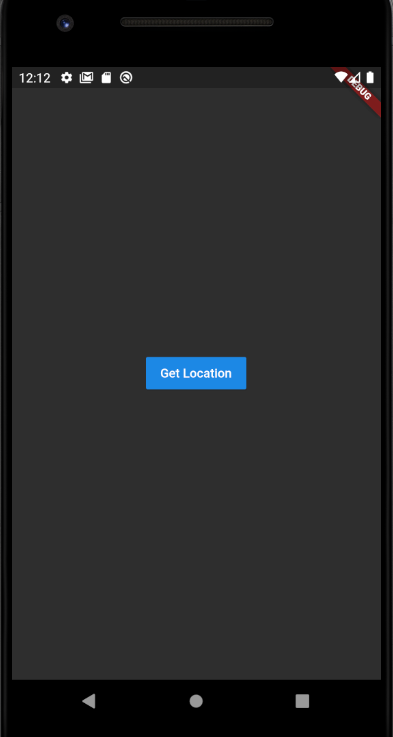
이것을 사용하여 geolocator의 위치를 얻어오는 작업을 구현하였다.
import 'package:flutter/material.dart';
import 'package:geolocator/geolocator.dart';

class LoadingScreen extends StatefulWidget {
  @override
  _LoadingScreenState createState() => _LoadingScreenState();
}

class _LoadingScreenState extends State<LoadingScreen> {
  void getLocation() async {
    Position position = await Geolocator()
        .getCurrentPosition(desiredAccuracy: LocationAccuracy.low);
    print(position);
  }

  @override
  Widget build(BuildContext context) {
    return Scaffold(
      body: Center(
        child: RaisedButton(
          onPressed: () {
            //Get the current location
            getLocation();
          },
          child: Text('Get Location'),
        ),
      ),
    );
  }
}
[141. [Dart] Futures, Async & Await]
다트의 Future, async, await에 대해 배웠다.
Future는 자바스크립트의 프로미스와 비슷하며 미래에 비동기작업으로 부터 받을 결과값 타입이라 생각하면 된다.
async는 비동시 실행 await는 이 비동기 작업을 기다려줬다 처리해주는 역할이라 생각하면 편하다.
[142. Stateful Widget Lifecycle Methods]
안드로이드에서 중요한 개념중 하나인 생명주기가 플러터에도 존재한다.
그 중 Stateful Widget의 생명주기에 대해 데모 프로젝트를 통해 배웠다.
크게위젯이 생성되었을떄 가장 먼저 불리는 initState()
위젯을 반환하고 위젯이 다시 만들어질때 불리는 build()
화면이 destoryed 되면 불리는 deactiviate() 가 있다.
자세한건 다음 링크를 참고하면 된다.
https://flutterbyexample.com/lesson/stateful-widget-lifecycle
StatefulWidget lifecycle
When a Flutter builds a [`StatefulWidget`](https://docs.flutter.io/flutter/widgets/StatefulWidget-class.html), it creates a [`State`](https://docs.flutter.io/flutter/widgets/State-class.html) object. This object is where all the **[mutable](https://en.wiki
flutterbyexample.com
import 'package:flutter/material.dart';
import 'package:geolocator/geolocator.dart';

class LoadingScreen extends StatefulWidget {
  @override
  _LoadingScreenState createState() => _LoadingScreenState();
}

class _LoadingScreenState extends State<LoadingScreen> {
  // async, await 학습
  void getLocation() async {
    Position position = await Geolocator()
        .getCurrentPosition(desiredAccuracy: LocationAccuracy.low);
    print(position);
  }

  @override
  void initState() {
    super.initState();
    getLocation();
  }

  @override
  Widget build(BuildContext context) {
    return Scaffold();
  }

  @override
  void deactivate() {
    super.deactivate();
  }
}
기존에 build()에 있던 getLocation()을 매번 다시 build()될때 하는것보다 항상 공통적으로 불러오는거라 initState() 생명주기로 코드를 옮겼다.
[143. [Dart] Exception Handling & Null Aware Operators]
플러터 Dart에서 에러를 핸들링하는 즉 예외처리 방법에 대해 배웠다.
코틀린하고 똑같이 try catch문을 사용하면 되었다.
class _LoadingScreenState extends State<LoadingScreen> {
  void getLocation() async {
    try {
      Position position = await Geolocator()
          .getCurrentPosition(desiredAccuracy: LocationAccuracy.low);
      print(position);
    } catch (e) {
      print(e);
    }
  }

  @override
  void initState() {
    super.initState();
    getLocation();
  }

  @override
  Widget build(BuildContext context) {
    String myMargin = '15';
    double myMarginAsADouble;

    try {
      myMarginAsADouble = double.parse(myMargin);
    } catch (e) {
      print(e);
    }

    return Scaffold(
      body: Container(
        margin: EdgeInsets.all(myMarginAsADouble ?? 30),
        color: Colors.red,
      ),
    );
  }

  @override
  void deactivate() {
    super.deactivate();
  }
}
[144. Async/Await Challenge]
기존의 getLocation() 함수를 다른 클래스에 모듈화해서 가져오는 식으로 구현하는 챌린지를 했다.
모듈화한 함수에서 Future와 async를 사용하도 비동기 작업과 리턴을 할 수 있게만들고
이 함수를 부르는 클래스에서는 비동기작업이 끝나면 값을 받아올 수 있게 await 해주었다.
import 'package:geolocator/geolocator.dart';

class Location {
  double latitude;
  double longitude;

  Future<void> getCurrentLocation() async {
    try {
      Position position = await Geolocator()
          .getCurrentPosition(desiredAccuracy: LocationAccuracy.low);
      latitude = position.latitude;
      longitude = position.longitude;
    } catch (e) {
      print(e);
    }
  }
}
import 'package:flutter/material.dart';
import 'package:clima/services/location.dart';

class LoadingScreen extends StatefulWidget {
  @override
  _LoadingScreenState createState() => _LoadingScreenState();
}

class _LoadingScreenState extends State<LoadingScreen> {
  @override
  void initState() {
    super.initState();
    getLocation();
  }

  void getLocation() async {
    Location location = Location();
    await location.getCurrentLocation();
    print(location.latitude);
    print(location.longitude);
  }
[145. Application Programming Interfaces (APIs) Explained]
API란 무엇인가에 대해 배웠다.
[146. Networking in Flutter Apps with the HTTP Package]
http | Dart Package
A composable, multi-platform, Future-based API for HTTP requests.
pub.dev
Flutter 에서 HTTP 통신을 하기 위해서 위의 패키지를 사용한다.
HTTP라이브러리를 사용하여 Weather API에서 데이터를 불러오는 것을 구현했다.
import 'package:flutter/material.dart';
import 'package:clima/services/location.dart';
import 'package:http/http.dart' as http;

class LoadingScreen extends StatefulWidget {
  @override
  _LoadingScreenState createState() => _LoadingScreenState();
}

class _LoadingScreenState extends State<LoadingScreen> {
  @override
  void initState() {
    super.initState();
    getLocation();
  }

  void getLocation() async {
    Location location = Location();
    await location.getCurrentLocation();
    print(location.latitude);
    print(location.longitude);
  }

  void getData() async {
    http.Response response = await http.get(
        'https://api.openweathermap.org/data/2.5/weather?lat=35&lon=136&appid=f46d282380022c79ed0008839c7af08d');
    if (response.statusCode == 200) {
      String data = response.body;
      print(data);
    } else {
      print(response.statusCode);
    }
  }

  @override
  Widget build(BuildContext context) {
    getData();
    return Scaffold();
  }

  @override
  void deactivate() {
    super.deactivate();
  }
}
네트워크 통신은 비동기로 이루어지므로 async과 await가 사용되었고 get()으로 데이터를 API로부터 호출해서 불러온다.
그리고 상태코드에 따라 200(성공)과 실패로 나눠 분기처리하였다.
import 'package:http/http.dart' as http;추가로 다음과 같이 특정 패키지에 이름을 as로 붙여서 사용할 수 있음도 배웠다.
[147. JSON Parsing and Dynamic Types]
import 'dart:convert';먼저 json 값을 컨버팅해서 추출할 수 있는 패키지를 추가해줬다.
void getData() async {
  http.Response response = await http.get(
      'https://api.openweathermap.org/data/2.5/weather?lat=35&lon=136&appid=f46d282380022c79ed0008839c7af08d');
  if (response.statusCode == 200) {
    String data = response.body;
    // dynamic type 인 var로 정확한 타입을 몰라도 저장할 수 있다.
    var decodedData = jsonDecode(data);
    double temperature = decodedData['main']['temp'];
    int condition = decodedData['weather'][0]['id'];
    String cityName = decodedData['name'];
    print(temperature);
    print(condition);
    print(cityName);
  } else {
    print(response.statusCode);
  }
}
json 구조를 코드로 받는 거는 이 예제만 보면 이해가 될 것 같다.
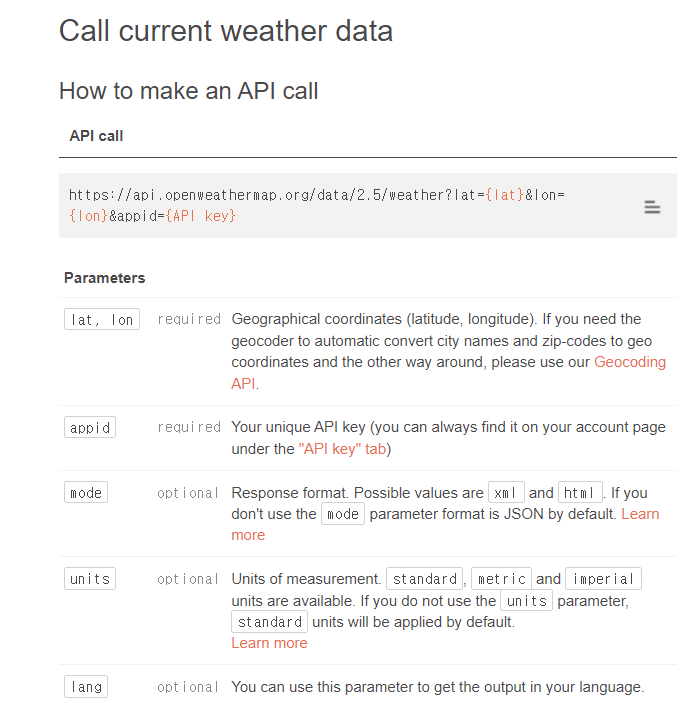
[148. Getting Actual Weather Data from the OpenWeatherMap API]
기존의 네트워크통신하던 로직을 좀 더 모듈화하고 NetworkHelper 클래스로 분리하였다.
import 'package:http/http.dart' as http;
import 'dart:convert';

class NetworkHelper {
  final String url;

  NetworkHelper(this.url);

  Future getData() async {
    http.Response response = await http.get(url);
    if (response.statusCode == 200) {
      String data = response.body;
      return jsonDecode(data);
    } else {
      print(response.statusCode);
    }
  }
}
import 'package:flutter/material.dart';
import 'package:clima/services/location.dart';
import 'package:http/http.dart' as http;
import 'dart:convert';
import 'package:clima/services/networking.dart';

const apiKey = 'f46d282380022c79ed0008839c7af08d';

class LoadingScreen extends StatefulWidget {
  @override
  _LoadingScreenState createState() => _LoadingScreenState();
}

class _LoadingScreenState extends State<LoadingScreen> {
  double latitude;
  double longitude;

  @override
  void initState() {
    super.initState();
    getLocationData();
  }

  void getLocationData() async {
    Location location = Location();
    await location.getCurrentLocation();
    latitude = location.latitude;
    longitude = location.longitude;
    NetworkHelper networkHelper = NetworkHelper(
        'https://api.openweathermap.org/data/2.5/weather?lat=$latitude&lon=$longitude&appid=$apiKey');

    var weatherData = await networkHelper.getData();
  }

  @override
  Widget build(BuildContext context) {
    return Scaffold();
  }

  @override
  void deactivate() {
    super.deactivate();
  }
}
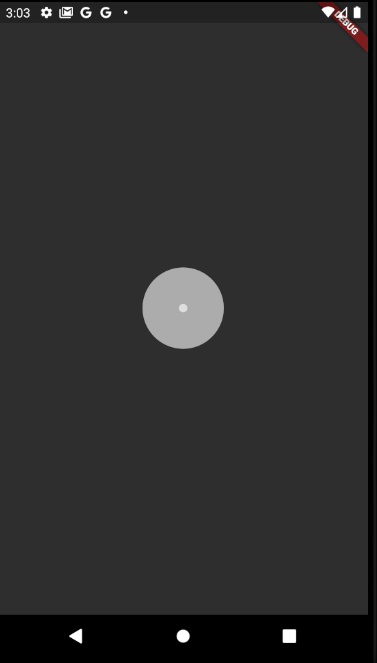
[149. Showing a Spinner While the User Waits]
플러터에서는 다양한 로딩바(spinner)를 지원한다.
https://pub.dev/packages/flutter_spinkit
flutter_spinkit | Flutter Package
A collection of loading indicators animated with flutter. Heavily inspired by @tobiasahlin's SpinKit.
pub.dev
이 라이브러리를 import 한 후 로딩스크린을 문서에 작성되있는대로 구현하였다.
import 'package:flutter/cupertino.dart';
import 'package:flutter/material.dart';
import 'package:clima/services/location.dart';
import 'package:clima/services/networking.dart';
import 'location_screen.dart';
import 'package:flutter_spinkit/flutter_spinkit.dart';

const apiKey = 'f46d282380022c79ed0008839c7af08d';

class LoadingScreen extends StatefulWidget {
  @override
  _LoadingScreenState createState() => _LoadingScreenState();
}

class _LoadingScreenState extends State<LoadingScreen> {
  double latitude;
  double longitude;

  @override
  void initState() {
    super.initState();
    getLocationData();
  }

  void getLocationData() async {
    Location location = Location();
    await location.getCurrentLocation();
    latitude = location.latitude;
    longitude = location.longitude;
    NetworkHelper networkHelper = NetworkHelper(
        'https://api.openweathermap.org/data/2.5/weather?lat=$latitude&lon=$longitude&appid=$apiKey');

    var weatherData = await networkHelper.getData();
    Navigator.push(context, MaterialPageRoute(builder: (context) {
      return LocationScreen();
    }));
  }

  @override
  Widget build(BuildContext context) {
    return Scaffold(
      body: Center(
        child: SpinKitDoubleBounce(
          color: Colors.white,
          size: 100.0,
        ),
      ),
    );
  }

  @override
  void deactivate() {
    super.deactivate();
  }
}
[150. Passing Data to a State Object]
State Object에 데이터를 넘겨주는 방법에 대해 배웠다.
class _LoadingScreenState extends State<LoadingScreen> {
  double latitude;
  double longitude;

  @override
  void initState() {
    super.initState();
    getLocationData();
  }

  void getLocationData() async {
    Location location = Location();
    await location.getCurrentLocation();
    NetworkHelper networkHelper = NetworkHelper(
        'https://api.openweathermap.org/data/2.5/weather?lat=${location.latitude}&lon=${location.longitude}&appid=$apiKey&units=metric');

    var weatherData = await networkHelper.getData();
    Navigator.push(context, MaterialPageRoute(builder: (context) {
      return LocationScreen(
        locationWeather: weatherData,
      );
    }));
  }
StateFulWidget의 initState()에서 넘겨받은 값을 초기화시켜준다.
import 'package:flutter/material.dart';
import 'package:clima/utilities/constants.dart';

class LocationScreen extends StatefulWidget {
  final locationWeather;

  @override
  _LocationScreenState createState() => _LocationScreenState();

  LocationScreen({this.locationWeather});
}

class _LocationScreenState extends State<LocationScreen> {
  int temperature;
  int condition;
  String cityName;

  @override
  void initState() {
    super.initState();
    updateUI(widget.locationWeather);
  }

  void updateUI(dynamic weatherData) {
    double temp = weatherData['main']['temp'];
    temperature = temp.toInt();
    condition = weatherData['weather'][0]['id'];
    cityName = weatherData['name'];
  }
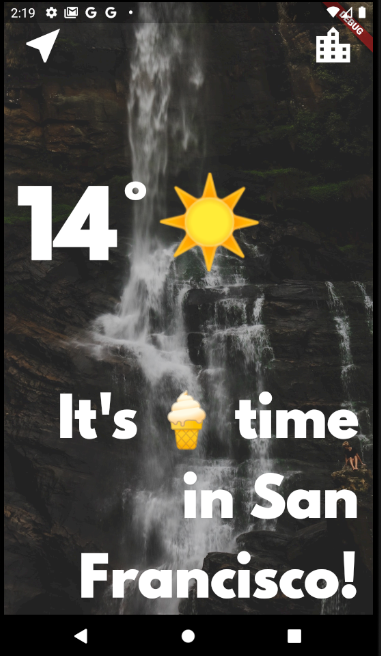
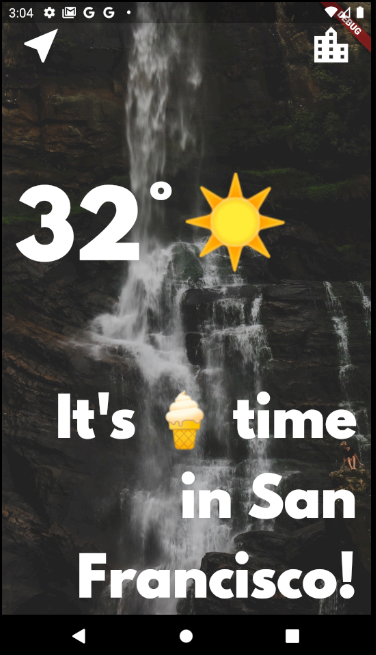
[151. Updating the Weather with the WeatherModel]
WeatherModel 클래스 함수를 활용하여 나머지 날씨아이콘과 메시지를 리펙토링해주었다.
class WeatherModel {
String getWeatherIcon(int condition) {
if (condition < 300) {
return '🌩';
} else if (condition < 400) {
return '🌧';
} else if (condition < 600) {
return '☔️';
} else if (condition < 700) {
return '☃️';
} else if (condition < 800) {
return '🌫';
} else if (condition == 800) {
return '☀️';
} else if (condition <= 804) {
return '☁️';
} else {
return '🤷';
}
}
String getMessage(int temp) {
if (temp > 25) {
return 'It\'s 🍦 time';
} else if (temp > 20) {
return 'Time for shorts and 👕';
} else if (temp < 10) {
return 'You\'ll need 🧣 and 🧤';
} else {
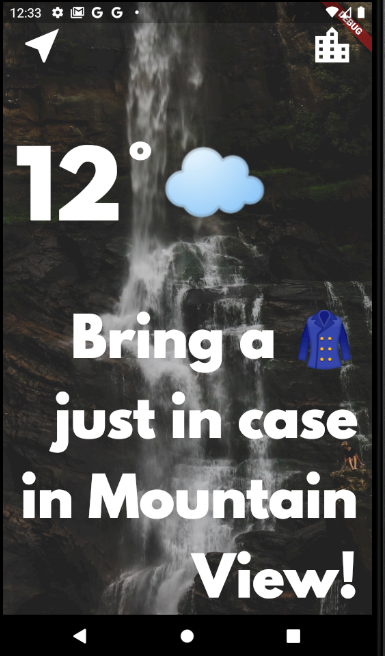
return 'Bring a 🧥 just in case';
}
}
}
import 'package:flutter/material.dart';
import 'package:clima/utilities/constants.dart';
import 'package:clima/services/weather.dart';

class LocationScreen extends StatefulWidget {
  final locationWeather;

  @override
  _LocationScreenState createState() => _LocationScreenState();

  LocationScreen({this.locationWeather});
}

class _LocationScreenState extends State<LocationScreen> {
  WeatherModel weather = WeatherModel();
  int temperature;
  String weatherIcon;
  String weatherMessage;
  String cityName;

  @override
  void initState() {
    super.initState();
    updateUI(widget.locationWeather);
  }

  void updateUI(dynamic weatherData) {
    setState(() {
      double temp = weatherData['main']['temp'];
      temperature = temp.toInt();
      var condition = weatherData['weather'][0]['id'];
      weatherIcon = weather.getWeatherIcon(condition);
      weatherMessage = weather.getMessage(temperature);
      cityName = weatherData['name'];
    });
  }

  @override
  Widget build(BuildContext context) {
    return Scaffold(
      body: Container(
        decoration: BoxDecoration(
          image: DecorationImage(
            image: AssetImage('images/location_background.jpg'),
            fit: BoxFit.cover,
            colorFilter: ColorFilter.mode(
                Colors.white.withOpacity(0.8), BlendMode.dstATop),
          ),
        ),
        constraints: BoxConstraints.expand(),
        child: SafeArea(
          child: Column(
            mainAxisAlignment: MainAxisAlignment.spaceBetween,
            crossAxisAlignment: CrossAxisAlignment.stretch,
            children: <Widget>[
              Row(
                mainAxisAlignment: MainAxisAlignment.spaceBetween,
                children: <Widget>[
                  FlatButton(
                    onPressed: () {},
                    child: Icon(
                      Icons.near_me,
                      size: 50.0,
                    ),
                  ),
                  FlatButton(
                    onPressed: () {},
                    child: Icon(
                      Icons.location_city,
                      size: 50.0,
                    ),
                  ),
                ],
              ),
              Padding(
                padding: EdgeInsets.only(left: 15.0),
                child: Row(
                  children: <Widget>[
                    Text(
                      '$temperature°',
                      style: kTempTextStyle,
                    ),
                    Text(
                      weatherIcon,
                      style: kConditionTextStyle,
                    ),
                  ],
                ),
              ),
              Padding(
                padding: EdgeInsets.only(right: 15.0),
                child: Text(
                  '$weatherMessage in $cityName!',
                  textAlign: TextAlign.right,
                  style: kMessageTextStyle,
                ),
              ),
            ],
          ),
        ),
      ),
    );
  }
}
[152. Refactoring the Location Methods]
날씨를 불러오는 함수를 WeahterModel 안으로 넣어주면서 리펙토링을 진행했다.
import 'package:clima/services/location.dart';
import 'package:clima/services/networking.dart';
const apiKey = 'f46d282380022c79ed0008839c7af08d';
const openWeatherMapURL = 'https://api.openweathermap.org/data/2.5/weather';
class WeatherModel {
Future<dynamic> getLocationWeather() async {
Location location = Location();
await location.getCurrentLocation();
NetworkHelper networkHelper = NetworkHelper(
'$openWeatherMapURL?lat=${location.latitude}&lon=${location.longitude}&appid=$apiKey&units=metric');
var weatherData = await networkHelper.getData();
return weatherData;
}
String getWeatherIcon(int condition) {
if (condition < 300) {
return '🌩';
} else if (condition < 400) {
return '🌧';
} else if (condition < 600) {
return '☔️';
} else if (condition < 700) {
return '☃️';
} else if (condition < 800) {
return '🌫';
} else if (condition == 800) {
return '☀️';
} else if (condition <= 804) {
return '☁️';
} else {
return '🤷';
}
}
String getMessage(int temp) {
if (temp > 25) {
return 'It\'s 🍦 time';
} else if (temp > 20) {
return 'Time for shorts and 👕';
} else if (temp < 10) {
return 'You\'ll need 🧣 and 🧤';
} else {
return 'Bring a 🧥 just in case';
}
}
}
그리고 onPressed() 에서 비동기 함수를 불러오는것이므로 앞에 async와 await를 설정해주었다.
또한 null 체크도 추가해주었다.
import 'package:flutter/material.dart';
import 'package:clima/utilities/constants.dart';
import 'package:clima/services/weather.dart';

class LocationScreen extends StatefulWidget {
  final locationWeather;

  @override
  _LocationScreenState createState() => _LocationScreenState();

  LocationScreen({this.locationWeather});
}

class _LocationScreenState extends State<LocationScreen> {
  WeatherModel weather = WeatherModel();
  int temperature;
  String weatherIcon;
  String weatherMessage;
  String cityName;

  @override
  void initState() {
    super.initState();
    updateUI(widget.locationWeather);
  }

  void updateUI(dynamic weatherData) {
    setState(() {
      if (weatherData == null) {
        temperature = 0;
        weatherIcon = 'Error';
        weatherMessage = 'Unable to get weahter Data';
        cityName = '';
        return;
      }
      double temp = weatherData['main']['temp'];
      temperature = temp.toInt();
      var condition = weatherData['weather'][0]['id'];
      weatherIcon = weather.getWeatherIcon(condition);
      weatherMessage = weather.getMessage(temperature);
      cityName = weatherData['name'];
    });
  }

  @override
  Widget build(BuildContext context) {
    return Scaffold(
      body: Container(
        decoration: BoxDecoration(
          image: DecorationImage(
            image: AssetImage('images/location_background.jpg'),
            fit: BoxFit.cover,
            colorFilter: ColorFilter.mode(
                Colors.white.withOpacity(0.8), BlendMode.dstATop),
          ),
        ),
        constraints: BoxConstraints.expand(),
        child: SafeArea(
          child: Column(
            mainAxisAlignment: MainAxisAlignment.spaceBetween,
            crossAxisAlignment: CrossAxisAlignment.stretch,
            children: <Widget>[
              Row(
                mainAxisAlignment: MainAxisAlignment.spaceBetween,
                children: <Widget>[
                  FlatButton(
                    onPressed: () async {
                      var weatherData = await weather.getLocationWeather();
                      updateUI(weatherData);
                    },
                    child: Icon(
                      Icons.near_me,
                      size: 50.0,
                    ),
                  ),
                  FlatButton(
                    onPressed: () {},
                    child: Icon(
                      Icons.location_city,
                      size: 50.0,
                    ),
                  ),
                ],
              ),
              Padding(
                padding: EdgeInsets.only(left: 15.0),
                child: Row(
                  children: <Widget>[
                    Text(
                      '$temperature°',
                      style: kTempTextStyle,
                    ),
                    Text(
                      weatherIcon,
                      style: kConditionTextStyle,
                    ),
                  ],
                ),
              ),
              Padding(
                padding: EdgeInsets.only(right: 15.0),
                child: Text(
                  '$weatherMessage in $cityName!',
                  textAlign: TextAlign.right,
                  style: kMessageTextStyle,
                ),
              ),
            ],
          ),
        ),
      ),
    );
  }
}
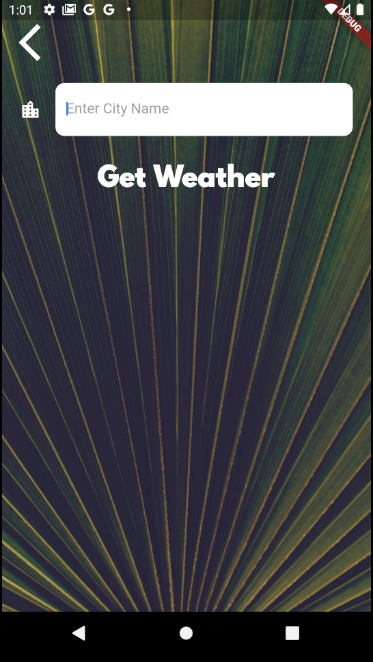
[153. Creating and Styling a TextField Widget for Text Entry]
TextField 위젯을 사용해봤다. 안드로이드로 치면 EditText와 비슷한거같다.
https://api.flutter.dev/flutter/material/TextField-class.html
TextField class - material library - Dart API
A material design text field. A text field lets the user enter text, either with hardware keyboard or with an onscreen keyboard. The text field calls the onChanged callback whenever the user changes the text in the field. If the user indicates that they ar
api.flutter.dev
const kTextFieldInputDecoration = InputDecoration(
  filled: true,
  fillColor: Colors.white,
  icon: Icon(
    Icons.location_city,
    color: Colors.white,
  ),
  hintText: 'Enter City Name',
  hintStyle: TextStyle(color: Colors.grey),
  border: OutlineInputBorder(
    borderRadius: BorderRadius.all(
      Radius.circular(10.0),
    ),
    borderSide: BorderSide.none,
  ),
);
import 'package:flutter/material.dart';
import 'package:clima/utilities/constants.dart';

class CityScreen extends StatefulWidget {
  @override
  _CityScreenState createState() => _CityScreenState();
}

class _CityScreenState extends State<CityScreen> {
  @override
  Widget build(BuildContext context) {
    return Scaffold(
      body: Container(
        decoration: BoxDecoration(
          image: DecorationImage(
            image: AssetImage('images/city_background.jpg'),
            fit: BoxFit.cover,
          ),
        ),
        constraints: BoxConstraints.expand(),
        child: SafeArea(
          child: Column(
            children: <Widget>[
              Align(
                alignment: Alignment.topLeft,
                child: FlatButton(
                  onPressed: () {},
                  child: Icon(
                    Icons.arrow_back_ios,
                    size: 50.0,
                  ),
                ),
              ),
              Container(
                padding: EdgeInsets.all(20.0),
                child: TextField(
                  style: TextStyle(
                    color: Colors.black,
                  ),
                  decoration: kTextFieldInputDecoration,
                  onChanged: (value) {},
                ),
              ),
              FlatButton(
                onPressed: () {},
                child: Text(
                  'Get Weather',
                  style: kButtonTextStyle,
                ),
              ),
            ],
          ),
        ),
      ),
    );
  }
}
[154. Passing Data Backwards Through the Navigation Stack]
Navigator를 사용하여 데이터를 전달하면서 화면을 이동하는 것은 배웠었는데
이번에는 현재 화면에서 pop()으로 이전화면으로 돌아가면서 동시에 데이터결과값을 전달해주는 방법에 대해 배웠다.
Weather 클래스에 먼저 도시이름으로 날씨를 얻어오는 함수를 구현하였따.
class WeatherModel {
  Future<dynamic> getCityWeather(String cityName) async {
    NetworkHelper networkHelper = NetworkHelper(
        '$openWeatherMapURL?q=$cityName&appid=$apiKey&units=metric');
    var weatherData = await networkHelper.getData();
    return weatherData;
  }
도시를 검색하는 화면에서 pop()을 통해 스택에서 화면이 제거됨과 동시에 결과값을 다음 화면스택에 전달할 수 있게했다.
import 'package:flutter/material.dart';
import 'package:clima/utilities/constants.dart';

class CityScreen extends StatefulWidget {
  @override
  _CityScreenState createState() => _CityScreenState();
}

class _CityScreenState extends State<CityScreen> {
  String cityName;

  @override
  Widget build(BuildContext context) {
    return Scaffold(
      body: Container(
        decoration: BoxDecoration(
          image: DecorationImage(
            image: AssetImage('images/city_background.jpg'),
            fit: BoxFit.cover,
          ),
        ),
        constraints: BoxConstraints.expand(),
        child: SafeArea(
          child: Column(
            children: <Widget>[
              Align(
                alignment: Alignment.topLeft,
                child: FlatButton(
                  onPressed: () {
                    // 뒤로가기는 값전달하지 않고 화면을 스택에서 제거한다.
                    Navigator.pop(context);
                  },
                  child: Icon(
                    Icons.arrow_back_ios,
                    size: 50.0,
                  ),
                ),
              ),
              Container(
                padding: EdgeInsets.all(20.0),
                child: TextField(
                  style: TextStyle(
                    color: Colors.black,
                  ),
                  decoration: kTextFieldInputDecoration,
                  onChanged: (value) {
                    cityName = value;
                  },
                ),
              ),
              FlatButton(
                onPressed: () {
                  // 결과값을 리턴할 수도 있음
                  Navigator.pop(context, cityName);
                },
                child: Text(
                  'Get Weather',
                  style: kButtonTextStyle,
                ),
              ),
            ],
          ),
        ),
      ),
    );
  }
}
결과값을 받는 화면쪽에서는 다음과 같이 받으면된다.
값이 안넘어 오는 단순 pop()일 수도 있으므로 null체크는 꼭 하도록하자.
FlatButton(
  onPressed: () async {
    // 네비게이터로 이동한 화면에서의 결과값을 받을 수 있다.
    // async await 사용이 필요
    var typedName = await Navigator.push(context,
        MaterialPageRoute(builder: (context) {
      return CityScreen();
    }));
    if (typedName != null) {
      var weatherData =
          await weather.getCityWeather(typedName);
      updateUI(weatherData);
    }
  },
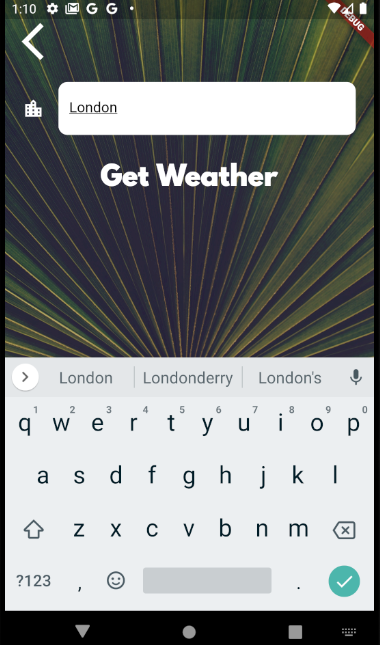
텍스트필드에 런던을 친후 Get Weather 버튼을 누르면 런던의 날씨를 얻어올 수 있다.

THE END..

이상 섹션 11 학습을 완료했습니다.
댓글과 공감은 큰 힘이 됩니다. 감사합니다 !!!
[다음강의]
https://youngest-programming.tistory.com/701
[Flutter] Udemy 플러터 강의 섹션 14 학습 (학습중인 포스팅입니다) (Boss Level Challenge 3 - Bitcoin Tricker)
[이전학습] https://youngest-programming.tistory.com/692 [Flutter] Udemy 플러터 강의 섹션 13 학습 (학습중 3시간18분 강의) (Clima - Powering Your Flutter App with Live W [이전학습] https://youngest-p..
youngest-programming.tistory.com


