| 일 | 월 | 화 | 수 | 목 | 금 | 토 |
|---|---|---|---|---|---|---|
| 1 | 2 | 3 | 4 | 5 | 6 | |
| 7 | 8 | 9 | 10 | 11 | 12 | 13 |
| 14 | 15 | 16 | 17 | 18 | 19 | 20 |
| 21 | 22 | 23 | 24 | 25 | 26 | 27 |
| 28 | 29 | 30 |
- 2022년 6월 일상
- 부스트코스에이스
- 막내의막무가내 일상
- 막내의 막무가내 알고리즘
- 막내의막무가내 rxjava
- 막내의막무가내 알고리즘
- 막내의막무가내
- 막내의막무가내 프로그래밍
- 안드로이드
- 안드로이드 sunflower
- flutter network call
- 주택가 잠실새내
- 막내의막무가내 코틀린 안드로이드
- 막내의 막무가내
- 주엽역 생활맥주
- 프래그먼트
- 막내의막무가내 목표 및 회고
- Fragment
- 막내의막무가내 코틀린
- 막무가내
- 막내의막무가내 플러터 flutter
- 막내의막무가내 플러터
- 부스트코스
- 막내의막무가내 안드로이드 에러 해결
- 막내의막무가내 SQL
- 프로그래머스 알고리즘
- 막내의막무가내 코볼 COBOL
- 안드로이드 Sunflower 스터디
- 막내의막무가내 안드로이드
- 막내의막무가내 안드로이드 코틀린
- Today
- Total
막내의 막무가내 프로그래밍 & 일상
[Flutter] Udemy 플러터 강의 섹션 8 학습 (Boss Level Challenge 1 - Magic 8 Ball) 본문
[Flutter] Udemy 플러터 강의 섹션 8 학습 (Boss Level Challenge 1 - Magic 8 Ball)
막무가내막내 2021. 9. 21. 12:12

[이전학습]
https://youngest-programming.tistory.com/617
[Flutter] Udemy 플러터 강의 섹션 7 학습 (Dicee - Building Apps with State)
플러터에 대해 조금씩 학습하고 있습니다. 최근에는 연수때문에 시간이 부족하여 섹션 6 학습을 오늘 끝냈습니다. 앞으로도 안드로이드와 함께 조금씩 학습할 예정입니다. 다만 이 섹션부터는
youngest-programming.tistory.com
[참고]
https://www.udemy.com/course/flutter-bootcamp-with-dart/
The Complete 2021 Flutter Development Bootcamp with Dart
Officially created in collaboration with the Google Flutter team.
www.udemy.com
https://github.com/mtjin/flutter-practice
GitHub - mtjin/flutter-practice: Learning About Flutter (플러터 공부)
Learning About Flutter (플러터 공부). Contribute to mtjin/flutter-practice development by creating an account on GitHub.
github.com
[65. Magic 8 Ball - A Decision Making App]
이번 섹션은 저번 섹션들과 다르게 그냥 챌린지도 아닌 Boss 챌린지 과제를 수행한다고 합니다.
강의로 이루어져있지않고 챕터마다 뭘 구현하라고 요구사항만 적혀있고 저는 이것들을 단계별로 수행해나가야합니다.
최종 앱은 터치할때마다 결정(대답)을 해주는 애플리케이션을 만드는 것 입니다.
[66. Step 1 - Set Up The Project]
Go to https://github.com/londonappbrewery/magic-8-ball-flutter and clone the starting project to your local computer. Open it using Android Studio and take a look around the project.
- There is an images folder with all the ball images you will need.
- There are a total of 5 images.
[67. Step 2 - Create a Stateless Widget]
- Create a new Stateless widget called BallPage in your main.dart file.
- Replace the word null with the new Stateless Widget you created.

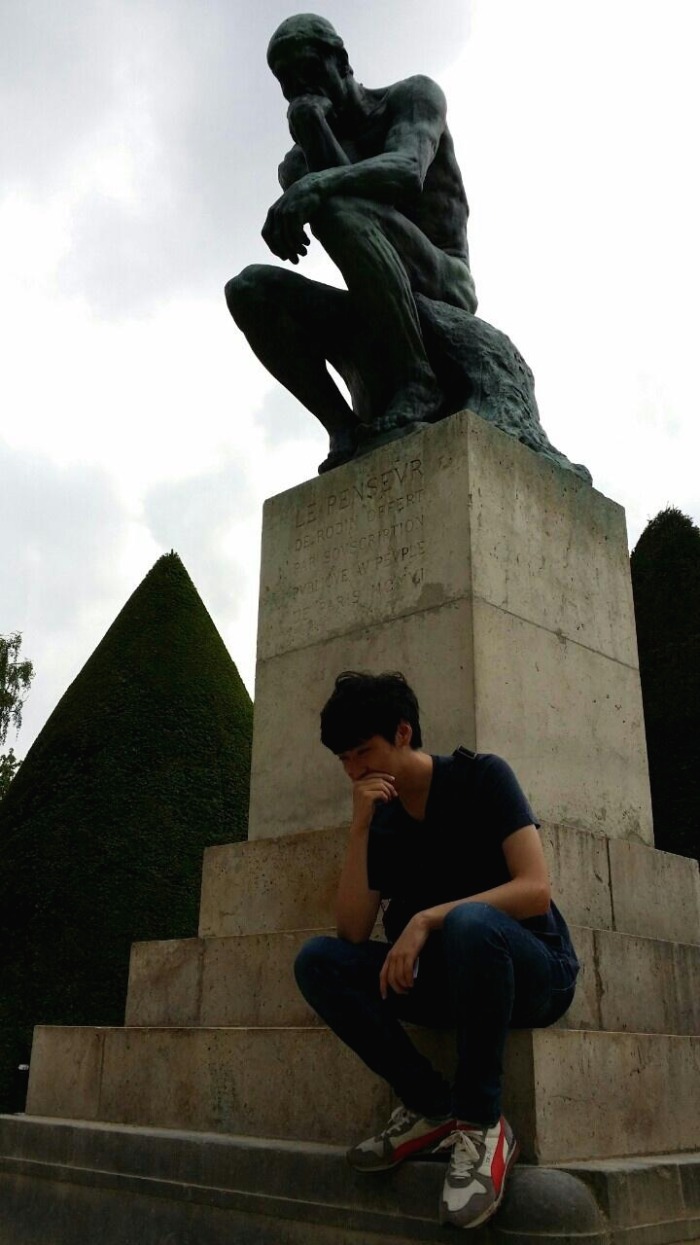
- Your BallPage should have a Scaffold with an AppBar and an empty Container as the body.
- The AppBar should have a dark blue backgroundColor and a title that says 'Ask Me Anything'.
- The background your Scaffold should have a blue color.
- Once you run the app this is what you're aiming for:
다음과 같이 구현했습니다.
import 'package:flutter/material.dart';

void main() => runApp(
      MaterialApp(
        home: BallPage(),
      ),
    );

class BallPage extends StatelessWidget {
  const BallPage({Key key}) : super(key: key);

  @override
  Widget build(BuildContext context) {
    return Scaffold(
      backgroundColor: Colors.blue,
      appBar: AppBar(
        title: Text('나에게 무엇이든 물어봐요'),
        backgroundColor: Colors.blue[900],
      ),
    );
  }
}
[68. Step 3 - Create a Stateful Widget]
- Create a new Stateful Widget called Ball in your main.dart file.
- Instead of BallPage having a body of Container() replace it with your new Stateful Widget.
- Your Ball Stateful Widget should display a the ball1.png image. (You don't have to touch the pubscpec.yaml file)
- Make sure the image is centred.
- When you run the app this is what you're aiming for:


다음과 같이 구현했습니다.
import 'package:flutter/material.dart';

void main() => runApp(
      MaterialApp(
        home: BallPage(),
      ),
    );

class BallPage extends StatelessWidget {
  const BallPage({Key key}) : super(key: key);

  @override
  Widget build(BuildContext context) {
    return Scaffold(
      backgroundColor: Colors.blue,
      appBar: AppBar(
        title: Text('나에게 무엇이든 물어봐요'),
        backgroundColor: Colors.blue[900],
      ),
      body: Ball(),
    );
  }
}

class Ball extends StatefulWidget {
  const Ball({Key key}) : super(key: key);

  @override
  _BallState createState() => _BallState();
}

class _BallState extends State<Ball> {
  @override
  Widget build(BuildContext context) {
    return Center(
      child: Image.asset('images/ball1.png'),
    );
  }
}
[69. Step 4 - Make it Interactive]
- Use a FlatButton Widget to make the Image clickable.
- Add a print statement that gets triggered when the button is pressed. It should print 'I got clicked'.
- When you run the app and click on the ball image you should see the words "I got clicked" into the console like this:
Image.asset을 FlatButton 위젯으로 감싸주고 onPessed() 를 통해 구현하였습니다.
import 'package:flutter/material.dart';

void main() =>
    runApp(
      MaterialApp(
        home: BallPage(),
      ),
    );

class BallPage extends StatelessWidget {
  const BallPage({Key key}) : super(key: key);

  @override
  Widget build(BuildContext context) {
    return Scaffold(
      backgroundColor: Colors.blue,
      appBar: AppBar(
        title: Text('나에게 무엇이든 물어봐요'),
        backgroundColor: Colors.blue[900],
      ),
      body: Ball(),
    );
  }
}

class Ball extends StatefulWidget {
  const Ball({Key key}) : super(key: key);

  @override
  _BallState createState() => _BallState();
}

class _BallState extends State<Ball> {
  @override
  Widget build(BuildContext context) {
    return Center(
      child: FlatButton(
        child: Image.asset('images/ball1.png'),
        onPressed: () {
          print('I got clicked');
        },
      ),
    );
  }
}
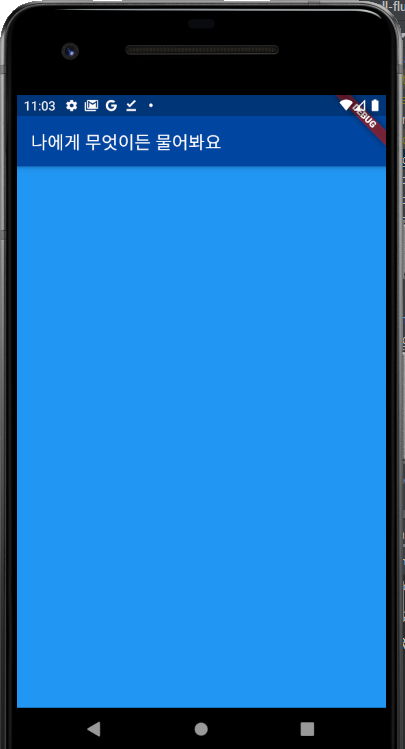
[70. Step 5 - Randomise it]
- Change the random numbers that are generated for ballNumber from 0 - 4 to 1 - 5 to match our ball image names.
- Instead of using a hard coded image name to display the ball image that's shown on screen, use String interpolation and the ballNumber variable instead to make it show a random image.
- Use setState() to update the state of the image when the ballNumber variable updates.
- All going well, you should now have the full functionality of the Magic 8 Ball app, it should look like this:

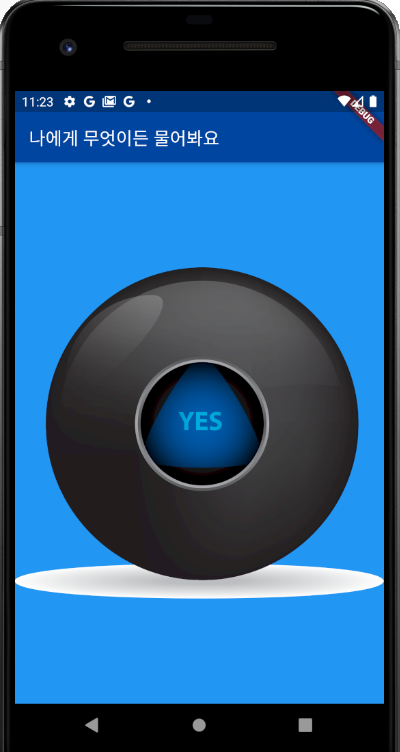
요구사항 대로 setState() 를 통해 재 Build()가 되게하여 이미지를 변경하게 구현했습니다.
추가로 함수로 모듈화를 진행했습니다.
import 'dart:math';

import 'package:flutter/material.dart';

void main() => runApp(
      MaterialApp(
        home: BallPage(),
      ),
    );

class BallPage extends StatelessWidget {
  const BallPage({Key key}) : super(key: key);

  @override
  Widget build(BuildContext context) {
    return Scaffold(
      backgroundColor: Colors.blue,
      appBar: AppBar(
        title: Text('나에게 무엇이든 물어봐요'),
        backgroundColor: Colors.blue[900],
      ),
      body: Ball(),
    );
  }
}

class Ball extends StatefulWidget {
  const Ball({Key key}) : super(key: key);

  @override
  _BallState createState() => _BallState();
}

class _BallState extends State<Ball> {
  int ballNumber = 1;

  void randomBall() {
    setState(() {
      ballNumber = Random().nextInt(5) + 1;
      print(ballNumber);
    });
  }

  @override
  Widget build(BuildContext context) {
    return Center(
      child: FlatButton(
        child: Image.asset('images/ball$ballNumber.png'),
        onPressed: () {
          randomBall();
        },
      ),
    );
  }
}

이상 보스 챌린지 Magic 8 Ball 프로젝트를 성공적으로 완수하였습니다.
댓글과 공감은 큰 힘이 됩니다. 감사합니다. !!!
[다음 학습]
https://youngest-programming.tistory.com/623
[Flutter] Udemy 플러터 강의 섹션 9 학습 (학습중..) (Xylophone - Using Flutter and Dart Packages toSpeed Up Developme
[이전학습] https://youngest-programming.tistory.com/621 [Flutter] Udemy 플러터 강의 섹션 8 학습 (학습중..) (Boss Level Challenge 1 - Magic 8 Ball) [이전학습] https://youngest-programming.tistory.co..
youngest-programming.tistory.com
'플러터(Flutter) & Dart' 카테고리의 다른 글
| [Flutter] Udemy 플러터 강의 섹션 10 학습 (섹션 10: Quizzler -Modularising & Organising FlutterCode) (0) | 2021.09.26 |
|---|---|
| [Flutter] Udemy 플러터 강의 섹션 9 학습 (Xylophone - Using Flutter and Dart Packages toSpeed Up Development) (0) | 2021.09.23 |
| [Flutter] Udemy 플러터 강의 섹션 7 학습 (Dicee - Building Apps with State) (2) | 2021.09.13 |
| [Flutter] 플러터 폰트 적용 안 되는 에러 (4) | 2021.09.10 |
| [플러터] Flutter 참고하면 좋은 사이트 모음 (0) | 2021.08.24 |


