250x250
Notice
Recent Posts
Recent Comments
| 일 | 월 | 화 | 수 | 목 | 금 | 토 |
|---|---|---|---|---|---|---|
| 1 | 2 | 3 | 4 | 5 | 6 | 7 |
| 8 | 9 | 10 | 11 | 12 | 13 | 14 |
| 15 | 16 | 17 | 18 | 19 | 20 | 21 |
| 22 | 23 | 24 | 25 | 26 | 27 | 28 |
Tags
- 2022년 6월 일상
- 막내의막무가내 코볼 COBOL
- 막내의막무가내 알고리즘
- 부스트코스
- 막내의막무가내 rxjava
- Fragment
- 막내의막무가내 코틀린
- 프래그먼트
- flutter network call
- 막내의막무가내 코틀린 안드로이드
- 막내의막무가내 안드로이드 코틀린
- 막내의 막무가내
- 주엽역 생활맥주
- 막내의막무가내 안드로이드
- 막내의막무가내 목표 및 회고
- 안드로이드 Sunflower 스터디
- 막내의막무가내 프로그래밍
- 막내의막무가내 일상
- 막내의막무가내
- 막내의막무가내 플러터
- 막무가내
- 안드로이드 sunflower
- 막내의막무가내 플러터 flutter
- 안드로이드
- 막내의 막무가내 알고리즘
- 막내의막무가내 안드로이드 에러 해결
- 막내의막무가내 회고 및 목표
- 프로그래머스 알고리즘
- 막내의막무가내 SQL
- 부스트코스에이스
Archives
- Today
- Total
막내의 막무가내 프로그래밍 & 일상
[안드로이드] 코틀린 Retrofit2 OkHttP interceptor 헤더 사용법 본문
728x90
[2021-06-05 업데이트]

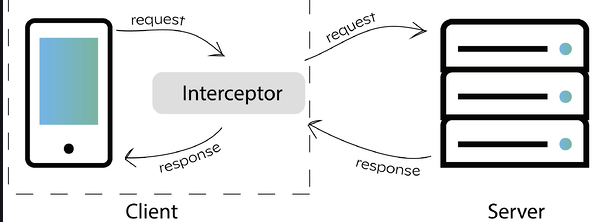
안드로이드(클라이언트)와 서버 간에 Retrofit2를 사용하여 통신을 하는데
안드로이드 클라이언트단 쪽에서 인터셉터를 추가로 사용하면 안드로이드에서 서버에게 데이터 전송 및 수신받을때 인터셉터 말 그대로 중간에 매개체가 되어 어떠한 처리를 해줄 수 있다.
그 중 헤더에 값을 담아주는 역할이 있다.
이를 활용하여 쿠키/세션을 유지하는 방법이 있는데 이는 밑 박상권 개발자님의 블로그를 참고하면 된다.
[안드로이드/Android]Retrofit에서 Interceptor를 이용해 쿠키/세션 유지하는 방법
Retrofit은 우리가 해주어야할 귀찮은 네트워크 통신 작업을 대신해주는 정말 유용한 라이브러리입니다. [안드로이드]유용한 라이브러리 - Retrofit(REST API 통신) REST API통신을 할때 정말 유용하고 편
gun0912.tistory.com
안드로이드 코틀린에서 레트로핏에 인터셉터의 다양한 기능 중 헤더만 덧붙이는 코드입니다.
package com.mtjin.androidarchitecturestudy.api

import okhttp3.Interceptor
import okhttp3.OkHttpClient
import okhttp3.Response
import retrofit2.Retrofit
import retrofit2.converter.gson.GsonConverterFactory
import java.io.IOException

object ApiClient {
    private const val BASE_URL = "https://openapi.naver.com/"
    fun getApiClient(): Retrofit {
        return Retrofit.Builder()
            .baseUrl(BASE_URL)
            .client(provideOkHttpClient(AppInterceptor()))
            .addConverterFactory(GsonConverterFactory.create())
            .build()
    }

    private fun provideOkHttpClient(
        interceptor: AppInterceptor
    ): OkHttpClient = OkHttpClient.Builder()
        .run {
            addInterceptor(interceptor)
            build()
        }

    class AppInterceptor : Interceptor {
        @Throws(IOException::class)
        override fun intercept(chain: Interceptor.Chain)
                : Response = with(chain) {
            val newRequest = request().newBuilder()
                .addHeader("X-Naver-Client-Id", "33chRuAiqlSn5hn8tIme")
                .addHeader("X-Naver-Client-Secret", "fyfwt9PCUN")
                .build()

            proceed(newRequest)
        }
    }
}
추후 애플리케이션 단 말고 네트워크 로깅도 사용하게 되면 추가할 예정입니다.
[추가 완료]
로깅과 헤더를 두개 추가한 예제입니다.
interface MainApiInterface {

    @GET("datas/compare/region")
    fun requestCompareRegion(): Single<EnvRes>

    @GET("datas/compare/same-region")
    fun requestCompareSameRegion(
        @Query("usage") usage: Int = 80000
    ): Single<EnvRes>

    @GET("datas/compare/industry-all")
    fun requestCompareIndustryAllEnv(): Single<EnvRes>

    @GET("datas/compare/industry-sameall")
    fun requestCompareIndustrySameAll(@Query("usage") usage: Int): Single<EnvRes>

    @GET("datas/detail/industry-energy")
    fun requestDetailIndustryEnergy(
        @Query("gas") gas: Int,
        @Query("other") other: Int,
        @Query("oil") oil: Int,
        @Query("coal") coal: Int,
        @Query("thermal") thermal: Int,
        @Query("electric") electric: Int
    ): Single<IndustryEnergyRes>

    companion object {
        private const val BASE_URL =
            "http://ff4839aab5bb.ngrok.io"

        fun create(): MainApiInterface {
            val logger = HttpLoggingInterceptor().apply {
                level =
                    HttpLoggingInterceptor.Level.BASIC
            }
            val interceptor = Interceptor { chain ->
                with(chain) {
                    val newRequest = request().newBuilder()
                        .addHeader("Authorization", "Token " + UserInfo.headerKey)
                        .build()
                    proceed(newRequest)
                }
            }
            Log.d("AAAAA", "Token " + UserInfo.headerKey)
            val client = OkHttpClient.Builder()
                .addInterceptor(logger)
                .addInterceptor(interceptor)
                .build()

            return Retrofit.Builder()
                .baseUrl(BASE_URL)
                .client(client)
                .addCallAdapterFactory(RxJava2CallAdapterFactory.create())
                .addConverterFactory(GsonConverterFactory.create())
                .build()
                .create(MainApiInterface::class.java)
        }
    }
}
728x90
'안드로이드 > 코틀린 & 아키텍처 & Recent' 카테고리의 다른 글
| [안드로이드] Android room persistent: AppDatabase_Impl does not exist (Room Database 관련 에러처리) (0) | 2020.03.09 |
|---|---|
| [안드로이드] 코틀린 lateinit var 초기화 되었는지 확인하는 방법 (2) | 2020.03.08 |
| [안드로이드] 코틀린 리사이클러뷰 예제 (0) | 2020.03.07 |
| [안드로이드] Kotlin Architecture Components (안드로이드 코틀린 아키텍처 구성요소) (1) | 2020.02.22 |
| [안드로이드] Kotlin - Databinding, LiveData, viewModel (0) | 2020.02.16 |
Comments


