
| 일 | 월 | 화 | 수 | 목 | 금 | 토 |
|---|---|---|---|---|---|---|
| 1 | ||||||
| 2 | 3 | 4 | 5 | 6 | 7 | 8 |
| 9 | 10 | 11 | 12 | 13 | 14 | 15 |
| 16 | 17 | 18 | 19 | 20 | 21 | 22 |
| 23 | 24 | 25 | 26 | 27 | 28 | 29 |
| 30 |
- 막내의막무가내 일상
- 막내의막무가내 목표 및 회고
- 막내의막무가내 안드로이드 코틀린
- Fragment
- 막내의막무가내 플러터 flutter
- 부스트코스
- 안드로이드 sunflower
- 막내의막무가내 회고 및 목표
- 막내의막무가내 rxjava
- 막내의막무가내 알고리즘
- 주엽역 생활맥주
- 안드로이드 Sunflower 스터디
- flutter network call
- 막내의막무가내 코볼 COBOL
- 부스트코스에이스
- 막내의 막무가내 알고리즘
- 막내의막무가내 프로그래밍
- 막내의막무가내 안드로이드 에러 해결
- 막내의막무가내 SQL
- 프래그먼트
- 프로그래머스 알고리즘
- 안드로이드
- 2022년 6월 일상
- 막무가내
- 막내의 막무가내
- 막내의막무가내 코틀린
- 막내의막무가내 안드로이드
- 막내의막무가내 코틀린 안드로이드
- 막내의막무가내
- 막내의막무가내 플러터
- Today
- Total
막내의 막무가내 프로그래밍 & 일상
[안드로이드] 구글맵(GoogleMapAPI) 예제 (주석참고) 본문
이번에는 간단한 구글맵 사용법에 대해 포스팅해볼려고합니다.
설명은 주석으로 자세하게 달아놨으니 복사붙여넣기해서 보시면 보기 좋을 것 같습니다.
//참고 :https://mailmail.tistory.com/17
[안드로이드 구글 맵 - 1] Google Maps API Key 발급받기.
안녕하세요. PEACE-입니다. 안드로이드 스터디 [열네 번째] 글입니다. 오늘은 안드로이드 어플리케이션에 구글 맵을 사용하기 위한 사전 작업으로 Google API Key를 받급 받는 방법에 대해서 포스팅하겠습니다. 이..
mailmail.tistory.com
시작하기에 앞서 제가 참고한 사이트이며 구글API키를 발급받는 방법도 자세히 써져있습니다. 구글맵을 사용하려면 구글맵 API 키를 받아야합니다.
키를 받았으면 이제 다음과 같은 순서대로 진행하면 됩니다.
dependencies {
    implementation fileTree(dir: 'libs', include: ['*.jar'])
    implementation 'com.android.support:appcompat-v7:26.0.0'
    implementation 'com.android.support.constraint:constraint-layout:1.1.3'
    testImplementation 'junit:junit:4.12'
    androidTestImplementation 'com.android.support.test:runner:1.0.2'
    androidTestImplementation 'com.android.support.test.espresso:espresso-core:3.0.2'

    implementation 'com.google.android.gms:play-services-maps:10.2.0'
}
1. 먼저 시작하기에 앞서 위와 같이 구글맵관련 라이브러리를 추가해줍니다. (build.gradle)
<?xml version="1.0" encoding="utf-8"?>
<manifest xmlns:android="http://schemas.android.com/apk/res/android"
    package="com.example.mygooglemap">

    <application
        android:allowBackup="true"
        android:icon="@mipmap/ic_launcher"
        android:label="@string/app_name"
        android:roundIcon="@mipmap/ic_launcher_round"
        android:supportsRtl="true"
        android:theme="@style/AppTheme">

        <meta-data
            android:name="com.google.android.geo.API_KEY"
            android:value="여러분들이 발급받은 키"/>
        <activity android:name=".MainActivity">
            <intent-filter>
                <action android:name="android.intent.action.MAIN" />

                <category android:name="android.intent.category.LAUNCHER" />
            </intent-filter>
        </activity>
    </application>

</manifest>
2. 매니페스트에 위와같은 <meta-data>를 추가하고 value에 자신이 발급받은 구글맵 API 키를 넣어주면 됩니다.
<?xml version="1.0" encoding="utf-8"?>
<android.support.constraint.ConstraintLayout xmlns:android="http://schemas.android.com/apk/res/android"
    xmlns:app="http://schemas.android.com/apk/res-auto"
    xmlns:tools="http://schemas.android.com/tools"
    android:layout_width="match_parent"
    android:layout_height="match_parent"
    tools:context=".MainActivity">

    <TextView
        android:layout_width="wrap_content"
        android:layout_height="wrap_content"
        android:textSize="25dp"
        android:text="THIS IS GOOGLE MAP"
        android:padding="10dp"
        app:layout_constraintLeft_toLeftOf="parent"
        app:layout_constraintRight_toRightOf="parent"
        android:id="@+id/textView"
        app:layout_constraintTop_toTopOf="parent"/>

    <fragment
        android:layout_width="0dp"
        android:layout_height="wrap_content"
        android:name="com.google.android.gms.maps.SupportMapFragment"
        android:id="@+id/map"
        app:layout_constraintLeft_toLeftOf="parent"
        app:layout_constraintRight_toRightOf="parent"
        app:layout_constraintTop_toBottomOf="@+id/textView"
        />

</android.support.constraint.ConstraintLayout>
3. 메인액티비티 xml 코드 및 레이아웃입니다.
package com.example.mygooglemap;

import android.support.v4.app.FragmentActivity;
import android.support.v7.app.AppCompatActivity;
import android.os.Bundle;
import android.widget.Toast;

import com.google.android.gms.maps.CameraUpdateFactory;
import com.google.android.gms.maps.GoogleMap;
import com.google.android.gms.maps.OnMapReadyCallback;
import com.google.android.gms.maps.SupportMapFragment;
import com.google.android.gms.maps.model.BitmapDescriptorFactory;
import com.google.android.gms.maps.model.LatLng;
import com.google.android.gms.maps.model.Marker;
import com.google.android.gms.maps.model.MarkerOptions;
//참고 : https://mailmail.tistory.com/17
public class MainActivity extends FragmentActivity implements OnMapReadyCallback {

    //구글맵참조변수
    GoogleMap mMap;

    @Override
    protected void onCreate(Bundle savedInstanceState) {
        super.onCreate(savedInstanceState);
        setContentView(R.layout.activity_main);

        // SupportMapFragment을 통해 레이아웃에 만든 fragment의 ID를 참조하고 구글맵을 호출한다.
        SupportMapFragment mapFragment = (SupportMapFragment) getSupportFragmentManager().findFragmentById(R.id.map);
        mapFragment.getMapAsync(this); //getMapAsync must be called on the main thread.
    }

    @Override //구글맵을 띄울준비가 됬으면 자동호출된다.
    public void onMapReady(GoogleMap googleMap) {
        mMap = googleMap;
        //지도타입 - 일반
        mMap.setMapType(GoogleMap.MAP_TYPE_NORMAL);
        oneMarker();
       // manyMarker();
    }

    //마커하나찍는 기본 예제
    public void oneMarker() {
        // 서울 여의도에 대한 위치 설정
        LatLng seoul = new LatLng(37.52487, 126.92723);

        // 구글 맵에 표시할 마커에 대한 옵션 설정  (알파는 좌표의 투명도이다.)
        MarkerOptions makerOptions = new MarkerOptions();
        makerOptions
                .position(seoul)
                .title("원하는 위치(위도, 경도)에 마커를 표시했습니다.")
                .snippet("여기는 여의도인거같네여!!")
                .icon(BitmapDescriptorFactory.defaultMarker(BitmapDescriptorFactory.HUE_BLUE))
                .alpha(0.5f);

        // 마커를 생성한다. showInfoWindow를 쓰면 처음부터 마커에 상세정보가 뜨게한다. (안쓰면 마커눌러야뜸)
        mMap.addMarker(makerOptions); //.showInfoWindow();

        //정보창 클릭 리스너
        mMap.setOnInfoWindowClickListener(infoWindowClickListener);

        //마커 클릭 리스너
        mMap.setOnMarkerClickListener(markerClickListener);

        //카메라를 여의도 위치로 옮긴다.
        // mMap.moveCamera(CameraUpdateFactory.newLatLng(seoul));
        //처음 줌 레벨 설정 (해당좌표=>서울, 줌레벨(16)을 매개변수로 넣으면 된다.) (위에 코드대신 사용가능)(중첩되면 이걸 우선시하는듯)
        mMap.moveCamera(CameraUpdateFactory.newLatLngZoom(seoul, 16));

        mMap.setOnMarkerClickListener(new GoogleMap.OnMarkerClickListener() {
            @Override
            public boolean onMarkerClick(Marker marker) {
                Toast.makeText(MainActivity.this, "눌렀습니다!!", Toast.LENGTH_LONG);
                return false;
            }
        });


    }

    ////////////////////////  구글맵 마커 여러개생성 및 띄우기 //////////////////////////
    public void manyMarker() {
        // for loop를 통한 n개의 마커 생성
        for (int idx = 0; idx < 10; idx++) {
            // 1. 마커 옵션 설정 (만드는 과정)
            MarkerOptions makerOptions = new MarkerOptions();
            makerOptions // LatLng에 대한 어레이를 만들어서 이용할 수도 있다.
                    .position(new LatLng(37.52487 + idx, 126.92723))
                    .title("마커" + idx); // 타이틀.

            // 2. 마커 생성 (마커를 나타냄)
            mMap.addMarker(makerOptions);
        }
        //정보창 클릭 리스너
        mMap.setOnInfoWindowClickListener(infoWindowClickListener);

        //마커 클릭 리스너
        mMap.setOnMarkerClickListener(markerClickListener);

        // 카메라를 위치로 옮긴다.
        mMap.moveCamera(CameraUpdateFactory.newLatLng(new LatLng(37.52487, 126.92723)));
    }

    //마커정보창 클릭리스너는 다작동하나, 마커클릭리스너는 snippet정보가 있으면 중복되어 이벤트처리가 안되는거같다.
    // oneMarker(); 는 동작하지않으나 manyMarker(); 는 snippet정보가 없어 동작이가능하다.

    //정보창 클릭 리스너
    GoogleMap.OnInfoWindowClickListener infoWindowClickListener = new GoogleMap.OnInfoWindowClickListener() {
        @Override
        public void onInfoWindowClick(Marker marker) {
                String markerId = marker.getId();
            Toast.makeText(MainActivity.this, "정보창 클릭 Marker ID : "+markerId, Toast.LENGTH_SHORT).show();
        }
    };

    //마커 클릭 리스너
    GoogleMap.OnMarkerClickListener markerClickListener = new GoogleMap.OnMarkerClickListener() {
        @Override
        public boolean onMarkerClick(Marker marker) {
            String markerId = marker.getId();
            //선택한 타겟위치
            LatLng location = marker.getPosition();
           Toast.makeText(MainActivity.this, "마커 클릭 Marker ID : "+markerId+"("+location.latitude+" "+location.longitude+")", Toast.LENGTH_SHORT).show();
            return false;
        }
    };

}
4. 메인액티비티 자바 소스크도입니다. 직접 붙여넣기하여 주석을 보면 이해하실 수 있으실겁니다. 제가 사용한거 외에도 마커에대한 여러 옵션들이 더 있는데 구글링 하시면 찾으실 수 있습니다.
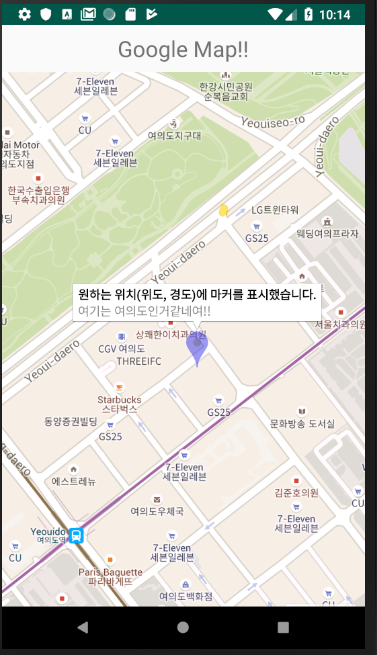
5. 마지막으로 결과화면입니다. 한가지 이상한점은 snippet 마커옵션을 사용하면 마커클릭이벤트가 동작이 안한다는거였습니다. (간단한 토스트메세지 띄우기 실험해봤는데)
이상 구글맵 간단 사용 예제 포스팅이였습니다.
댓글과 공감은 큰 힘이 됩니다. !
'안드로이드 > 자바 & Previous' 카테고리의 다른 글
| [안드로이드] 갤러리 사진 불러오는 방법(다중선택 포함) + Crop 기능 (6) | 2019.04.26 |
|---|---|
| [안드로이드] 내가 올렸던 질문 답변 - 파이어베이스 데이터베이스 관련 (0) | 2019.04.24 |
| [안드로이드] intent.putExtra("data", data) vs intent.putExtras(bundle); (0) | 2019.04.20 |
| [안드로이드] 기억노트 - 쉐이프 드로어블 (shape drawable) + <layer-list> 기록 (0) | 2019.04.05 |
| [안드로이드] 유튜브 썸네일 이미지 가져오는 방법 (3) | 2019.04.03 |

