| 일 | 월 | 화 | 수 | 목 | 금 | 토 |
|---|---|---|---|---|---|---|
| 1 | ||||||
| 2 | 3 | 4 | 5 | 6 | 7 | 8 |
| 9 | 10 | 11 | 12 | 13 | 14 | 15 |
| 16 | 17 | 18 | 19 | 20 | 21 | 22 |
| 23 | 24 | 25 | 26 | 27 | 28 | 29 |
| 30 |
- 막내의 막무가내 알고리즘
- 안드로이드 sunflower
- 막무가내
- 막내의막무가내 프로그래밍
- Fragment
- 막내의막무가내 SQL
- 막내의막무가내 코볼 COBOL
- 부스트코스에이스
- 막내의막무가내 안드로이드 에러 해결
- 막내의막무가내 플러터
- 프래그먼트
- 안드로이드
- 막내의막무가내 알고리즘
- 막내의막무가내 안드로이드
- 2022년 6월 일상
- 프로그래머스 알고리즘
- 막내의막무가내 rxjava
- 막내의막무가내 코틀린
- 주엽역 생활맥주
- 안드로이드 Sunflower 스터디
- 부스트코스
- 막내의막무가내
- 막내의막무가내 안드로이드 코틀린
- flutter network call
- 막내의막무가내 일상
- 막내의 막무가내
- 막내의막무가내 회고 및 목표
- 막내의막무가내 플러터 flutter
- 막내의막무가내 목표 및 회고
- 막내의막무가내 코틀린 안드로이드
- Today
- Total
막내의 막무가내 프로그래밍 & 일상
[안드로이드] 네이버맵 코드 정리 (마커, 현재위치표시, 카메라이동 및 감지, Geocoder 좌표 주소 변환 등) 본문
[안드로이드] 네이버맵 코드 정리 (마커, 현재위치표시, 카메라이동 및 감지, Geocoder 좌표 주소 변환 등)
막무가내막내 2022. 1. 9. 22:14
지금까지 안드로이드 개발을 하며 구글맵, 티맵, 카카오맵을 사용해봤는데 네이버맵은 처음 사용해봤습니다.
사용한 코드를 메모하는 포스팅입니다 :)
https://navermaps.github.io/android-map-sdk/guide-ko/1.html
시작하기 · 네이버 지도 안드로이드 SDK
No results matching ""
navermaps.github.io
먼저 네이버맵 관련 세팅과 사용법은 위 공식문서를 참고하면 됩니다.
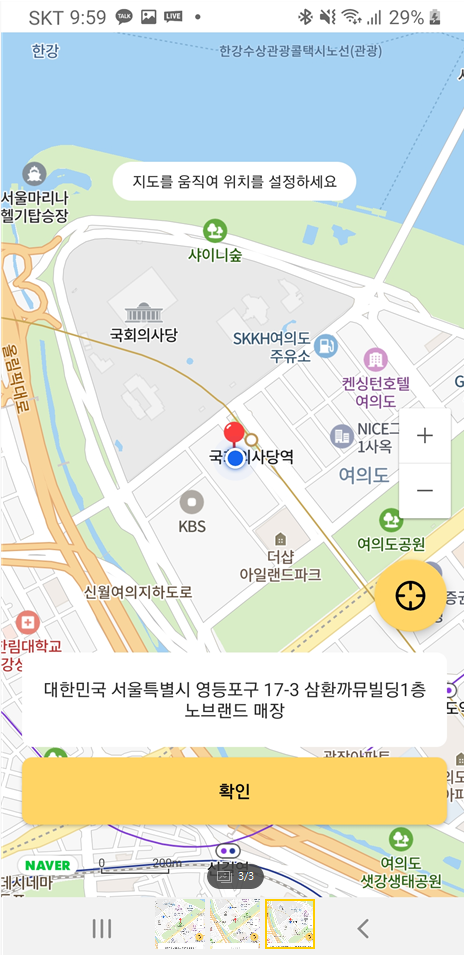
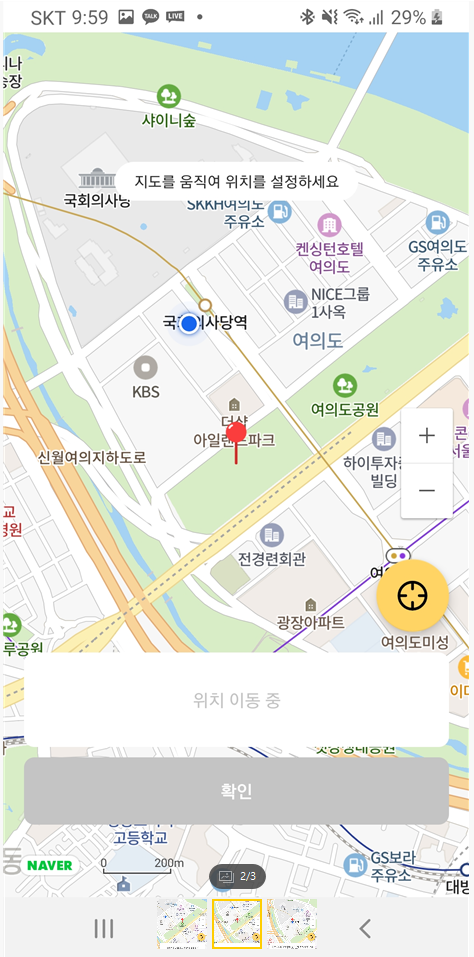
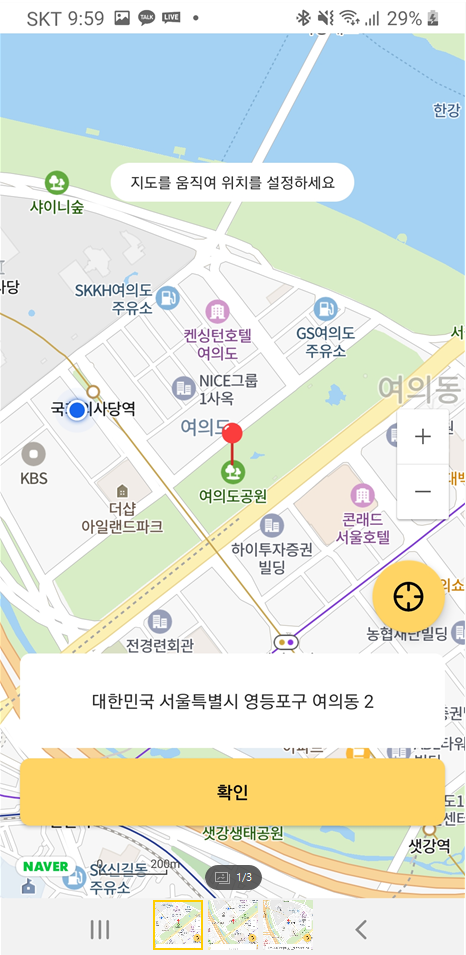
구현해야하는 화면과 로직은 다음과 같았습니다.
1. 사용자 현재 위치 표시 (파랑 아이콘)
2. 상점을 등록할 마커 (빨간색 아이콘) - 항상 가운데에 고정되어야함
3. 처음 현재위치로 카메라와 아이콘들이 세팅되어있어야함
4. 움직일때는 이동중 텍스트와 함께 확인 버튼 비활성화
5. 카메라 이동이 멈추면 빨간색 마커 좌표를 주소로 변환하여 텍스트에 세팅하고 확인 버튼 활성화
[Manifest]
먼저 현재 위치를 받아오기 위해서는 manifest에 위치 권한을 등록해주어야 합니다.
<manifest xmlns:android="http://schemas.android.com/apk/res/android"
    package="com.mtjin.bungsegwon">

    <uses-permission android:name="android.permission.INTERNET" />
    <uses-permission android:name="android.permission.ACCESS_COARSE_LOCATION" />
    <uses-permission android:name="android.permission.ACCESS_FINE_LOCATION" />
[build.gradle]
https://github.com/ParkSangGwon/TedPermission
GitHub - ParkSangGwon/TedPermission: Easy check permission library for Android Marshmallow
Easy check permission library for Android Marshmallow - GitHub - ParkSangGwon/TedPermission: Easy check permission library for Android Marshmallow
github.com
코드에서 위치권한 요청을 위해 저는 TedPermission 라이브러리를 사용했습니다.
평소에도 자주 사용하는데 정말 편합니다. ㅎㅎ 감사합니다 :)
// Ted Permission - RxJava3
implementation 'io.github.ParkSangGwon:tedpermission-rx3:3.3.0'
[Layout XML]
레이아웃은 크게 볼건 없을것 같고 네이버맵을 FrameLayout에 프래그먼트 코드에서 동적으로 넣어주는식으로 구현했습니다.
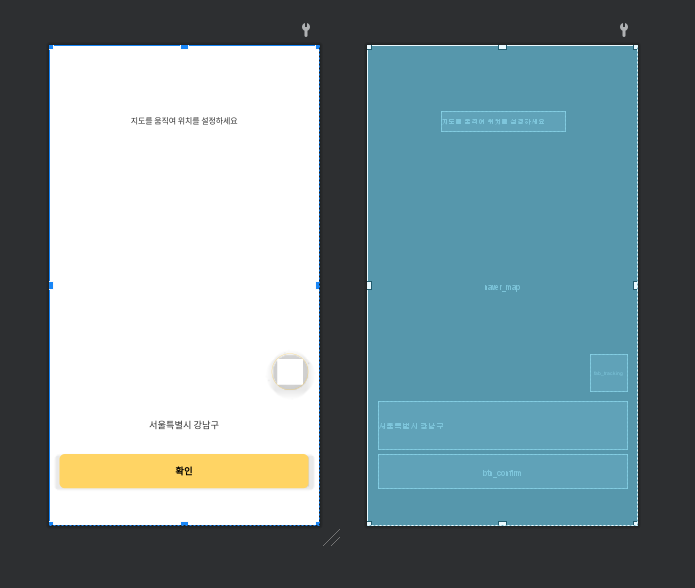
<?xml version="1.0" encoding="utf-8"?>
<layout xmlns:android="http://schemas.android.com/apk/res/android"
    xmlns:app="http://schemas.android.com/apk/res-auto"
    xmlns:tools="http://schemas.android.com/tools">

    <data>

    </data>

    <androidx.constraintlayout.widget.ConstraintLayout
        android:layout_width="match_parent"
        android:layout_height="match_parent"
        tools:context=".views.location_enroll.LocationEnrollFragment">

        <FrameLayout
            android:id="@+id/naver_map"
            android:layout_width="match_parent"
            android:layout_height="match_parent" />

        <TextView
            android:layout_width="188dp"
            android:layout_height="30dp"
            android:layout_marginTop="100dp"
            android:background="@drawable/rect_round_white_radius_30"
            android:gravity="center"
            android:text="@string/text_move_map_set_location"
            android:textColor="@color/black_2d2d2d"
            android:textSize="12dp"
            app:layout_constraintEnd_toEndOf="parent"
            app:layout_constraintStart_toStartOf="parent"
            app:layout_constraintTop_toTopOf="parent" />

        <TextView
            android:id="@+id/tv_location"
            android:layout_width="0dp"
            android:layout_height="73dp"
            android:layout_marginHorizontal="16dp"
            android:layout_marginBottom="8dp"
            android:background="@drawable/rect_round_white_radius_8"
            android:gravity="center"
            android:paddingHorizontal="12dp"
            android:textColor="@color/black_2d2d2d"
            app:layout_constraintBottom_toTopOf="@id/btn_confirm"
            app:layout_constraintEnd_toEndOf="parent"
            app:layout_constraintStart_toStartOf="parent"
            tools:text="서울특별시 강남구" />

        <androidx.appcompat.widget.AppCompatButton
            android:id="@+id/btn_confirm"
            android:layout_width="0dp"
            android:layout_height="52dp"
            android:layout_marginStart="16dp"
            android:layout_marginTop="23.74dp"
            android:layout_marginEnd="16dp"
            android:layout_marginBottom="56dp"
            android:background="@drawable/rect_round_ffd464_radius_8"
            android:text="@string/confirm_text"
            android:textColor="@color/black"
            android:textSize="14dp"
            android:textStyle="bold"
            app:layout_constraintBottom_toBottomOf="parent"
            app:layout_constraintEnd_toEndOf="parent"
            app:layout_constraintStart_toStartOf="parent" />

        <com.google.android.material.floatingactionbutton.FloatingActionButton
            android:id="@+id/fab_tracking"
            android:layout_width="wrap_content"
            android:layout_height="wrap_content"
            android:layout_marginEnd="16dp"
            android:layout_marginBottom="16dp"
            android:backgroundTint="@color/yellow_ffd464"
            android:contentDescription="추적"
            android:src="@drawable/ic_tracking"
            app:backgroundTint="@color/yellow_ffd464"
            app:layout_constraintBottom_toTopOf="@id/tv_location"
            app:layout_constraintEnd_toEndOf="parent" />


    </androidx.constraintlayout.widget.ConstraintLayout>
</layout>
[Fragment]
프래그먼트에 로직들을 구현했습니다.
하나하나 다 설명하긴 힘들고 메모용이라 주석을 참고하시면 될 것 같습니다. ㅎㅎ
package com.mtjin.bungsegwon.views.location_enroll

import android.Manifest
import android.content.pm.PackageManager
import android.graphics.Color
import android.location.Address
import android.location.Geocoder
import android.location.Location
import android.util.Log
import androidx.annotation.UiThread
import androidx.core.app.ActivityCompat
import com.google.android.gms.location.FusedLocationProviderClient
import com.google.android.gms.location.LocationServices
import com.gun0912.tedpermission.rx3.TedPermission
import com.mtjin.bungsegwon.R
import com.mtjin.bungsegwon.base.BaseFragment
import com.mtjin.bungsegwon.databinding.FragmentLocationEnrollBinding
import com.naver.maps.geometry.LatLng
import com.naver.maps.map.CameraUpdate
import com.naver.maps.map.MapFragment
import com.naver.maps.map.NaverMap
import com.naver.maps.map.OnMapReadyCallback
import com.naver.maps.map.overlay.Marker
import com.naver.maps.map.overlay.OverlayImage
import com.naver.maps.map.util.FusedLocationSource
import java.io.IOException
import java.util.*


class LocationEnrollFragment :
    BaseFragment<FragmentLocationEnrollBinding>(R.layout.fragment_location_enroll),
    OnMapReadyCallback {
    private lateinit var fusedLocationClient: FusedLocationProviderClient
    private lateinit var locationSource: FusedLocationSource
    private lateinit var naverMap: NaverMap

    override fun init() {
        fusedLocationClient = LocationServices.getFusedLocationProviderClient(requireContext())
        requestPermissions()
        initView()
    }

    private fun initView() {
        // 네이버맵 동적으로 불러오기
        val fm = childFragmentManager
        val mapFragment = fm.findFragmentById(R.id.naver_map) as MapFragment?
            ?: MapFragment.newInstance().also {
                fm.beginTransaction().add(R.id.naver_map, it).commit()
            }
        mapFragment.getMapAsync(this)
    }

    // 위치권한 관련 요청
    private fun requestPermissions() {
        // 내장 위치 추적 기능 사용
        locationSource =
            FusedLocationSource(this, LOCATION_PERMISSION_REQUEST_CODE)
        TedPermission.create()
            .setRationaleTitle("위치권한 요청")
            .setRationaleMessage("현재 위치로 이동하기 위해 위치권한이 필요합니다.") // "we need permission for read contact and find your location"
            .setPermissions(
                Manifest.permission.ACCESS_COARSE_LOCATION,
                Manifest.permission.ACCESS_FINE_LOCATION
            )
            .request()
            .subscribe({ tedPermissionResult ->
                if (!tedPermissionResult.isGranted) {
                    showToast(getString(R.string.location_permission_denied_msg))
                }
            }) { throwable -> Log.e("AAAAAA", throwable.message.toString()) }


    }

    // 네이버맵 불러오기가 완료되면 콜백
    @UiThread
    override fun onMapReady(naverMap: NaverMap) {
        this.naverMap = naverMap
        // 내장 위치 추적 기능 사용
        naverMap.locationSource = locationSource

        // 빨간색 표시 마커 (네이버맵 현재 가운데에 항상 위치)
        val marker = Marker()
        marker.position = LatLng(
            naverMap.cameraPosition.target.latitude,
            naverMap.cameraPosition.target.longitude
        )
        marker.icon = OverlayImage.fromResource(R.drawable.ic_location_enroll)
        marker.map = naverMap

        // 카메라의 움직임에 대한 이벤트 리스너 인터페이스.
        // 참고 : https://navermaps.github.io/android-map-sdk/reference/com/naver/maps/map/package-summary.html
        naverMap.addOnCameraChangeListener { reason, animated ->
            Log.i("NaverMap", "카메라 변경 - reson: $reason, animated: $animated")
            marker.position = LatLng(
                // 현재 보이는 네이버맵의 정중앙 가운데로 마커 이동
                naverMap.cameraPosition.target.latitude,
                naverMap.cameraPosition.target.longitude
            )
            // 주소 텍스트 세팅 및 확인 버튼 비활성화
            binding.tvLocation.run {
                text = "위치 이동 중"
                setTextColor(Color.parseColor("#c4c4c4"))
            }
            binding.btnConfirm.run {
                setBackgroundResource(R.drawable.rect_round_c4c4c4_radius_8)
                setTextColor(Color.parseColor("#ffffff"))
                isEnabled = false
            }
        }

        // 카메라의 움직임 종료에 대한 이벤트 리스너 인터페이스.
        naverMap.addOnCameraIdleListener {
            marker.position = LatLng(
                naverMap.cameraPosition.target.latitude,
                naverMap.cameraPosition.target.longitude
            )
            // 좌표 -> 주소 변환 텍스트 세팅, 버튼 활성화
            binding.tvLocation.run {
                text = getAddress(
                    naverMap.cameraPosition.target.latitude,
                    naverMap.cameraPosition.target.longitude
                )
                setTextColor(Color.parseColor("#2d2d2d"))
            }
            binding.btnConfirm.run {
                setBackgroundResource(R.drawable.rect_round_ffd464_radius_8)
                setTextColor(Color.parseColor("#FF000000"))
                isEnabled = true
            }
        }

        if (ActivityCompat.checkSelfPermission(
                requireContext(),
                Manifest.permission.ACCESS_FINE_LOCATION
            ) != PackageManager.PERMISSION_GRANTED && ActivityCompat.checkSelfPermission(
                requireContext(),
                Manifest.permission.ACCESS_COARSE_LOCATION
            ) != PackageManager.PERMISSION_GRANTED
        ) {
            return
        }
        // 사용자 현재 위치 받아오기
        var currentLocation: Location?
        fusedLocationClient.lastLocation
            .addOnSuccessListener { location: Location? ->
                currentLocation = location
                // 위치 오버레이의 가시성은 기본적으로 false로 지정되어 있습니다. 가시성을 true로 변경하면 지도에 위치 오버레이가 나타납니다.
                // 파랑색 점, 현재 위치 표시
                naverMap.locationOverlay.run {
                    isVisible = true
                    position = LatLng(currentLocation!!.latitude, currentLocation!!.longitude)
                }

                // 카메라 현재위치로 이동
                val cameraUpdate = CameraUpdate.scrollTo(
                    LatLng(
                        currentLocation!!.latitude,
                        currentLocation!!.longitude
                    )
                )
                naverMap.moveCamera(cameraUpdate)

                // 빨간색 마커 현재위치로 변경
                marker.position = LatLng(
                    naverMap.cameraPosition.target.latitude,
                    naverMap.cameraPosition.target.longitude
                )
            }
    }

    // 좌표 -> 주소 변환
    private fun getAddress(lat: Double, lng: Double): String {
        val geoCoder = Geocoder(requireContext(), Locale.KOREA)
        val address: ArrayList<Address>
        var addressResult = "주소를 가져 올 수 없습니다."
        try {
            //세번째 파라미터는 좌표에 대해 주소를 리턴 받는 갯수로
            //한좌표에 대해 두개이상의 이름이 존재할수있기에 주소배열을 리턴받기 위해 최대갯수 설정
            address = geoCoder.getFromLocation(lat, lng, 1) as ArrayList<Address>
            if (address.size > 0) {
                // 주소 받아오기
                val currentLocationAddress = address[0].getAddressLine(0)
                    .toString()
                addressResult = currentLocationAddress

            }

        } catch (e: IOException) {
            e.printStackTrace()
        }
        return addressResult
    }


    companion object {
        private const val LOCATION_PERMISSION_REQUEST_CODE = 1000
    }

}
처음 사용해보는 맵이라 몇가지 구현부분에서 삽질이 좀 많고 코드도 좀 더럽네요... ㅠ
보시다가 궁금하신 점이 있으면 댓글로 남겨주시면 답변해드리겠습니다. ㅎㅎ

댓글과 공감은 큰 힘이 됩니다. 감사합니다. !!!
