| 일 | 월 | 화 | 수 | 목 | 금 | 토 |
|---|---|---|---|---|---|---|
| 1 | 2 | 3 | 4 | 5 | 6 | 7 |
| 8 | 9 | 10 | 11 | 12 | 13 | 14 |
| 15 | 16 | 17 | 18 | 19 | 20 | 21 |
| 22 | 23 | 24 | 25 | 26 | 27 | 28 |
- 막내의막무가내 회고 및 목표
- 막내의막무가내 일상
- 막내의막무가내 코틀린
- 안드로이드 sunflower
- 막내의막무가내 코틀린 안드로이드
- 막내의막무가내
- 안드로이드
- 막내의막무가내 rxjava
- 막내의막무가내 플러터
- 부스트코스
- 막내의 막무가내 알고리즘
- 막내의막무가내 SQL
- 프로그래머스 알고리즘
- 막무가내
- 부스트코스에이스
- 막내의막무가내 안드로이드 코틀린
- 2022년 6월 일상
- 프래그먼트
- 막내의막무가내 코볼 COBOL
- 막내의막무가내 안드로이드
- 막내의막무가내 플러터 flutter
- 안드로이드 Sunflower 스터디
- 막내의막무가내 알고리즘
- 막내의막무가내 목표 및 회고
- Fragment
- 막내의막무가내 프로그래밍
- 막내의막무가내 안드로이드 에러 해결
- flutter network call
- 막내의 막무가내
- 주엽역 생활맥주
- Today
- Total
막내의 막무가내 프로그래밍 & 일상
[안드로이드] 데이터바인딩 간단하게 적용해보는 공부 본문
데이터바인딩 많이 들어봤지만 실제 프로젝트에 써본적은 없었습니다.
이번기회에 한번 써보고 싶어서 간단하게 findViewById를 생략해주고 onClick리스너 관련 데이터바인딩만 사용해봤습니다.
프래그먼트와 액티비티에서 사용해봤습니다.
android {
...

dataBinding {
enabled = true
}
}
이것을 앱수준 build.gradle에 추가해준다.

프래그먼트에 적용한 거부터 살펴보겠습니다.
먼저 xml입니다. layout태그를 밖에 감싸줍니다. 저같은 경우 layout에 있는 tools:context나 context를 그 바로 하단의 CoordinatorLayout에 넣어놨었더니(데이터바인딩을 나중에 넣은거여서 CoordinatorLayout가 최상다 레이아웃이여서 갖고 있었다.) 계속 에러가나서 layout으로 옮겼더니 해결되었습니다.
이렇게 layout 태그로 감싸준 후 onClick관련 이벤트를 적용시킬려면 그 밑의 <data><vairable>태그를 추가하고 name에는 이름을 지어주고 type에는 내패키지명+프래그먼트명을 적어주면 됩니다. 이 name은 이따가 프래그먼트에서 set하는데 사용되는명이고 바로 다음에서 onClick에 정의될 이름이므로 알맞게 지어주면 좋습니다.
<layout xmlns:android="http://schemas.android.com/apk/res/android"
    xmlns:tools="http://schemas.android.com/tools"
    tools:context=".fragments.community.Tab3CommunityFragment">
    <data>
        <variable
            name="tab3CommunityFragment"
            type="com.minjin.romang.fragments.community.Tab3CommunityFragment"/>
    </data>

저는 플로팅버튼에 onClick을 달아봤습니다. 앞에는 앞서 정의한 <variable>의 name에 ::를 붙여주고 버튼의 이름을 뒤에 적어주면됩니다.
android:onClick="@{tab3CommunityFragment::onWriteButtonClick}"

이제 해당 xml의 프래그먼트 자바코드를 살펴보겠습니다.
먼저 다음과 같이 바인딩을 해주는데 42번줄에서 FragmentTab3CommunityBinding라는 이름은 xml이름에 맞춰서 지어지게 됩니다. 저 같은 경우는 fragment_tab3_community이다 보니까 뒤에 Binding이 붙으면서 FragmentTab3CommunityBinding라는 이름을 갖게되었습니다. 그리고 이거에 평소 프래그먼트 inflate해주는거에서 DataBindingUtil을 붙여서 해주면됩니다. 밑과 같이 평소 프래그먼트에서 inflate하는게 어떻게 다른지 붙여봤습니다. (서로 다른프래그먼트입니다^^)
-데이터바인딩 안한 프래그먼트
ViewGroup rootView = (ViewGroup) inflater.inflate(R.layout.fragment_tab2_evaluation, container, false);-데이터바인딩 한 프래그먼트
FragmentTab3CommunityBinding layout = DataBindingUtil.inflate(inflater, R.layout.fragment_tab3_community, container, false);
그 후 앞서 말했던 것처럼 <data><variable>에서 설정한 name을 set해줍니다. (50줄) set+앞서지어준이름 으로 할 수 있는 것을 볼 수 있습니다.
이제 마지막으로 플로팅버튼에서 onClick을 적용했던것을 정의해주면 됩니다. 이 메소드의 이름은 앞서 @{tab3CommunityFragment::onWriteButtonClick}에서의 :: 뒷부분이 메소드 이름입니다. 매개변수에 View view가 들어감을 잊으면안됩니다. 이렇게 정의하면 해당 버튼을 클릭하면 해당 클릭이벤트가 발생합니다.
이번에는 액티비티에 적용한걸 보겠습니다. 액티비티에서는 onClick을 2개 달아봤습니다.

액티비티도 프래그먼트와 마찬가지로 다음과같이 xml을 작성해주면 됩니다. 설명이 중복되는게 많으므로 생략 좀 하겠습니다.

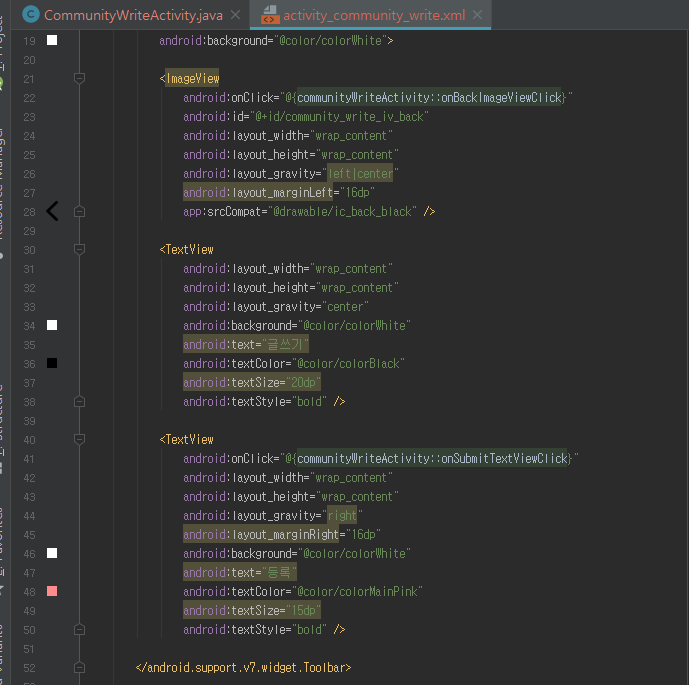
그리고 전 다음과같이 버튼 두개에 onClick을 달았습니다.

액티비티의 자바코드는 프래그먼트와는 약간 비슷하면서 조금 다릅니다. 프래그먼트와 마찬가지로 xml명과 비슷한 이름으로 ActivityCommunityWriteBinding라고 이름이 지어집니다. 그리고 기전에 setContentView를 지워주시고 21번줄과 같이 바꿔주시면 됩니다. 그 후 프래그먼트와 마찬가지로 set+ <variable>의name 으로 세팅해주면 됩니다.
마지막으로 제가 onClick에 정의해논 메소드 두개를 정의하면 해당 버튼 클릭시 이 메소드들이 동작하게됩니다.
이상 해당 코드들을 올린 후 포스팅을 마치도록 하겠습니다.
댓글과 공감은 큰 힘이 됩니다. 감사합니다.!
P.S
<variable>의 name을 보통 그냥 view 라든지 activity로 하는 경우가 많다고? 합니다. 그냥 view라고 name을 지워줘서 통일되게 xml을 복붙하고 자바코드에서는 setView라고 하는게 좋을 것 같습니다.
1.프래그먼트
//데이터바인딩 사용
public class Tab3CommunityFragment extends Fragment {

    public Tab3CommunityFragment() {
    }

    @Override
    public void onCreate(@Nullable Bundle savedInstanceState) {
        super.onCreate(savedInstanceState);

    }

    @Nullable
    @Override
    public View onCreateView(@NonNull LayoutInflater inflater, @Nullable ViewGroup container, @Nullable Bundle savedInstanceState) {
        FragmentTab3CommunityBinding layout = DataBindingUtil.inflate(inflater, R.layout.fragment_tab3_community, container, false);

        /* <data>
        <variable
            name="tab3CommunityFragment"
            type="com.minjin.romang.fragments.community.Tab3CommunityFragment"/>
            </data>
        * */
        layout.setTab3CommunityFragment(this); //위와같이 정의한것을 세팅해줌(가져와줌)
        return layout.getRoot();
    }


    //데이터바인딩 온클릭
    public void onWriteButtonClick(View view) {
        Intent profileIntent = new Intent(getActivity(), CommunityWriteActivity.class);
        startActivity(profileIntent);
    }

}
<?xml version="1.0" encoding="utf-8"?>
<layout xmlns:android="http://schemas.android.com/apk/res/android"
    xmlns:tools="http://schemas.android.com/tools"
    tools:context=".fragments.community.Tab3CommunityFragment">
    <data>
        <variable
            name="tab3CommunityFragment"
            type="com.minjin.romang.fragments.community.Tab3CommunityFragment"/>
    </data>

    <android.support.design.widget.CoordinatorLayout
        xmlns:app="http://schemas.android.com/apk/res-auto"
        android:layout_width="match_parent"
        android:layout_height="match_parent"
        android:orientation="vertical"
     >

        <LinearLayout
            android:layout_width="match_parent"
            android:layout_height="match_parent"
            android:orientation="vertical">

            <LinearLayout
                android:layout_width="match_parent"
                android:layout_height="wrap_content"
                android:gravity="center_horizontal"
                android:orientation="horizontal"
                android:weightSum="1">

                <Button
                    android:id="@+id/meeting_tab3_btn_notice"
                    android:layout_width="0dp"
                    android:layout_height="wrap_content"
                    android:layout_marginTop="12dp"
                    android:layout_marginBottom="12dp"
                    android:layout_weight="0.7"
                    android:background="@color/colorMainPink"
                    android:text="[공지] 커뮤니티 이용 안내"
                    android:textColor="@color/colorWhite" />


            </LinearLayout>

            <android.support.v7.widget.RecyclerView
                android:layout_width="match_parent"
                android:layout_height="match_parent"
                tools:listitem="@layout/item_community_board">

            </android.support.v7.widget.RecyclerView>
        </LinearLayout>

        <android.support.design.widget.FloatingActionButton
            android:id="@+id/meeting_tab3_fab_mywrite"
            android:layout_width="wrap_content"
            android:layout_height="wrap_content"
            android:layout_gravity="bottom|end"
            android:layout_marginRight="15dp"
            android:layout_marginBottom="100dp"
            android:backgroundTint="@color/colorOrange"
            app:borderWidth="0dp"
            app:fabCustomSize="@android:dimen/notification_large_icon_height"
            app:maxImageSize="@android:dimen/notification_large_icon_height"
            app:srcCompat="@drawable/ic_community_mypost" />

        <android.support.design.widget.FloatingActionButton
            android:id="@+id/meeting_tab3_fab_write"
            android:onClick="@{tab3CommunityFragment::onWriteButtonClick}"
            android:layout_width="wrap_content"
            android:layout_height="wrap_content"
            android:layout_gravity="bottom|end"
            android:layout_margin="15dp"
            android:backgroundTint="@color/colorMainPink"
            app:borderWidth="0dp"
            app:fabCustomSize="@android:dimen/notification_large_icon_height"
            app:maxImageSize="@android:dimen/notification_large_icon_height"
            app:srcCompat="@drawable/ic_writing" />

    </android.support.design.widget.CoordinatorLayout>
</layout>
2. 액티비티
//데이터바인딩 적용
public class CommunityWriteActivity extends AppCompatActivity {
     ActivityCommunityWriteBinding binding;

    @Override
    protected void onCreate(Bundle savedInstanceState) {
        super.onCreate(savedInstanceState);
        //setContentView(R.layout.activity_community_write); 데이터바인딩에서는 이거대신 밑과같이 바꿔줌
        binding = DataBindingUtil.setContentView(this, R.layout.activity_community_write);
        binding.setCommunityWriteActivity(this); //<data><vairable>의 name을 set
    }

    //뒤로가기 클릭시(데이터바인딩 적용)
    public void  onBackImageViewClick(View view){
        finish();
    }

    public void onSubmitTextViewClick(View view){
        finish();
    }
}
<?xml version="1.0" encoding="utf-8"?>
<layout xmlns:android="http://schemas.android.com/apk/res/android"
    xmlns:tools="http://schemas.android.com/tools"
    tools:context=".activities.community.CommunityWriteActivity">
    <data>
        <variable
            name="communityWriteActivity"
            type="com.minjin.romang.activities.community.CommunityWriteActivity"/>
    </data>
    <LinearLayout xmlns:app="http://schemas.android.com/apk/res-auto"
        android:layout_width="match_parent"
        android:layout_height="match_parent"
        android:orientation="vertical">

        <android.support.v7.widget.Toolbar
            android:id="@+id/toolbar"
            android:layout_width="match_parent"
            android:layout_height="48dp"
            android:background="@color/colorWhite">

            <ImageView
                android:onClick="@{communityWriteActivity::onBackImageViewClick}"
                android:id="@+id/community_write_iv_back"
                android:layout_width="wrap_content"
                android:layout_height="wrap_content"
                android:layout_gravity="left|center"
                android:layout_marginLeft="16dp"
                app:srcCompat="@drawable/ic_back_black" />

            <TextView
                android:layout_width="wrap_content"
                android:layout_height="wrap_content"
                android:layout_gravity="center"
                android:background="@color/colorWhite"
                android:text="글쓰기"
                android:textColor="@color/colorBlack"
                android:textSize="20dp"
                android:textStyle="bold" />

            <TextView
                android:onClick="@{communityWriteActivity::onSubmitTextViewClick}"
                android:layout_width="wrap_content"
                android:layout_height="wrap_content"
                android:layout_gravity="right"
                android:layout_marginRight="16dp"
                android:background="@color/colorWhite"
                android:text="등록"
                android:textColor="@color/colorMainPink"
                android:textSize="15dp"
                android:textStyle="bold" />

        </android.support.v7.widget.Toolbar>

        <View
            android:layout_width="match_parent"
            android:layout_height="0.5dp"
            android:background="@color/colorLightGray200" />

        <View
            android:layout_width="match_parent"
            android:layout_height="4dp"
            android:background="@color/colorLightGray243" />

        <ScrollView
            android:layout_width="match_parent"
            android:layout_height="wrap_content">

            <LinearLayout
                android:layout_width="match_parent"
                android:layout_height="wrap_content"
                android:orientation="vertical">

                <TextView
                    android:id="@+id/community_write_et_title"
                    android:layout_width="match_parent"
                    android:layout_height="48dp"
                    android:background="@color/colorWhite"
                    android:gravity="center_vertical"
                    android:paddingHorizontal="32dp"
                    android:text="제목을 입력해주세요"
                    android:textColor="@color/colorGray130"
                    android:textSize="15dp"
                    android:textStyle="bold" />

                <View
                    android:layout_width="match_parent"
                    android:layout_height="0.5dp"
                    android:layout_marginBottom="32dp"
                    android:background="@color/colorLightGray200" />


                <android.support.v7.widget.CardView xmlns:android="http://schemas.android.com/apk/res/android"
                    xmlns:app="http://schemas.android.com/apk/res-auto"
                    android:layout_width="match_parent"
                    android:layout_height="240dp"
                    android:layout_marginHorizontal="24dp"
                    android:layout_marginTop="20dp"
                    app:cardBackgroundColor="@color/colorWhite"
                    app:cardUseCompatPadding="true">

                    <EditText
                        android:id="@+id/community_write_et_write"
                        android:layout_width="match_parent"
                        android:layout_height="match_parent"
                        android:background="@color/colorWhite"
                        android:gravity="top"
                        android:hint="내용을 입력해주세요"
                        android:padding="24dp"
                        android:textSize="13dp"
                        android:textStyle="bold" />

                </android.support.v7.widget.CardView>

                <android.support.v7.widget.CardView xmlns:android="http://schemas.android.com/apk/res/android"
                    xmlns:app="http://schemas.android.com/apk/res-auto"
                    android:layout_width="match_parent"
                    android:layout_height="240dp"
                    android:layout_margin="24dp"
                    app:cardBackgroundColor="@color/colorWhite"
                    app:cardUseCompatPadding="true">
                    <!--사진선택하면 여기다가 set할거임-->
                    <ImageView
                        android:id="@+id/community_write_iv_setimage"
                        android:layout_width="match_parent"
                        android:layout_height="match_parent" />

                    <ImageView
                        android:id="@+id/community_write_iv_uploadimage"
                        android:layout_width="50dp"
                        android:layout_height="50dp"
                        android:layout_gravity="center"
                        app:srcCompat="@drawable/ic_picture" />

                </android.support.v7.widget.CardView>
            </LinearLayout>
        </ScrollView>
    </LinearLayout>
</layout>'안드로이드 > 자바 & Previous' 카테고리의 다른 글
| [안드로이드] 인플레이션 이해하기 (0) | 2019.07.22 |
|---|---|
| [안드로이드] 카카오톡 로그인 (54) | 2019.07.19 |
| [안드로이드] 선택 다이얼로그 (0) | 2019.06.24 |
| [안드로이드] 버튼 중복클릭 방지하기 (0) | 2019.06.24 |
| [안드로이드] Realm 데이터베이스 정리 (0) | 2019.06.16 |


