| 일 | 월 | 화 | 수 | 목 | 금 | 토 |
|---|---|---|---|---|---|---|
| 1 | 2 | 3 | ||||
| 4 | 5 | 6 | 7 | 8 | 9 | 10 |
| 11 | 12 | 13 | 14 | 15 | 16 | 17 |
| 18 | 19 | 20 | 21 | 22 | 23 | 24 |
| 25 | 26 | 27 | 28 | 29 | 30 | 31 |
- 막내의막무가내 플러터 flutter
- 프래그먼트
- 부스트코스
- 막내의막무가내 플러터
- 막내의막무가내 코틀린
- 막내의막무가내 SQL
- 막내의막무가내 rxjava
- 프로그래머스 알고리즘
- 막내의막무가내 코볼 COBOL
- 막내의막무가내
- 2022년 6월 일상
- 막내의막무가내 프로그래밍
- 막내의 막무가내
- 부스트코스에이스
- 막내의막무가내 일상
- 막내의막무가내 목표 및 회고
- 막내의막무가내 알고리즘
- 막무가내
- 막내의 막무가내 알고리즘
- 막내의막무가내 안드로이드 에러 해결
- 안드로이드 sunflower
- 안드로이드 Sunflower 스터디
- 주엽역 생활맥주
- 안드로이드
- 막내의막무가내 안드로이드 코틀린
- Fragment
- 막내의막무가내 코틀린 안드로이드
- 막내의막무가내 회고 및 목표
- 막내의막무가내 안드로이드
- flutter network call
- Today
- Total
막내의 막무가내 프로그래밍 & 일상
[Flutter] Udemy 플러터 강의 섹션 6 학습 (MiCard - How to Build Beautiful UIs with FlutterWidgets) 본문
[Flutter] Udemy 플러터 강의 섹션 6 학습 (MiCard - How to Build Beautiful UIs with FlutterWidgets)
막무가내막내 2021. 8. 19. 22:11
[이전학습]
https://youngest-programming.tistory.com/607
[Flutter] Udemy 플러터 강의 섹션 5 학습 (I Am Poor - App Challenge)
[이전학습] https://youngest-programming.tistory.com/606 [Flutter] Udemy 플러터 강의 섹션 4 학습 (학습예정) [이전학습] https://youngest-programming.tistory.com/604 [Flutter] Udemy 플러터 강의 섹션 3..
youngest-programming.tistory.com
[참고]
https://www.udemy.com/course/flutter-bootcamp-with-dart/
The Complete 2021 Flutter Development Bootcamp with Dart
Officially created in collaboration with the Google Flutter team.
www.udemy.com
https://github.com/mtjin/flutter-practice
GitHub - mtjin/flutter-practice: Learning About Flutter (플러터 공부)
Learning About Flutter (플러터 공부). Contribute to mtjin/flutter-practice development by creating an account on GitHub.
github.com
[39. MiCard - A Single Screen Personal Business Card App]
초심자 기준으로 강의를 설명하시기 때문에 친절하게 깃허브 프로젝트를 clone하고 불러오는 법에 대해 가르쳐주셨습니다. 밑 레포지토리를 다운받았습니다.
https://github.com/londonappbrewery/mi_card_flutter
GitHub - londonappbrewery/mi_card_flutter: Starter code for the Mi Card Project from the Complete Flutter Development Bootcamp
Starter code for the Mi Card Project from the Complete Flutter Development Bootcamp - GitHub - londonappbrewery/mi_card_flutter: Starter code for the Mi Card Project from the Complete Flutter Devel...
github.com
[40. Hot Reload and Hot Restart - Flutter Power Tools]
플러터의 가장 큰 장점 중 하나라고 할 수 있는 Hot Reload와 Hot Restart 기능에 대해 배웠습니다.
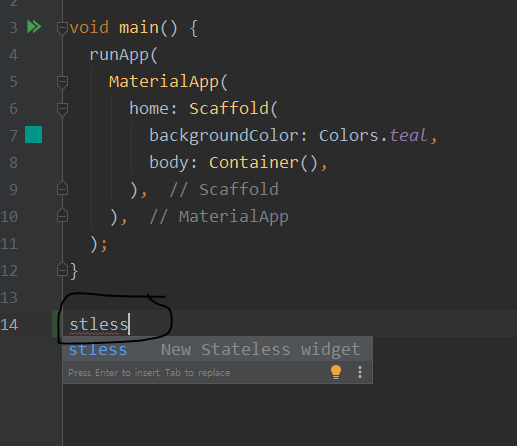
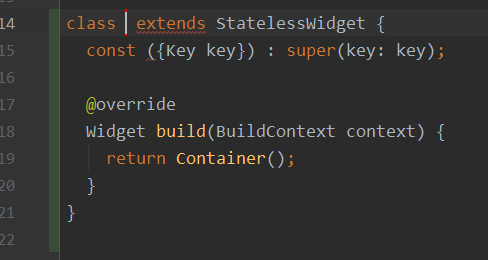
stless 로 stateless widget을 쉽게 만들 수 있습니다.
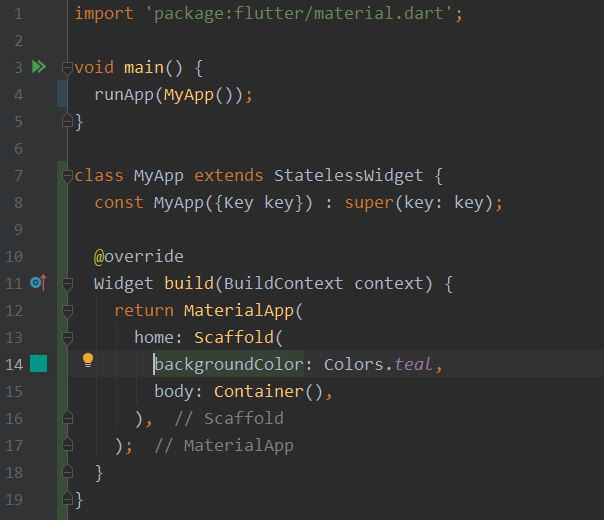
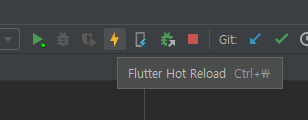
Stateless widget 혹은 Stateful widget 을 만들어 widget을 구성하면 widget을 변경 후 Hot reload를 하면 변강사항을 바로 에뮬레이터를 통해 볼 수 있습니다.
이 StatlessWidget의 내부가 바뀐 build() 함수를 재호출함으로써 디자인을 다시 그려 변경사항이 적용되는 것 입니다.
Hot Reload 기능은 앱을 다시 Stop하고 빌드하고 재실행할 필요가 없이 빠르게 변경사항들을 볼 수 있어 시간절약에 매우 효과적입니다. 매번 앱을 변경 후 재실행할때 시간이 오래걸리는 안드로이드 개발을 하다가 플러터의 Hot Reload 기능을 사용해보니 정말 빠르고 혁신적이라 느꼈습니다. ㅎㅎ
그리고 안젤라선생님께서 맥북환경에서 IOS에서 코드를 변경 후 재실행했을때와 Flutter에서 Hot Reload로 재실행했을때를 시간이 얼마나 걸리는지 비교를 하셨는데 30초 vs 5초로 플러터의 압승이었습니다. 쩐다.
추가로 Hot Reload 에서 기억해야할 점은 디자인은 바뀔 수 있어도 갖고 있는 데이터는 바뀌지 않는다는 점을 알아야합니다. (예를들면, 타이머앱의 카운트 숫자)
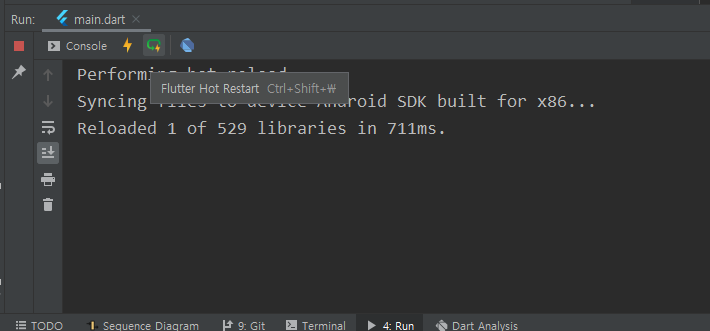
만약 이러한 데이터 상태 또한 모두 초기화(Reset)하고 싶다면 Hot Restart 기능을 사용하시면 됩니다. (Hot Reload 보다는 시간이 조금더 걸리지만 재실행보다는 훨씬 시간이 절약됩니다.)
[41. How to Use Container Widgets]
Container의 특성에 대해 배웠습니다.
Container 위젯은 웹프로그래밍으로 치면 <div>와 비슷하며 기본적으로 레이아웃 박스라고 보면 됩니다.
자세한 사항은 공식문서에서 확인하면 되고 공식문서에서는 Container를 다음과 같이 정의하고 있습니다.
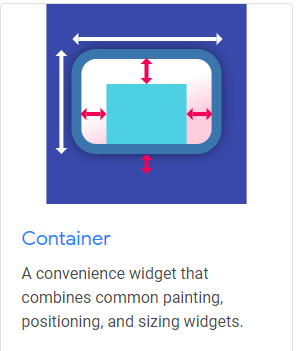
https://flutter.dev/docs/development/ui/widgets/layout
Layout widgets
flutter.dev
https://api.flutter.dev/flutter/widgets/Container-class.html
Container class - widgets library - Dart API
A convenience widget that combines common painting, positioning, and sizing widgets. A container first surrounds the child with padding (inflated by any borders present in the decoration) and then applies additional constraints to the padded extent (incorp
api.flutter.dev
먼저 Container는 오직 한개의 Child를 가질 수 있습니다.
Conatiner 는 Child가 없거나 크기를 정해주지 않으면 가능한 최대 크기로 설정이 됩니다. Child가 있는 경우는 Child의 크기만큼 자동 설정 됩니다. 이러한 자동설정 말고 높이와 너비 패딩, 마진 등을 당연히 개발자가 설정할 수 있습니다.
마진설정시 EdgeInsets 로 다양한 방법으로 마진을 설정할 수 있습니다. (밑 예제 주석참고)
SafeArea를 사용하면 시간이나 와이파이가 있는 상태바가 아닌 사용자가 보이는 그 밑의 메인 UI 공간에 Container가 위치하게 할 수 있습니다.
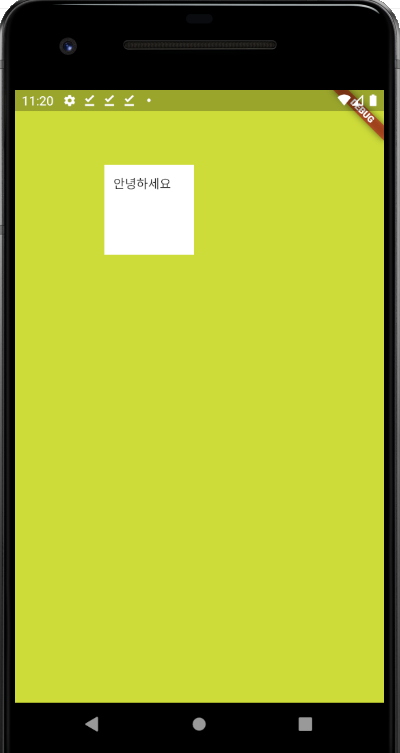
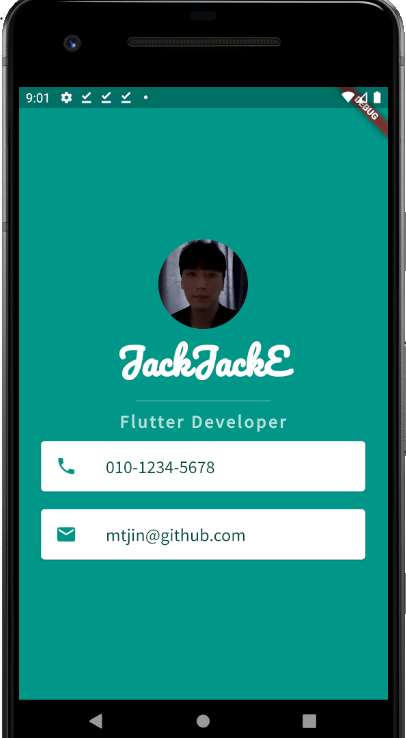
최종코드와 결과는 다음과 같습니다.
import 'package:flutter/material.dart';

void main() {
  runApp(MyApp());
}

class MyApp extends StatelessWidget {
  const MyApp({Key key}) : super(key: key);

  @override
  Widget build(BuildContext context) {
    return MaterialApp(
      home: Scaffold(
        backgroundColor: Colors.lime,
        body: SafeArea(
          child: Container(
            margin: EdgeInsets.fromLTRB(100.0, 60.0, 10.0, 20.0), // left, top, right, bottom 각각 마진설정
            //margin : EdgeInsets.all(30.0) // 전체 한번에 마진설정
            //margin: EdgeInsets.symmetric(vertical: 30.0, horizontal: 50.0), // 수직, 수평 마진 설정
            //margin: EdgeInsets.only(left: 30.0), // 한 방향만 마진 설정
            padding: EdgeInsets.all(10.0),
            height: 100.0,
            width: 100.0,
            color: Colors.white,
            child: Text("안녕하세요"),
          ),
        ),
      ),
    );
  }
}
[42. How to use Column & Row Widgets for Layout]
바로 위에 41번 강의에서는 하나의 Child만 가질 수 있는 Container에 대해 배웠습니다.
이번 강의에서는 하나가 아닌 여러개의 Child를 가지기 위해서 가장 쉬운 방법인 Column 와 Row 에 대해 배웠습니다.
이에 대한 개념은 프로그래밍을 어느정도 해봤다면 생각하는거와 동일하게 Column는 Vertical 이고 Row는 Horizontal 디자인을 구현하기 위해 사용되고 자세한 사항은 다음 공식문서를 참고하면 됩니다.
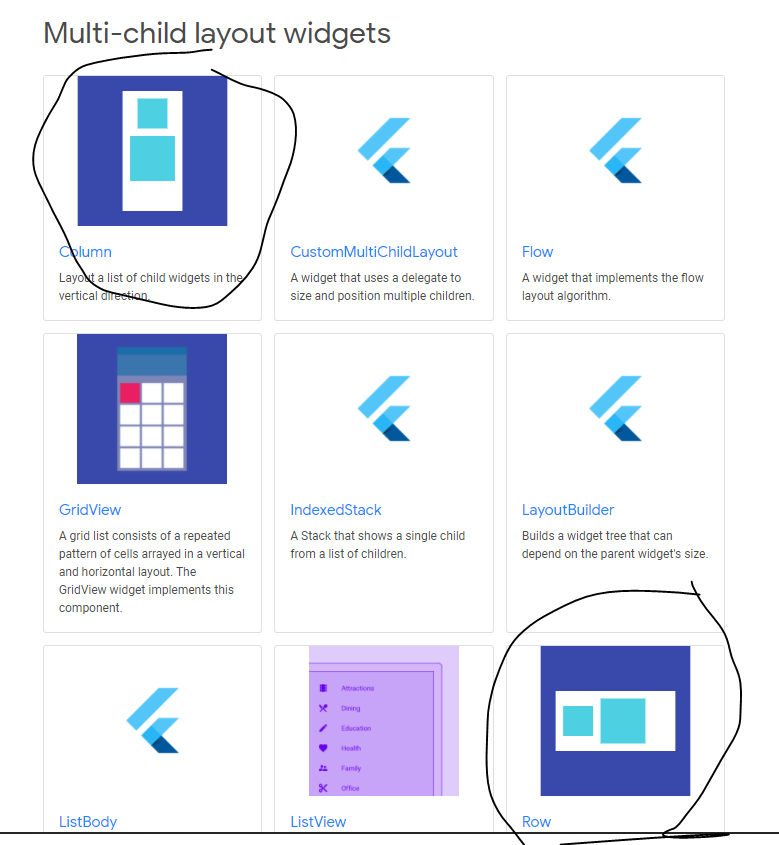
https://flutter.dev/docs/development/ui/widgets/layout#Multi-child%20layout%20widgets
Layout widgets
flutter.dev
Column과 Row 를 처음 접할때 주의할 점은 Container와 다르게 child 속성을 가지지 않고 여러개(복수)의 child를 가질 수 있으므로 children 속성을 가지고 있다는 점입니다.
Column의 예시는 다음과 같습니다.
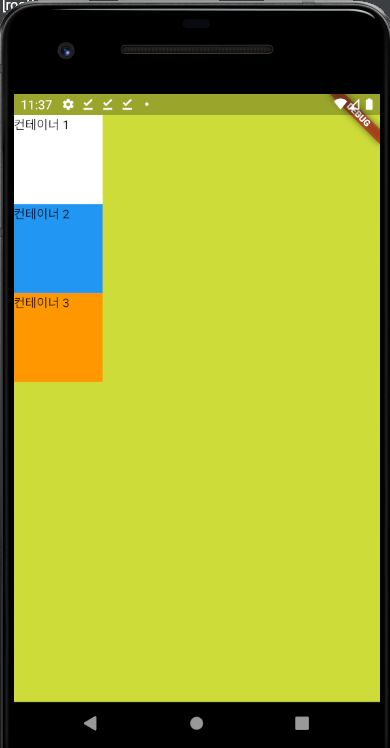
children에 Widget을 명시하고 여러개의 컨테이너를 두는 것을 볼 수 있습니다.
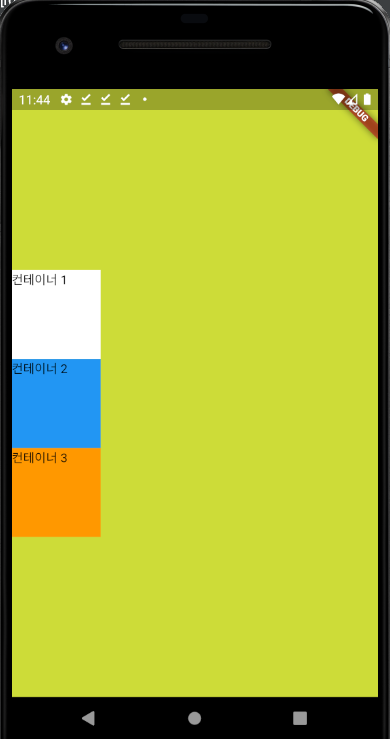
또한 mainAxisSize에 대해서도 알아봤는데 높이를 컨테이너의 높이만큼 맞춰주는 것 입니다.
import 'package:flutter/material.dart';

void main() {
  runApp(MyApp());
}

class MyApp extends StatelessWidget {
  const MyApp({Key key}) : super(key: key);

  @override
  Widget build(BuildContext context) {
    return MaterialApp(
      home: Scaffold(
        backgroundColor: Colors.lime,
        body: SafeArea(
          child: Column(
            mainAxisSize: MainAxisSize.min, // 3개의 container 높이 만큼 Column 의 높이를 자동조절해준다.
            // 안하면 자동으로 안드로이드 match parent 처럼 된다
            children: <Widget>[
              Container(
                  height: 100.0,
                  width: 100.0,
                  color: Colors.white,
                  child: Text("컨테이너 1")
              ),
              Container(
                height: 100.0,
                width: 100.0,
                color: Colors.blue,
                child: Text("컨테이너 2"),
              ),
              Container(
                  height: 100.0,
                  width: 100.0,
                  color: Colors.orange,
                  child: Text("컨테이너 3")
              )
            ],
          ),
        ),
      ),
    );
  }
}
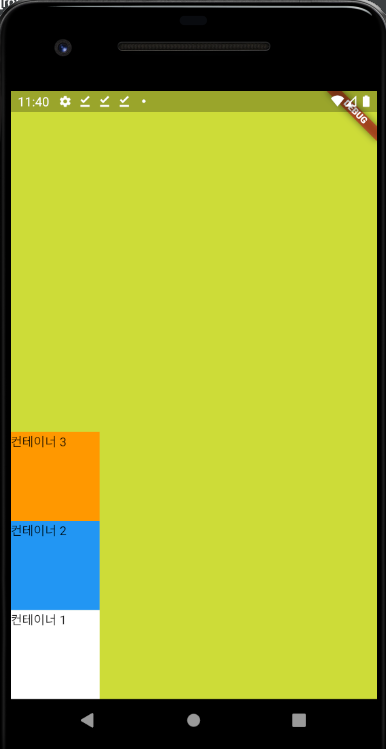
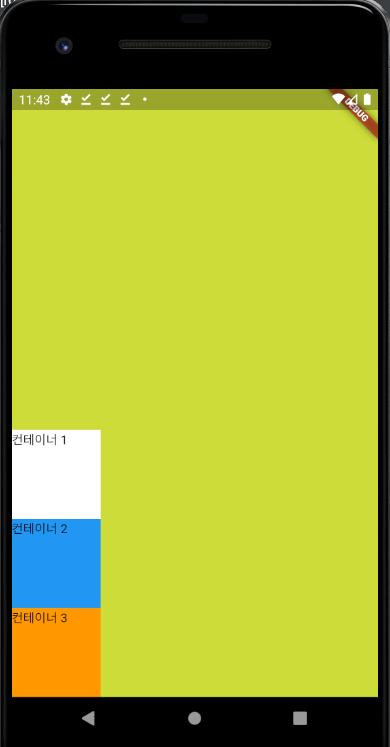
다음은 verticalDirection 속성을 사용했을때의 예제입니다.
up인 경우 위로 쌓아올라가겠다는 의미로 해석하면 됩니다.
import 'package:flutter/material.dart';

void main() {
  runApp(MyApp());
}

class MyApp extends StatelessWidget {
  const MyApp({Key key}) : super(key: key);

  @override
  Widget build(BuildContext context) {
    return MaterialApp(
      home: Scaffold(
        backgroundColor: Colors.lime,
        body: SafeArea(
          child: Column(
            verticalDirection: VerticalDirection.up,
            children: <Widget>[
              Container(
                  height: 100.0,
                  width: 100.0,
                  color: Colors.white,
                  child: Text("컨테이너 1")
              ),
              Container(
                height: 100.0,
                width: 100.0,
                color: Colors.blue,
                child: Text("컨테이너 2"),
              ),
              Container(
                  height: 100.0,
                  width: 100.0,
                  color: Colors.orange,
                  child: Text("컨테이너 3")
              )
            ],
          ),
        ),
      ),
    );
  }
}
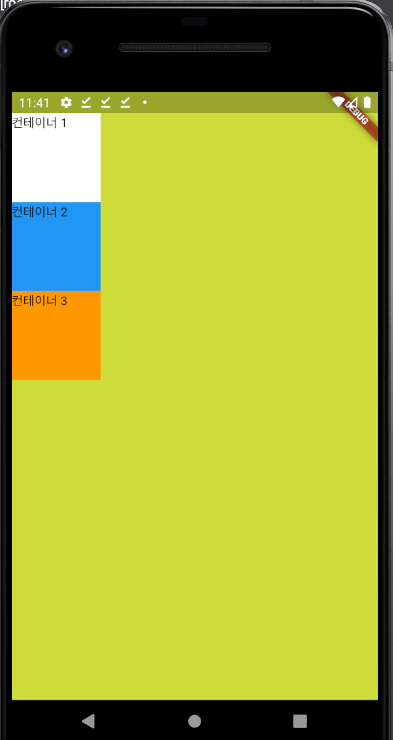
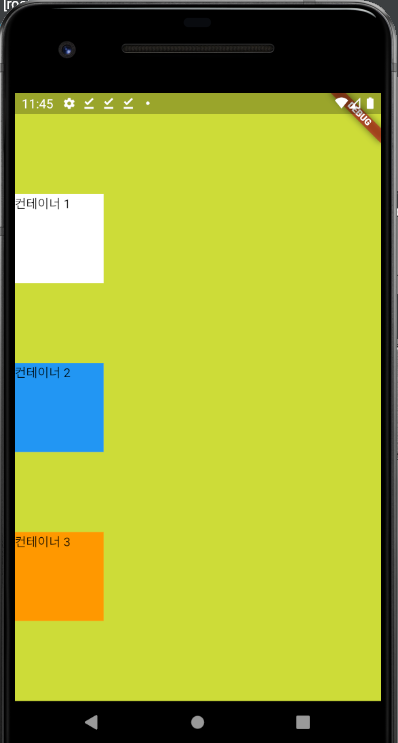
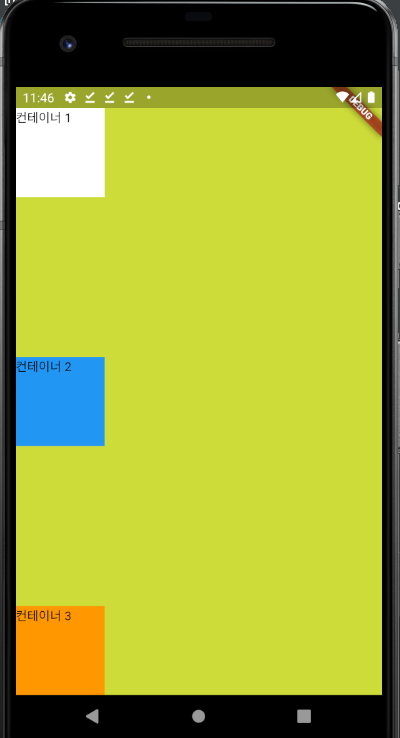
다음은 verticalDirection 속성을 사용했을때의 예제입니다.
수직 정렬을 할 수 있습니다.
import 'package:flutter/material.dart';

void main() {
  runApp(MyApp());
}

class MyApp extends StatelessWidget {
  const MyApp({Key key}) : super(key: key);

  @override
  Widget build(BuildContext context) {
    return MaterialApp(
      home: Scaffold(
        backgroundColor: Colors.lime,
        body: SafeArea(
          child: Column(
            mainAxisAlignment: MainAxisAlignment.end,
            children: <Widget>[
              Container(
                  height: 100.0,
                  width: 100.0,
                  color: Colors.white,
                  child: Text("컨테이너 1")
              ),
              Container(
                height: 100.0,
                width: 100.0,
                color: Colors.blue,
                child: Text("컨테이너 2"),
              ),
              Container(
                  height: 100.0,
                  width: 100.0,
                  color: Colors.orange,
                  child: Text("컨테이너 3")
              )
            ],
          ),
        ),
      ),
    );
  }
}
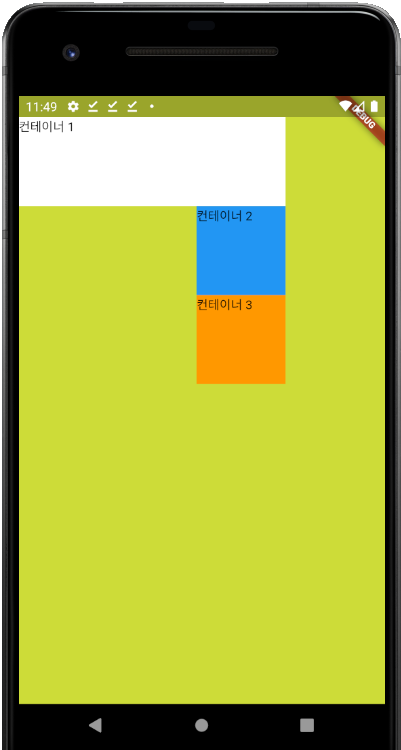
다음은 crossAxisAlignment 속성을 사용했을때의 예제입니다.
수평 정렬을 할 수 있습니다. 세개의 컨테이너 너비가 만약 다 똑같다면 적용 전후가 같은 모습일 겁니다.
import 'package:flutter/material.dart';

void main() {
  runApp(MyApp());
}

class MyApp extends StatelessWidget {
  const MyApp({Key key}) : super(key: key);

  @override
  Widget build(BuildContext context) {
    return MaterialApp(
      home: Scaffold(
        backgroundColor: Colors.lime,
        body: SafeArea(
          child: Column(
            crossAxisAlignment: CrossAxisAlignment.end,
            children: <Widget>[
              Container(
                  height: 100.0,
                  width: 300.0,
                  color: Colors.white,
                  child: Text("컨테이너 1")
              ),
              Container(
                height: 100.0,
                width: 100.0,
                color: Colors.blue,
                child: Text("컨테이너 2"),
              ),
              Container(
                  height: 100.0,
                  width: 100.0,
                  color: Colors.orange,
                  child: Text("컨테이너 3")
              )
            ],
          ),
        ),
      ),
    );
  }
}
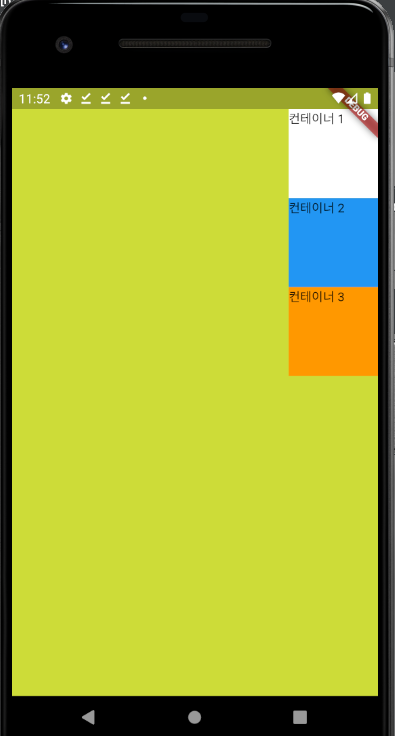
다음은 crossAxisAlignment 속성을 사용했을때의 예제입니다.
invisible한 컨테이너를 만들어 컨테이너들의 정렬을 조작할 수도 있습니다.
여기 예제에서는 높이는 주지 않고 width를 무한대로 설정하여 이를 구현했습니다.
import 'package:flutter/material.dart';

void main() {
  runApp(MyApp());
}

class MyApp extends StatelessWidget {
  const MyApp({Key key}) : super(key: key);

  @override
  Widget build(BuildContext context) {
    return MaterialApp(
      home: Scaffold(
        backgroundColor: Colors.lime,
        body: SafeArea(
          child: Column(
            crossAxisAlignment: CrossAxisAlignment.end,
            children: <Widget>[
              Container(
                  height: 100.0,
                  width: 100.0,
                  color: Colors.white,
                  child: Text("컨테이너 1")
              ),
              Container(
                height: 100.0,
                width: 100.0,
                color: Colors.blue,
                child: Text("컨테이너 2"),
              ),
              Container(
                  height: 100.0,
                  width: 100.0,
                  color: Colors.orange,
                  child: Text("컨테이너 3")
              ),
              Container( //invisible Container
                width: double.infinity,
              )
            ],
          ),
        ),
      ),
    );
  }
}
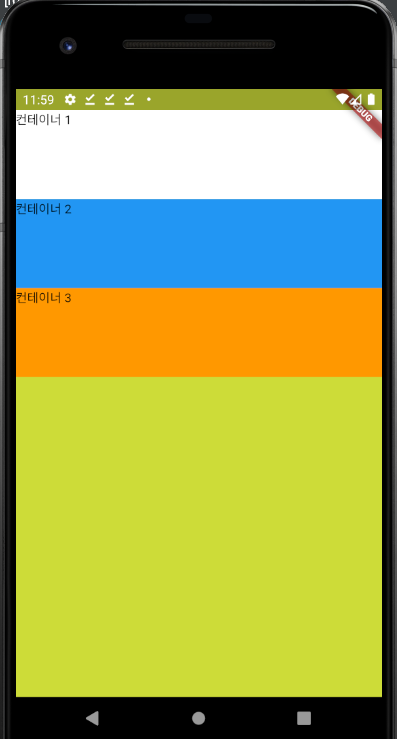
위에 예제에서 invisble한 컨테이너를 하나 더 만드는건 뭔가 불편하고 왜저런식으로 코딩해야하지를 느끼셨을겁니다.
이거와 같은 가장 좋은 버전으로 CrossAxisAlignment.stretch 속성을 사용하면 해결할 수 있고 다음예제를 참고하시면 쉽게 눈치채실 것 입니다. (추가로 Container 들의 width를 제거했습니다. strech되어 그 만큼 자동으로 width가 설정됨을 에뮬레이터를 통해 확인도 하실 수 있습니다.)
import 'package:flutter/material.dart';

void main() {
  runApp(MyApp());
}

class MyApp extends StatelessWidget {
  const MyApp({Key key}) : super(key: key);

  @override
  Widget build(BuildContext context) {
    return MaterialApp(
      home: Scaffold(
        backgroundColor: Colors.lime,
        body: SafeArea(
          child: Column(
            crossAxisAlignment: CrossAxisAlignment.stretch,
            children: <Widget>[
              Container(
                  height: 100.0,
                  color: Colors.white,
                  child: Text("컨테이너 1")
              ),
              Container(
                height: 100.0,
                color: Colors.blue,
                child: Text("컨테이너 2"),
              ),
              Container(
                  height: 100.0,
                  color: Colors.orange,
                  child: Text("컨테이너 3")
              ),
            ],
          ),
        ),
      ),
    );
  }
}
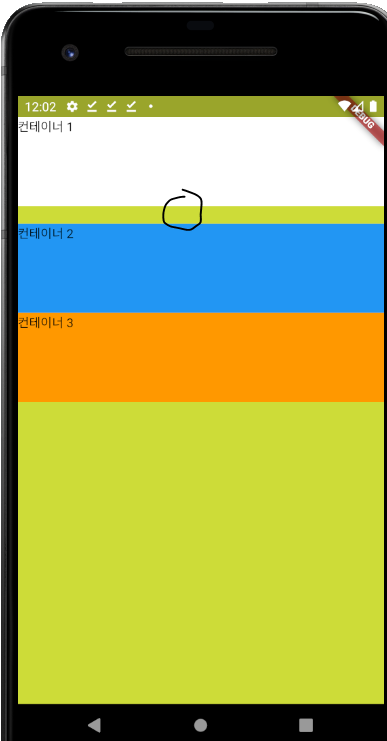
다음은 SizedBox를 사용했을때의 예제입니다.
이것을 사용해서 컨테이너 사이 간격을 조절하는데 사용할 수 있습니다. 또한 이는 코드를 읽는데 쉽게 만들어줍니다.
여기 예제에서는 Column안이고 aligment도 설정되어 있으므로 width는 필요없고 height 속성만 가져도 됩니다.
import 'package:flutter/material.dart';

void main() {
  runApp(MyApp());
}

class MyApp extends StatelessWidget {
  const MyApp({Key key}) : super(key: key);

  @override
  Widget build(BuildContext context) {
    return MaterialApp(
      home: Scaffold(
        backgroundColor: Colors.lime,
        body: SafeArea(
          child: Column(
            crossAxisAlignment: CrossAxisAlignment.stretch,
            children: <Widget>[
              Container(
                  height: 100.0,
                  color: Colors.white,
                  child: Text("컨테이너 1")
              ),
              SizedBox(
                height: 20.0,
              ),
              Container(
                height: 100.0,
                color: Colors.blue,
                child: Text("컨테이너 2"),
              ),
              Container(
                  height: 100.0,
                  color: Colors.orange,
                  child: Text("컨테이너 3")
              ),
            ],
          ),
        ),
      ),
    );
  }
}
[43. Flutter Layouts Challenge]
챌린지에서 구현해야할 디자인입니다.
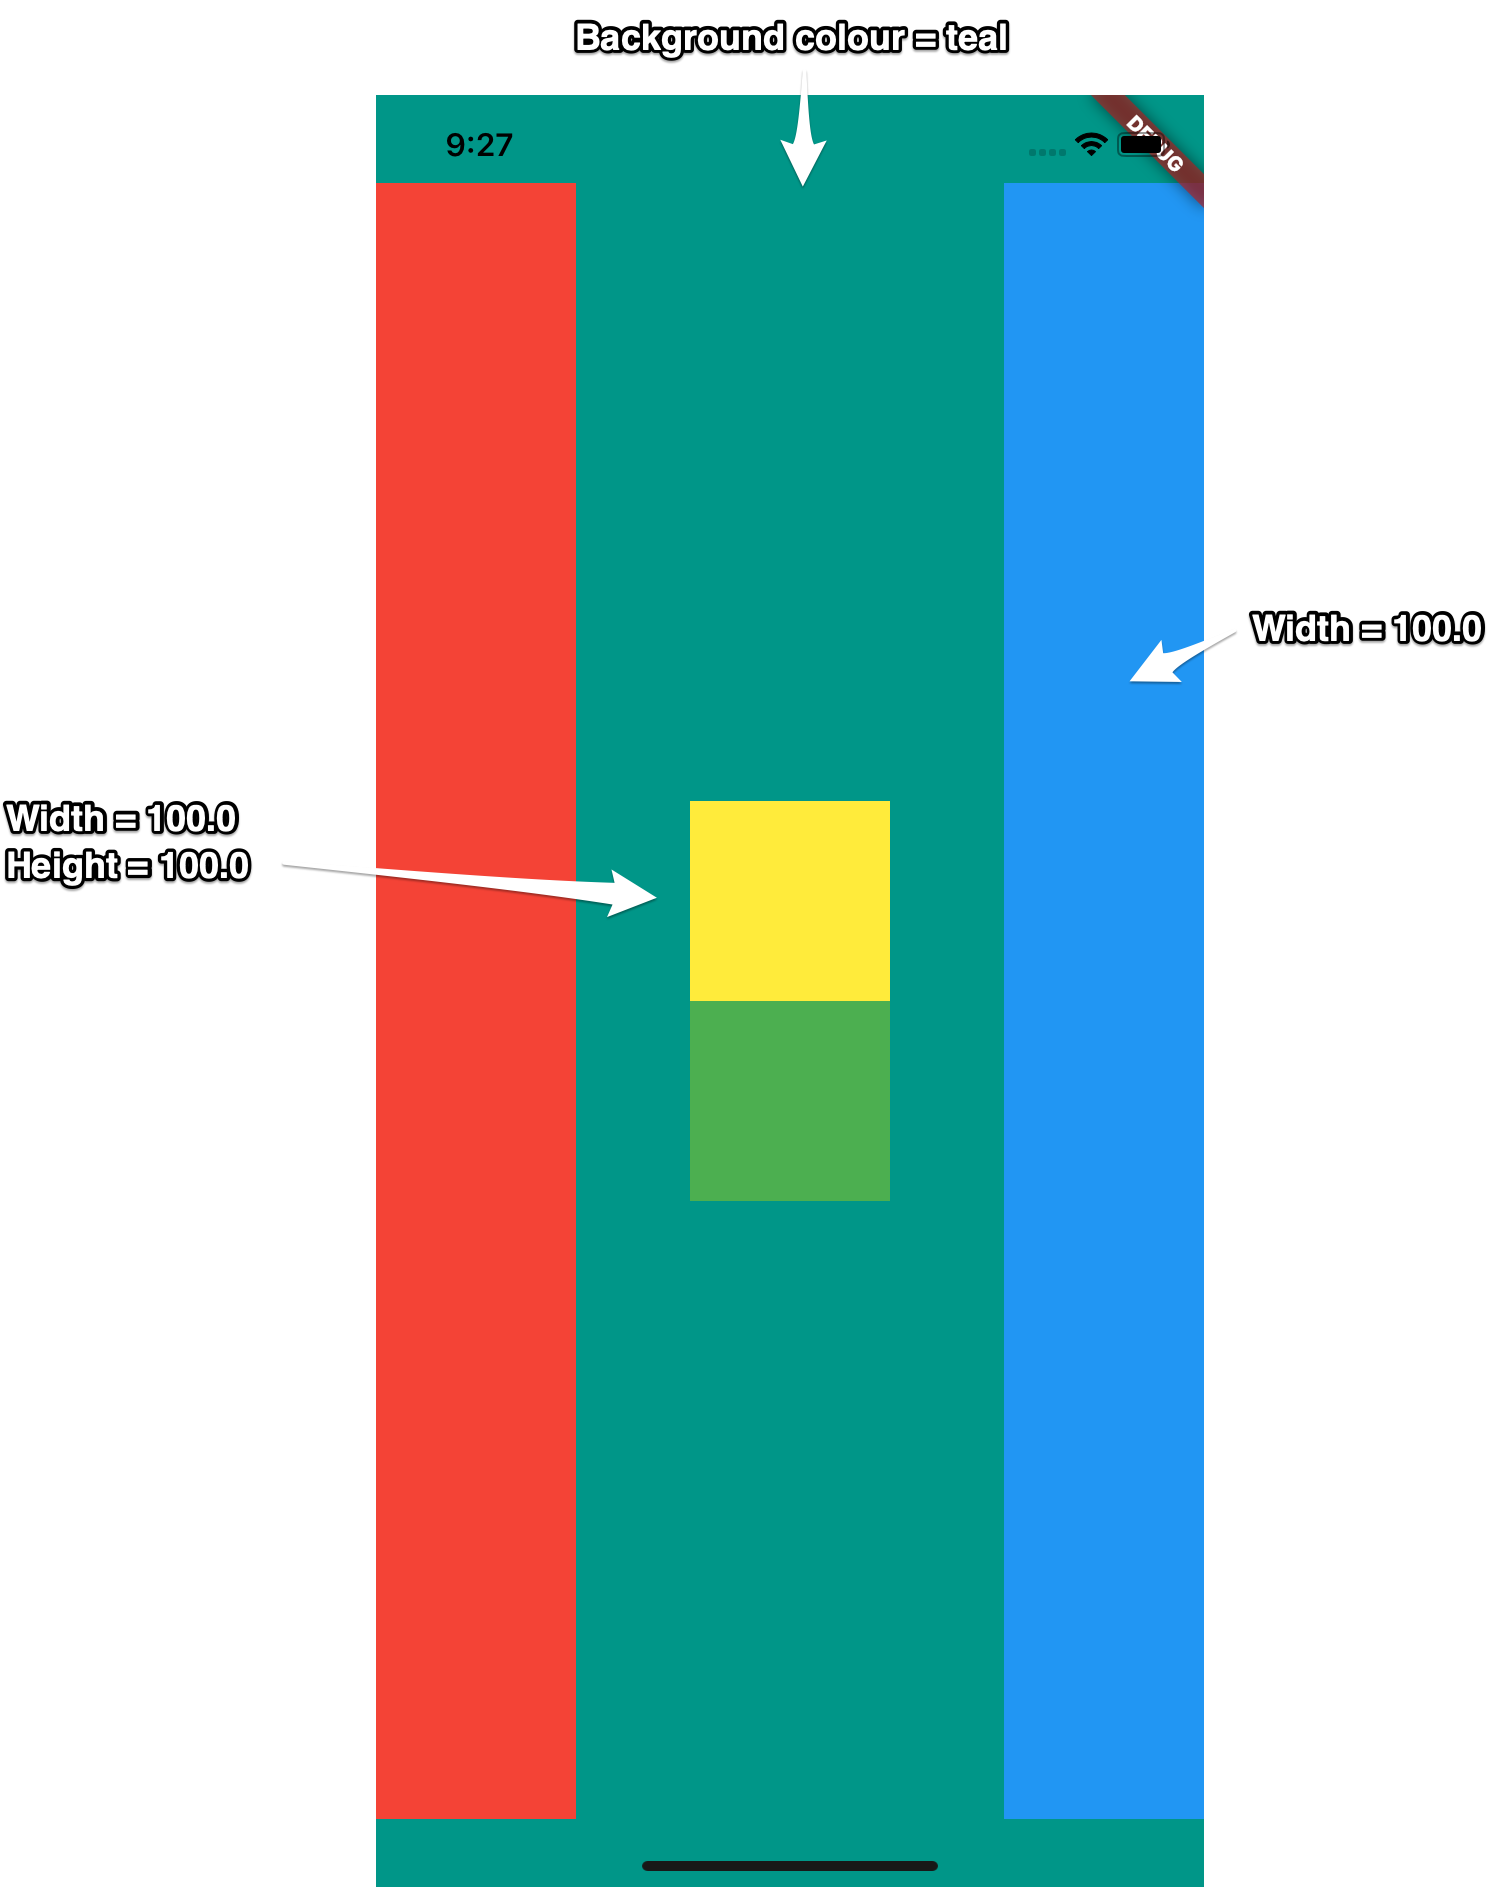
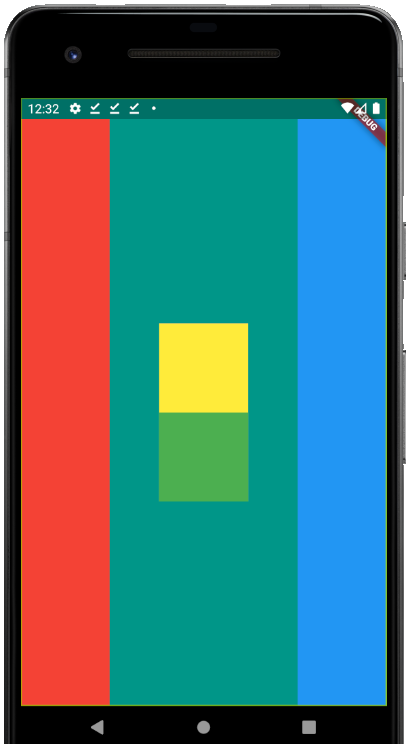
다음과 같이 구현했습니다.
설명은 주석에 달아놨습니다.
import 'package:flutter/material.dart';

void main() {
  runApp(MyApp());
}

class MyApp extends StatelessWidget {
  const MyApp({Key key}) : super(key: key);

  @override
  Widget build(BuildContext context) {
    return MaterialApp(
      home: Scaffold(
        backgroundColor: Colors.teal,
        body: SafeArea(
          child: Row(
            mainAxisAlignment: MainAxisAlignment.spaceBetween,
            // 컨테이너를 끝에서부터 동등하게 간격조절하여 가운데 정렬
            children: [
              Container(
                //height 는 match parent 자동으로 되게 설정 따로 안해줘도됨
                width: 100.0,
                color: Colors.red,
              ),
              Container( // 반반 나눠서 색 2개 만듬, 근데 더 좋은 방법있을거같은데 흠..
                  width: 100.0,
                  height: 200.0,
                  color: Colors.yellow,
                  padding: EdgeInsets.fromLTRB(0.0, 100.0, 0.0, 0.0),
                  child: Container(color: Colors.green)),
              Container(width: 100.0, color: Colors.blue),
            ],
          ),
        ),
      ),
    );
  }
}
[44. Tapping into Widget Properties]
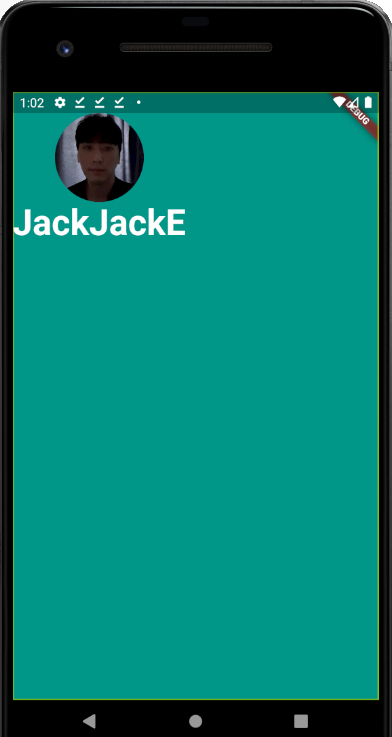
개인 프로필 화면을 단계별로 만들어나갈 겁니다. 여기서는 프로필 이미지와 이름 디자인을 구현했습니다.
CircleAvatar 로 둥근 이미지를 쉽게 구현할 수 있었습니다.
import 'package:flutter/material.dart';

void main() {
  runApp(MyApp());
}

class MyApp extends StatelessWidget {
  const MyApp({Key key}) : super(key: key);

  @override
  Widget build(BuildContext context) {
    return MaterialApp(
      home: Scaffold(
        backgroundColor: Colors.teal,
        body: SafeArea(
            child: Column(
          children: <Widget>[
            CircleAvatar(
              radius: 50.0,
              backgroundImage: AssetImage('images/profile.jpg'),
            ),
            Text(
              "JackJackE",
              style: TextStyle(
                  fontSize: 40.0,
                  color: Colors.white,
                  fontWeight: FontWeight.bold),
            )
          ],
        )),
      ),
    );
  }
}
[45. Incorporating Custom Fonts in Your Flutter App]
커스텀 폰트 적용 방법에 대해 배웠습니다.
팁 : 폰트는 다음 사이트에서 얻을 수 있습니다.
Google Fonts
Making the web more beautiful, fast, and open through great typography
fonts.google.com
위 사이트에서 폰트를 다운받아서 fonts 디렉토리를 만들어 여기에 옮겨줍니다.
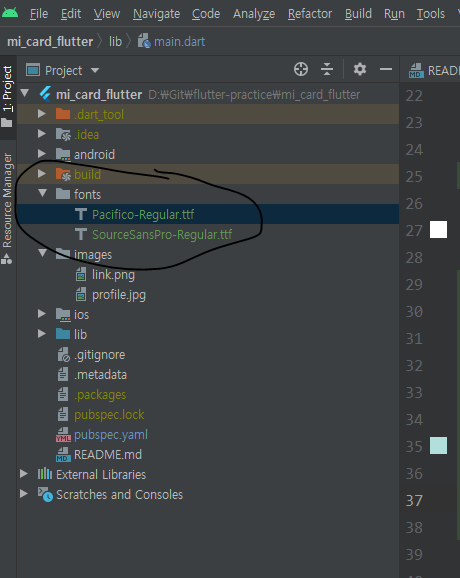
그 다음 폰트들을 pubspec.yaml에 다음과 같이 추가해줍니다. family는 이 폰트를 불러오기 위한 이름으로 사용될 아이디값이라 생각하면 되고 asset에는 폰트가 있는 디렉토리와 파일이름을 세팅해줘야합니다.
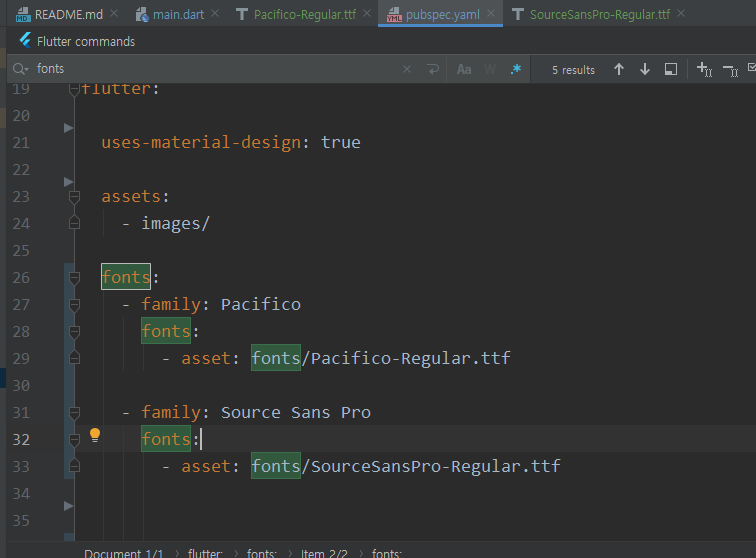
name: mi_card
description: A new Flutter application.

version: 1.0.0+1

environment:
  sdk: ">=2.0.0-dev.68.0 <3.0.0"

dependencies:
  flutter:
    sdk: flutter

  cupertino_icons: ^0.1.2

dev_dependencies:
  flutter_test:
    sdk: flutter

flutter:

  uses-material-design: true

  assets:
    - images/

  fonts:
    - family: Pacifico
      fonts:
        - asset: fonts/Pacifico-Regular.ttf

    - family: Source Sans Pro
      fonts:
        - asset: fonts/SourceSansPro-Regular.ttf
마지막으로 폰트를 다음과 같이 fontFamily 속성을 사용하여 세팅하면 됩니다.
import 'package:flutter/material.dart';

void main() {
  runApp(MyApp());
}

class MyApp extends StatelessWidget {
  const MyApp({Key key}) : super(key: key);

  @override
  Widget build(BuildContext context) {
    return MaterialApp(
      home: Scaffold(
        backgroundColor: Colors.teal,
        body: SafeArea(
            child: Column(
          children: <Widget>[
            CircleAvatar(
              radius: 50.0,
              backgroundImage: AssetImage('images/profile.jpg'),
            ),
            Text(
              "JackJackE",
              style: TextStyle(
                  fontFamily: 'Pacifico', // pubspec.yaml 에 폰트이름 설정해논거 세팅
                  fontSize: 40.0,
                  color: Colors.white,
                  fontWeight: FontWeight.bold),
            ),
            Text(
              "Flutter Developer",
              style: TextStyle(
                fontFamily: 'Source Sans Pro', // pubspec.yaml 에 폰트이름 설정해논거 세팅
                fontSize: 40.0,
                color: Colors.teal.shade100,
                letterSpacing: 2.5,
                fontWeight: FontWeight.bold
              ),
            )
          ],
        )),
      ),
    );
  }
}
[46. Adding Material Icons with the Icon Widget]
Icon Widget을 추가하는 방법에 대해 배웠습니다.
안드로이드에서는 머터리얼 아이콘이더라도 아이콘 파일을 생성해주는 작업이 필요했는데
플러터에서는 머터리얼 아이콘을 쉽게 가져다 쓸 수 있도록 준비가 되어있다고 합니다. 다음 사이트에서 필요한 아이콘을 골라서 쓰면 됩니다!
https://api.flutter.dev/flutter/material/Icons-class.html
Icons class - material library - Dart API
Identifiers for the supported material design icons. Use with the Icon class to show specific icons. Icons are identified by their name as listed below. Do not use codepoints directly, as they are subject to change. To use this class, make sure you set use
api.flutter.dev
별개로 머터리얼 아이콘과 컬러를 테스트할 수 있는 사이트도 소개합니다.
https://www.materialpalette.com/purple/purple
Material Palette - Material Design Color Palette Generator
Choose your favorite colors and get your Material Design palette generated and downloadable.
www.materialpalette.com
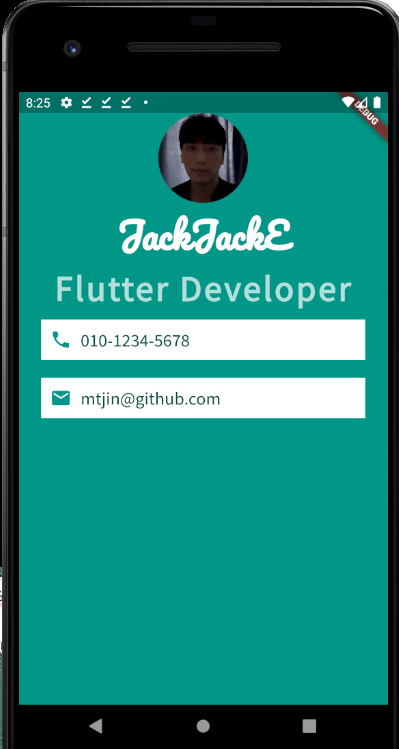
사용방법은 밑의 코드를 참고하면 쉽게 이해할 수 있습니다. ㅎㅎ
Icon 위젯을 사용하면 됩니다.
import 'package:flutter/material.dart';

void main() {
  runApp(MyApp());
}

class MyApp extends StatelessWidget {
  const MyApp({Key key}) : super(key: key);

  @override
  Widget build(BuildContext context) {
    return MaterialApp(
      home: Scaffold(
        backgroundColor: Colors.teal,
        body: SafeArea(
            child: Column(
              children: <Widget>[
                CircleAvatar(
                  radius: 50.0,
                  backgroundImage: AssetImage('images/profile.jpg'),
                ),
                Text(
                  "JackJackE",
                  style: TextStyle(
                      fontFamily: 'Pacifico', // pubspec.yaml 에 폰트이름 설정해논거 세팅
                      fontSize: 40.0,
                      color: Colors.white,
                      fontWeight: FontWeight.bold),
                ),
                Text(
                  "Flutter Developer",
                  style: TextStyle(
                      fontFamily: 'Source Sans Pro',
                      // pubspec.yaml 에 폰트이름 설정해논거 세팅
                      fontSize: 40.0,
                      color: Colors.teal.shade100,
                      letterSpacing: 2.5,
                      fontWeight: FontWeight.bold),
                ),
                Container(
                  padding: EdgeInsets.all(10.0),
                  color: Colors.white,
                  margin: EdgeInsets.symmetric(
                      vertical: 10.0, horizontal: 25.0),
                  child: Row(
                    children: <Widget>[
                      Icon(
                        Icons.phone,
                        color: Colors.teal,
                      ),
                      SizedBox(
                        width: 10.0,
                      ),
                      Text(
                        '010-1234-5678',
                        style: TextStyle(
                          color: Colors.teal.shade900,
                          fontFamily: 'Source Sans Pro',
                          fontSize: 20.0,
                        ),
                      ),
                    ],
                  ),
                ),
                Container(
                  color: Colors.white,
                  padding: EdgeInsets.all(10.0),
                  margin: EdgeInsets.symmetric(
                      vertical: 10.0, horizontal: 25.0),
                  child: Row(
                    children: <Widget>[
                      Icon(
                        Icons.email,
                        color: Colors.teal,
                      ),
                      SizedBox(
                        width: 10.0,
                      ),
                      Text(
                        'mtjin@github.com',
                        style: TextStyle(
                            fontSize: 20.0,
                            color: Colors.teal.shade900,
                            fontFamily: 'Source Sans Pro'),
                      ),
                    ],
                  ),
                )
              ],
            )),
      ),
    );
  }
}
[47. Flutter Card & ListTile Widgets]
플러터 Card 클래스에 대해 배웠습니다.
안드로이드의 CardView와 비슷한거라 생각하시면 됩니다. (사각형 기준의 뷰, 테두리 그림자 등의 특징을 가짐)
https://api.flutter.dev/flutter/material/Card-class.html
Card class - material library - Dart API
A material design card: a panel with slightly rounded corners and an elevation shadow. A card is a sheet of Material used to represent some related information, for example an album, a geographical location, a meal, contact details, etc. This is what it lo
api.flutter.dev
Card 로 사용할 수 있으며 아래 예시코드를 보시면 사용법을 쉽게 이해 가능합니다.
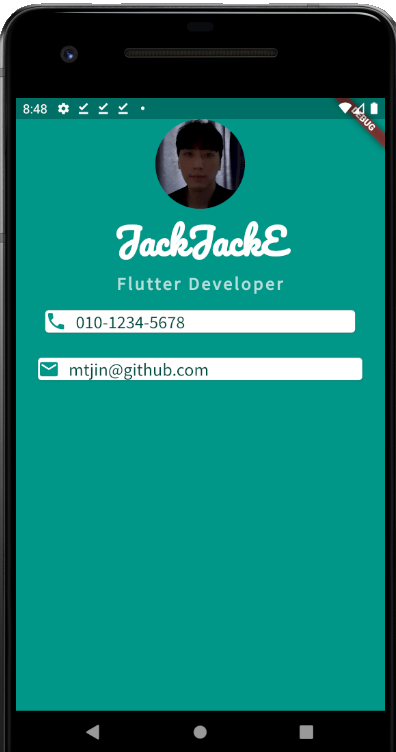
이전 코드에서 Container -> Card 로 수정했습니다.
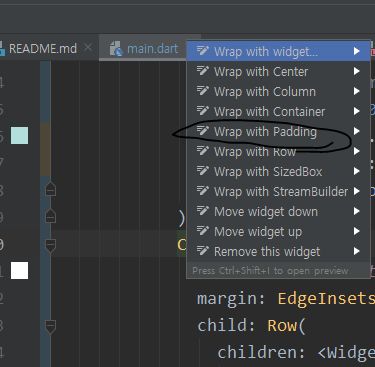
참고로 Card는 padding 속성을 갖고 있지 않습니다. 이를 대신하여 Padding 위젯을 사용해야합니다.
Padding 위젯은 Card 에 Alt+Enter를 하면 바로 tip이 나와서 쉽게 할 수 있습니다.
import 'package:flutter/material.dart';

void main() {
  runApp(MyApp());
}

class MyApp extends StatelessWidget {
  const MyApp({Key key}) : super(key: key);

  @override
  Widget build(BuildContext context) {
    return MaterialApp(
      home: Scaffold(
        backgroundColor: Colors.teal,
        body: SafeArea(
            child: Column(
          children: <Widget>[
            CircleAvatar(
              radius: 50.0,
              backgroundImage: AssetImage('images/profile.jpg'),
            ),
            Text(
              "JackJackE",
              style: TextStyle(
                  fontFamily: 'Pacifico', // pubspec.yaml 에 폰트이름 설정해논거 세팅
                  fontSize: 40.0,
                  color: Colors.white,
                  fontWeight: FontWeight.bold),
            ),
            Text(
              "Flutter Developer",
              style: TextStyle(
                  fontFamily: 'Source Sans Pro',
                  // pubspec.yaml 에 폰트이름 설정해논거 세팅
                  fontSize: 20.0,
                  color: Colors.teal.shade100,
                  letterSpacing: 2.5,
                  fontWeight: FontWeight.bold),
            ),
            Padding(
              padding: const EdgeInsets.all(8.0),
              child: Card(
                color: Colors.white,
                margin: EdgeInsets.symmetric(vertical: 10.0, horizontal: 25.0),
                child: Row(
                  children: <Widget>[
                    Icon(
                      Icons.phone,
                      color: Colors.teal,
                    ),
                    SizedBox(
                      width: 10.0,
                    ),
                    Text(
                      '010-1234-5678',
                      style: TextStyle(
                        color: Colors.teal.shade900,
                        fontFamily: 'Source Sans Pro',
                        fontSize: 20.0,
                      ),
                    ),
                  ],
                ),
              ),
            ),
            Card(
              color: Colors.white,
              margin: EdgeInsets.symmetric(vertical: 10.0, horizontal: 25.0),
              child: Row(
                children: <Widget>[
                  Icon(
                    Icons.email,
                    color: Colors.teal,
                  ),
                  SizedBox(
                    width: 10.0,
                  ),
                  Text(
                    'mtjin@github.com',
                    style: TextStyle(
                        fontSize: 20.0,
                        color: Colors.teal.shade900,
                        fontFamily: 'Source Sans Pro'),
                  ),
                ],
              ),
            )
          ],
        )),
      ),
    );
  }
}
ListTile 클래스에 대해서도 배웠습니다.
A single fixed-height row that typically contains some text as well as a leading or trailing icon.
이것을 사용해 Card에서 쉽게 아이콘과 글자 혼합 디자인을 구현할 수 있습니다. 또한 이 위젯을 사용하면 이전 Card 에 패딩과 잡다한 코드를 사용하는 것보다 훨씬 이해하기 쉬운 위젯이고 코드 관리에도 도움이 된다는 것을 알 수 있습니다.
https://api.flutter.dev/flutter/material/ListTile-class.html
ListTile class - material library - Dart API
A single fixed-height row that typically contains some text as well as a leading or trailing icon. A list tile contains one to three lines of text optionally flanked by icons or other widgets, such as check boxes. The icons (or other widgets) for the tile
api.flutter.dev
추가로 구분선을 짓기 위해 SizedBox + Divder 를 사용하는 방법도 배웠는데 코드에 주석했으니 참고하면 바로 이해가 갈 것 입니다. (가운데 정렬도 했습니다.)
import 'package:flutter/material.dart';

void main() {
  runApp(MyApp());
}

class MyApp extends StatelessWidget {
  const MyApp({Key key}) : super(key: key);

  @override
  Widget build(BuildContext context) {
    return MaterialApp(
      home: Scaffold(
        backgroundColor: Colors.teal,
        body: SafeArea(
            child: Column(
          mainAxisAlignment: MainAxisAlignment.center,
          // Column(main) 기준으로 가운데 정렬
          children: <Widget>[
            CircleAvatar(
              radius: 50.0,
              backgroundImage: AssetImage('images/profile.jpg'),
            ),
            Text(
              "JackJackE",
              style: TextStyle(
                  fontFamily: 'Pacifico', // pubspec.yaml 에 폰트이름 설정해논거 세팅
                  fontSize: 40.0,
                  color: Colors.white,
                  fontWeight: FontWeight.bold),
            ),
            SizedBox(
              // Divider 를 사용하여 쉽게 구분선을 추가
              height: 20.0,
              width: 150.0,
              child: Divider(
                color: Colors.teal.shade100,
              ),
            ),
            Text(
              "Flutter Developer",
              style: TextStyle(
                  fontFamily: 'Source Sans Pro',
                  // pubspec.yaml 에 폰트이름 설정해논거 세팅
                  fontSize: 20.0,
                  color: Colors.teal.shade100,
                  letterSpacing: 2.5,
                  fontWeight: FontWeight.bold),
            ),
            Card(
              color: Colors.white,
              margin: EdgeInsets.symmetric(vertical: 10.0, horizontal: 25.0),
              child: ListTile(
                leading: Icon(
                  Icons.phone,
                  color: Colors.teal,
                ),
                title: Text(
                  '010-1234-5678',
                  style: TextStyle(
                      fontSize: 20.0,
                      color: Colors.teal.shade900,
                      fontFamily: 'Source Sans Pro'),
                ),
              ),
            ),
            Card(
              color: Colors.white,
              margin: EdgeInsets.symmetric(vertical: 10.0, horizontal: 25.0),
              child: ListTile(
                leading: Icon(
                  Icons.email,
                  color: Colors.teal,
                ),
                title: Text(
                  'mtjin@github.com',
                  style: TextStyle(
                      fontSize: 20.0,
                      color: Colors.teal.shade900,
                      fontFamily: 'Source Sans Pro'),
                ),
              ),
            )
          ],
        )),
      ),
    );
  }
}
이상 플러터 섹션 6 학습을 마쳤습니다.
How to Build Beautiful UIs with Flutter Widgets
챕터의 주제대로 다양한 위젯을 사용하고 마진, 패딩, 정렬 같은 디자인의 기본 요소들을 배울 수 있는 시간이 었습니다.

댓글과 공감은 큰 힘이 됩니다. 감사합니다. !!!
[다음 학습]
https://youngest-programming.tistory.com/617
[Flutter] Udemy 플러터 강의 섹션 7 학습 (Dicee - Building Apps with State)
플러터에 대해 조금씩 학습하고 있습니다. 최근에는 연수때문에 시간이 부족하여 섹션 6 학습을 오늘 끝냈습니다. 앞으로도 안드로이드와 함께 조금씩 학습할 예정입니다. 다만 이 섹션부터는
youngest-programming.tistory.com
'플러터(Flutter) & Dart' 카테고리의 다른 글
| [Flutter] 플러터 폰트 적용 안 되는 에러 (4) | 2021.09.10 |
|---|---|
| [플러터] Flutter 참고하면 좋은 사이트 모음 (0) | 2021.08.24 |
| [Flutter] Udemy 플러터 강의 섹션 5 학습 (I Am Poor - App Challenge) (4) | 2021.08.17 |
| [Flutter] Udemy 플러터 강의 섹션 4 학습 (Running Your App on a Physical Device) (0) | 2021.08.17 |
| [Flutter] Udemy 플러터 강의 섹션 3 학습 (I Am Rich - How to Create Flutter Apps FromScratch) (0) | 2021.08.14 |
