
| 일 | 월 | 화 | 수 | 목 | 금 | 토 |
|---|---|---|---|---|---|---|
| 1 | ||||||
| 2 | 3 | 4 | 5 | 6 | 7 | 8 |
| 9 | 10 | 11 | 12 | 13 | 14 | 15 |
| 16 | 17 | 18 | 19 | 20 | 21 | 22 |
| 23 | 24 | 25 | 26 | 27 | 28 | 29 |
| 30 |
- 막내의막무가내 플러터 flutter
- 안드로이드 Sunflower 스터디
- 막내의막무가내
- 막내의막무가내 코볼 COBOL
- 2022년 6월 일상
- 막내의막무가내 플러터
- 부스트코스
- 막무가내
- 막내의막무가내 알고리즘
- 막내의막무가내 프로그래밍
- 막내의 막무가내
- 막내의막무가내 일상
- 프로그래머스 알고리즘
- flutter network call
- 막내의막무가내 코틀린 안드로이드
- 안드로이드 sunflower
- 막내의막무가내 안드로이드 코틀린
- 주엽역 생활맥주
- 막내의막무가내 안드로이드 에러 해결
- 막내의막무가내 안드로이드
- 막내의막무가내 코틀린
- 막내의막무가내 회고 및 목표
- 막내의막무가내 목표 및 회고
- 막내의막무가내 SQL
- 막내의막무가내 rxjava
- 막내의 막무가내 알고리즘
- 프래그먼트
- Fragment
- 안드로이드
- 부스트코스에이스
- Today
- Total
막내의 막무가내 프로그래밍 & 일상
[Flutter] Udemy 플러터 강의 섹션 12 학습 (BMI Calculator - Building Flutter for intermediates) 본문
[Flutter] Udemy 플러터 강의 섹션 12 학습 (BMI Calculator - Building Flutter for intermediates)
막무가내막내 2022. 4. 4. 15:16
[이전학습]
https://youngest-programming.tistory.com/682
[Flutter] Udemy 플러터 강의 섹션 11 학습 (섹션 11: Boss Level Challenge 2 - Destini)
[이전학습] https://youngest-programming.tistory.com/624 [Flutter] Udemy 플러터 강의 섹션 10 학습 (섹션 10: Quizzler -Modularising & Organising FlutterCode) [이전학습] https://youngest-programming.t..
youngest-programming.tistory.com
[참고]
https://www.udemy.com/course/flutter-bootcamp-with-dart/
The Complete 2021 Flutter Development Bootcamp with Dart
Officially created in collaboration with the Google Flutter team.
www.udemy.com
https://github.com/mtjin/flutter-practice
GitHub - mtjin/flutter-practice: Learning About Flutter (플러터 공부)
Learning About Flutter (플러터 공부). Contribute to mtjin/flutter-practice development by creating an account on GitHub.
github.com
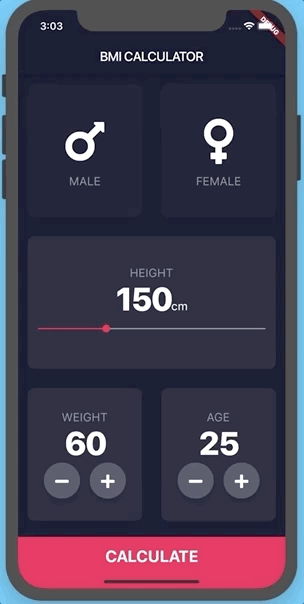
[121. BMI Calculator - A Beautiful Health App]
BMI 계산기 앱을 만들거다.
커스텀 위젯을 만들어보고 UI를 더 깊이 알아보는 강의가 될 것 이다.
[122. How to Use Flutter Themes]
안드로이드에서 Theme를 사용하는 것 처럼 플러터에도 Theme가 있고 ThemeData 클래스를 사용하면된다.
기본적인 테마를 잘 설정하면 기본속성들에 대한 모듈화가 되고 추가 코드도 필요 없어지므로 개발이 편리해진다.
class BMICalculator extends StatelessWidget {
  @override
  Widget build(BuildContext context) {
    return MaterialApp(
      theme: ThemeData(
          primaryColor: Color(0xFF0A0E21),
          scaffoldBackgroundColor: Color(0xFF0A0E21),
          accentColor: Colors.purple,
          textTheme: TextTheme(
              bodyText2: TextStyle(
            color: Colors.white,
          ))),
      home: InputPage(),
    );
  }
}
이렇게 내가 커스텀으로 테마를 설정할 수 있다.
class BMICalculator extends StatelessWidget {
  @override
  Widget build(BuildContext context) {
    return MaterialApp(
      theme: ThemeData.dark().copyWith(
        primaryColor: Color(0xFF0A0E21),
        scaffoldBackgroundColor: Color(0xFF0A0E21),
      ),
      home: InputPage(),
    );
  }
}
그리고 copyWith() 를 사용하여 기존의 다크테마를 기반으로 부분 커스텀도 가능하다.
import 'package:flutter/material.dart';

import 'input_page.dart';

void main() => runApp(BMICalculator());

class BMICalculator extends StatelessWidget {
  @override
  Widget build(BuildContext context) {
    return MaterialApp(
      theme: ThemeData.dark().copyWith(
        primaryColor: Color(0xFF0A0E21),
        scaffoldBackgroundColor: Color(0xFF0A0E21),
      ),
      home: InputPage(),
    );
  }
}
import 'package:flutter/material.dart';
class InputPage extends StatefulWidget {
@override
_InputPageState createState() => _InputPageState();
}
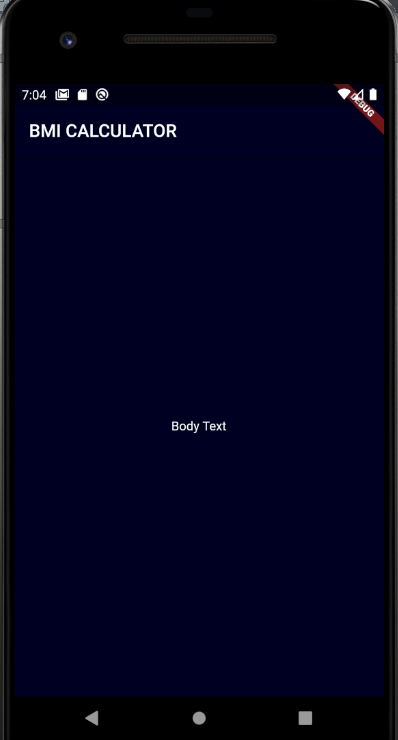
class _InputPageState extends State<InputPage> {
@override
Widget build(BuildContext context) {
return Scaffold(
appBar: AppBar(
title: Text('BMI CALCULATOR'),
),
body: Center(
child: Text('Body Text'),
),
);
}
}그리고 input_page 코드를 main과 분리하였다.
[123. How to Refactor Flutter Widgets]
import 'package:flutter/material.dart';

class InputPage extends StatefulWidget {
  @override
  _InputPageState createState() => _InputPageState();
}

class _InputPageState extends State<InputPage> {
  @override
  Widget build(BuildContext context) {
    return Scaffold(
        appBar: AppBar(
          title: Text('BMI CALCULATOR'),
        ),
        body: Column(
          children: <Widget>[
            Expanded(
                child: Row(
              children: <Widget>[
                Expanded(
                    child: Container(
                  margin: EdgeInsets.all(15.0),
                  decoration: BoxDecoration(
                      color: Color(0xFF1D1E33),
                      borderRadius: BorderRadius.circular(10.0)),
                )),
                Expanded(
                    child: Container(
                  margin: EdgeInsets.all(15.0),
                  decoration: BoxDecoration(
                      color: Color(0xFF1D1E33),
                      borderRadius: BorderRadius.circular(10.0)),
                ))
              ],
            )),
            Expanded(
                child: Container(
              margin: EdgeInsets.all(15.0),
              decoration: BoxDecoration(
                  color: Color(0xFF1D1E33),
                  borderRadius: BorderRadius.circular(10.0)),
            )),
            Expanded(
                child: Row(
              children: <Widget>[
                Expanded(
                    child: Container(
                  margin: EdgeInsets.all(15.0),
                  decoration: BoxDecoration(
                      color: Color(0xFF1D1E33),
                      borderRadius: BorderRadius.circular(10.0)),
                )),
                Expanded(
                    child: Container(
                  margin: EdgeInsets.all(15.0),
                  decoration: BoxDecoration(
                      color: Color(0xFF1D1E33),
                      borderRadius: BorderRadius.circular(10.0)),
                ))
              ],
            )),
          ],
        ));
  }
}
먼저 샘플 앱 디자인 틀대로 위젯을 구현해주었다.
안드로이드로 따지면 카드뷰 같은 둥근 위젯을 구현할떄 BoxDecoration을 사용한다.
그런데 중복되는 Container 코드가 너무 많다. 리펙토링이 필요하다.
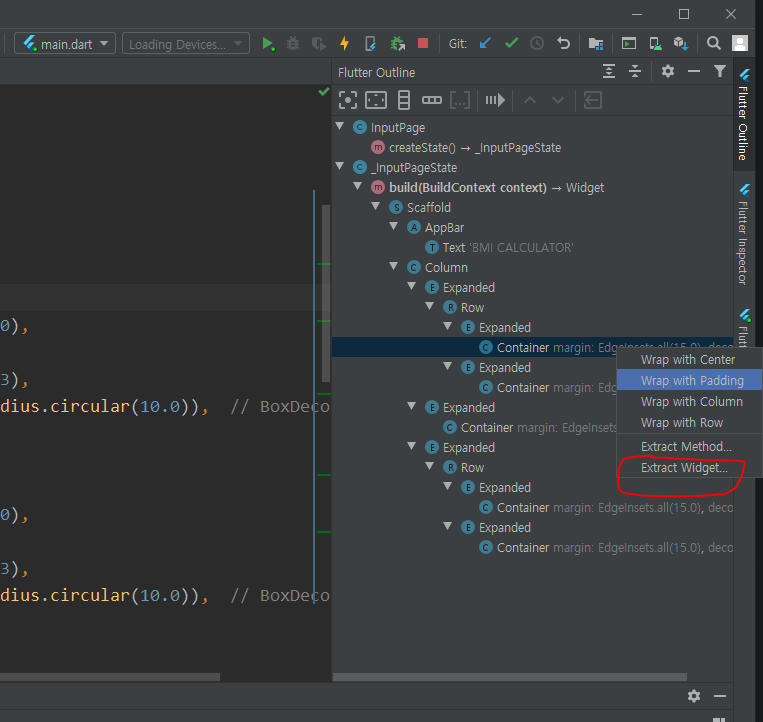
위와 같이 하면 된다.
import 'package:flutter/material.dart';

class InputPage extends StatefulWidget {
  @override
  _InputPageState createState() => _InputPageState();
}

class _InputPageState extends State<InputPage> {
  @override
  Widget build(BuildContext context) {
    return Scaffold(
        appBar: AppBar(
          title: Text('BMI CALCULATOR'),
        ),
        body: Column(
          children: <Widget>[
            Expanded(
                child: Row(
              children: <Widget>[
                Expanded(child: ReusableCard()),
                Expanded(child: ReusableCard())
              ],
            )),
            Expanded(child: ReusableCard()),
            Expanded(
                child: Row(
              children: <Widget>[
                Expanded(child: ReusableCard()),
                Expanded(child: ReusableCard())
              ],
            )),
          ],
        ));
  }
}

class ReusableCard extends StatelessWidget {
  const ReusableCard({
    Key key,
  }) : super(key: key);

  @override
  Widget build(BuildContext context) {
    return Container(
      margin: EdgeInsets.all(15.0),
      decoration: BoxDecoration(
          color: Color(0xFF1D1E33), borderRadius: BorderRadius.circular(10.0)),
    );
  }
}
ReusableCard라는 이름으로 리펙토링하였다.
class ReusableCard extends StatelessWidget {
  // @required로 색상값 매개변수 필요하다고 알려줌 (린트로 잡힘)
  ReusableCard({@required this.colour});

  Color colour;

  @override
  Widget build(BuildContext context) {
    return Container(
      margin: EdgeInsets.all(15.0),
      decoration: BoxDecoration(
          // 생성자로 받은 컬러 사용
          color: colour,
          borderRadius: BorderRadius.circular(10.0)),
    );
  }
}
Expanded(
child: ReusableCard(
colour: Color(0xFF1D1E33),
))그리고 ReusableCard 클래스에서 색상변경을 위한 생성자를 커스텀해주었다.
@required 키워드에 대해서도 배웠다. 이거를 설정안하면 사용하는 곳에서 color 매개변수를 안넣어도 린트오류표시가 안뜬다...

그리고 stateless한 클래스에 불변적인 속성만 들어가는게 보통 원칙이라서 클래스에 린트표시가 된다.
class ReusableCard extends StatelessWidget {
  // @required로 색상값 매개변수 필요하다고 알려줌 (린트로 잡힘)
  ReusableCard({@required this.colour});

  final Color colour;
그래서 Color colour에 final로 해주도록 한다.

[124. [Dart] Final vs. Const]
Final 과 Const 의 차이점에 대해 알아봤다.
우선 둘의 공통점은 불변(immutable)의 성질을 가지고 있어 선언한 값을 변경할 수 없다.
차이점은 const 는 컴파일 타임에 상수를 설정하고 final 은 런타임시에 결정되는 값도 상수로 설정할 수 있다는 점이다.
main() {
	// error const 는 실행시에 결정되는 값을 설정할 수 없다. 정해진 값만 가능하다.
	const DateTime now1 = new DateTime.now();
    // final 은 실행시에 결정되는 값도 설정할 수 있다.
	final DateTime nw = new DateTime.now();
}
출처: https://skymin2.tistory.com/52 [생계형 개발자]
배운내용을 바탕으로 코드를 리펙토링 해주었다.
import 'package:flutter/material.dart';

const bottomContainerHeight = 80.0;
const activeCardColour = Color(0xFF1D1E33);
const bottomContainerColour = Color(0xFFEB1555);

class InputPage extends StatefulWidget {
  @override
  _InputPageState createState() => _InputPageState();
}

class _InputPageState extends State<InputPage> {
  @override
  Widget build(BuildContext context) {
    return Scaffold(
        appBar: AppBar(
          title: Text('BMI CALCULATOR'),
        ),
        body: Column(
          children: <Widget>[
            Expanded(
                child: Row(
              children: <Widget>[
                Expanded(
                    child: ReusableCard(
                  colour: activeCardColour,
                )),
                Expanded(
                    child: ReusableCard(
                  colour: activeCardColour,
                ))
              ],
            )),
            Expanded(
                child: ReusableCard(
              colour: activeCardColour,
            )),
            Expanded(
                child: Row(
              children: <Widget>[
                Expanded(
                    child: ReusableCard(
                  colour: activeCardColour,
                )),
                Expanded(
                    child: ReusableCard(
                  colour: activeCardColour,
                ))
              ],
            )),
            Container(
              color: bottomContainerColour,
              margin: EdgeInsets.only(top: 10.0),
              width: double.infinity,
              height: bottomContainerHeight,
            )
          ],
        ));
  }
}

class ReusableCard extends StatelessWidget {
  // @required로 색상값 매개변수 필요하다고 알려줌 (린트로 잡힘)
  ReusableCard({@required this.colour});

  final Color colour;

  @override
  Widget build(BuildContext context) {
    return Container(
      margin: EdgeInsets.all(15.0),
      decoration: BoxDecoration(
          // 생성자로 받은 컬러 사용
          color: colour,
          borderRadius: BorderRadius.circular(10.0)),
    );
  }
}

[125. Creating Custom Flutter Widgets]
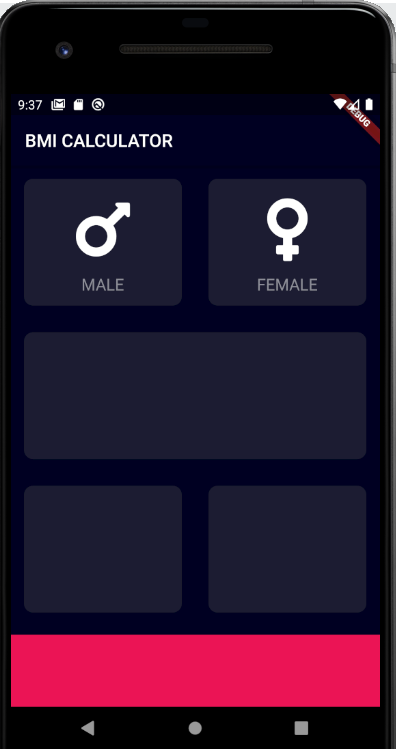
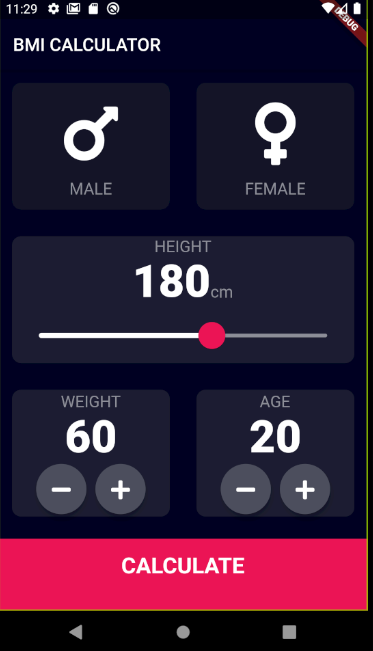
가장 상단 두개의 남/녀 위젯을 구현했다.
이것도 124에서 했던것처럼 공통적인 부분이 많아 위젯을 모듈화 시켰다.
그리고 필요한 UI 요소를 위해
yaml파일에 font_awesome_flutter 디펜던시를 추가해줬다.
dependencies:
  flutter:
    sdk: flutter

  cupertino_icons: ^0.1.2
  font_awesome_flutter: ^8.4.0
기존 ReusableCard 위젯 클래스에 이 안에 위젯을 하나 더 담기위해 cardChild 위젯속성을 추가했다.
import 'package:flutter/material.dart';

class ReusableCard extends StatelessWidget {
  // @required로 색상값 매개변수 필요하다고 알려줌 (린트로 잡힘)
  ReusableCard({@required this.colour, this.cardChild});

  final Color colour;
  final Widget cardChild;

  @override
  Widget build(BuildContext context) {
    return Container(
      child: cardChild,
      margin: EdgeInsets.all(15.0),
      decoration: BoxDecoration(
          // 생성자로 받은 컬러 사용
          color: colour,
          borderRadius: BorderRadius.circular(10.0)),
    );
  }
}
cardChild 에 담을 아이콘과 텍스트가 위아래로 들어갈 공통 위젯 클래스 IconContent를 만들었다.
import 'package:flutter/material.dart';

const labelTextStyle = TextStyle(
  fontSize: 18.0,
  color: Color(0xFF8D8E98),
);

class IconContent extends StatelessWidget {
  IconContent({this.icon, this.label});

  final IconData icon;
  final String label;

  @override
  Widget build(BuildContext context) {
    return Column(
      mainAxisAlignment: MainAxisAlignment.center,
      children: <Widget>[
        Icon(
          icon,
          size: 80.0,
        ),
        SizedBox(
          height: 15.0,
        ),
        Text(
          label,
          style: labelTextStyle,
        )
      ],
    );
  }
}
메인에서 모듈화한거 사용
import 'package:flutter/material.dart';
import 'package:font_awesome_flutter/font_awesome_flutter.dart';

import 'icon_content.dart';
import 'reusable_card.dart';

const bottomContainerHeight = 80.0;
const activeCardColour = Color(0xFF1D1E33);
const bottomContainerColour = Color(0xFFEB1555);

class InputPage extends StatefulWidget {
  @override
  _InputPageState createState() => _InputPageState();
}

class _InputPageState extends State<InputPage> {
  @override
  Widget build(BuildContext context) {
    return Scaffold(
        appBar: AppBar(
          title: Text('BMI CALCULATOR'),
        ),
        body: Column(
          children: <Widget>[
            Expanded(
                child: Row(
              children: <Widget>[
                Expanded(
                    child: ReusableCard(
                  colour: activeCardColour,
                  cardChild: IconContent(
                    icon: FontAwesomeIcons.mars,
                    label: 'MALE',
                  ),
                )),
                Expanded(
                    child: ReusableCard(
                        colour: activeCardColour,
                        cardChild: IconContent(
                          icon: FontAwesomeIcons.venus,
                          label: 'FEMALE',
                        )))
              ],
            )),
            Expanded(
                child: ReusableCard(
              colour: activeCardColour,
            )),
            Expanded(
                child: Row(
              children: <Widget>[
                Expanded(
                    child: ReusableCard(
                  colour: activeCardColour,
                )),
                Expanded(
                    child: ReusableCard(
                  colour: activeCardColour,
                ))
              ],
            )),
            Container(
              color: bottomContainerColour,
              margin: EdgeInsets.only(top: 10.0),
              width: double.infinity,
              height: bottomContainerHeight,
            )
          ],
        ));
  }
}
참고로 핫리로드로는 아이콘이 안뜬다. 재실행을 해줘야함!
[126. The GestureDetector Widget]
GestureDetector 위젯을 사용해서 onTap 이벤트를 통해 남/녀 버튼을 눌렀을때 색상이 변하는 로직을 구현하였다.
import 'package:flutter/material.dart';
import 'package:font_awesome_flutter/font_awesome_flutter.dart';

import 'icon_content.dart';
import 'reusable_card.dart';

const bottomContainerHeight = 80.0;
const activeCardColour = Color(0xFF1D1E33);
const inactiveCardColour = Color(0xFF111328);
const bottomContainerColour = Color(0xFFEB1555);

class InputPage extends StatefulWidget {
  @override
  _InputPageState createState() => _InputPageState();
}

class _InputPageState extends State<InputPage> {
  Color maleCardColour = inactiveCardColour;
  Color femaleCardColour = inactiveCardColour;

  // 1 = male, 2= female
  void updateColour(int gender) {
    // male card pressed
    if (gender == 1) {
      if (maleCardColour == inactiveCardColour) {
        maleCardColour = activeCardColour;
        femaleCardColour = inactiveCardColour;
      } else {
        maleCardColour = inactiveCardColour;
      }
    }
    if (gender == 2) {
      if (femaleCardColour == inactiveCardColour) {
        femaleCardColour = activeCardColour;
        maleCardColour = inactiveCardColour;
      } else {
        femaleCardColour = inactiveCardColour;
      }
    }
  }

  @override
  Widget build(BuildContext context) {
    return Scaffold(
        appBar: AppBar(
          title: Text('BMI CALCULATOR'),
        ),
        body: Column(
          children: <Widget>[
            Expanded(
                child: Row(
              children: <Widget>[
                Expanded(
                    child: GestureDetector(
                  onTap: () {
                    setState(() {
                      updateColour(1);
                    });
                  },
                  child: ReusableCard(
                    colour: maleCardColour,
                    cardChild: IconContent(
                      icon: FontAwesomeIcons.mars,
                      label: 'MALE',
                    ),
                  ),
                )),
                Expanded(
                    child: GestureDetector(
                  onTap: () {
                    setState(() {
                      updateColour(2);
                    });
                  },
                  child: ReusableCard(
                      colour: femaleCardColour,
                      cardChild: IconContent(
                        icon: FontAwesomeIcons.venus,
                        label: 'FEMALE',
                      )),
                ))
              ],
            )),
            Expanded(
                child: ReusableCard(
              colour: activeCardColour,
            )),
            Expanded(
                child: Row(
              children: <Widget>[
                Expanded(
                    child: ReusableCard(
                  colour: activeCardColour,
                )),
                Expanded(
                    child: ReusableCard(
                  colour: activeCardColour,
                ))
              ],
            )),
            Container(
              color: bottomContainerColour,
              margin: EdgeInsets.only(top: 10.0),
              width: double.infinity,
              height: bottomContainerHeight,
            )
          ],
        ));
  }
}
[127. [Dart] Enums]
Enum에 대해 배웠다.
Enum은 숫자로 표현하던 것들을 사람이 이해하기 쉽게 선언해줄 수 있어 코드 가독성이 좋아진다는 장점이 있다.
기존의 1, 2 로 male , female로 구분했던 것을 Enum을 통해 가독성을 높여줬다.
import 'package:flutter/material.dart';
import 'package:font_awesome_flutter/font_awesome_flutter.dart';

import 'icon_content.dart';
import 'reusable_card.dart';

const bottomContainerHeight = 80.0;
const activeCardColour = Color(0xFF1D1E33);
const inactiveCardColour = Color(0xFF111328);
const bottomContainerColour = Color(0xFFEB1555);

enum Gender { male, female }

class InputPage extends StatefulWidget {
  @override
  _InputPageState createState() => _InputPageState();
}

class _InputPageState extends State<InputPage> {
  Color maleCardColour = inactiveCardColour;
  Color femaleCardColour = inactiveCardColour;

  // 1 = male, 2= female
  void updateColour(Gender selectedGender) {
    // male card pressed
    if (selectedGender == Gender.male) {
      if (maleCardColour == inactiveCardColour) {
        maleCardColour = activeCardColour;
        femaleCardColour = inactiveCardColour;
      } else {
        maleCardColour = inactiveCardColour;
      }
    }
    if (selectedGender == Gender.female) {
      if (femaleCardColour == inactiveCardColour) {
        femaleCardColour = activeCardColour;
        maleCardColour = inactiveCardColour;
      } else {
        femaleCardColour = inactiveCardColour;
      }
    }
  }

  @override
  Widget build(BuildContext context) {
    return Scaffold(
        appBar: AppBar(
          title: Text('BMI CALCULATOR'),
        ),
        body: Column(
          children: <Widget>[
            Expanded(
                child: Row(
              children: <Widget>[
                Expanded(
                    child: GestureDetector(
                  onTap: () {
                    setState(() {
                      updateColour(Gender.male);
                    });
                  },
                  child: ReusableCard(
                    colour: maleCardColour,
                    cardChild: IconContent(
                      icon: FontAwesomeIcons.mars,
                      label: 'MALE',
                    ),
                  ),
                )),
                Expanded(
                    child: GestureDetector(
                  onTap: () {
                    setState(() {
                      updateColour(Gender.female);
                    });
                  },
                  child: ReusableCard(
                      colour: femaleCardColour,
                      cardChild: IconContent(
                        icon: FontAwesomeIcons.venus,
                        label: 'FEMALE',
                      )),
                ))
              ],
            )),
            Expanded(
                child: ReusableCard(
              colour: activeCardColour,
            )),
            Expanded(
                child: Row(
              children: <Widget>[
                Expanded(
                    child: ReusableCard(
                  colour: activeCardColour,
                )),
                Expanded(
                    child: ReusableCard(
                  colour: activeCardColour,
                ))
              ],
            )),
            Container(
              color: bottomContainerColour,
              margin: EdgeInsets.only(top: 10.0),
              width: double.infinity,
              height: bottomContainerHeight,
            )
          ],
        ));
  }
}
[128. [Dart] Ternary Operator]
3항 연산자에 대해 배웠다.
기존의 if else 문으로 분기처리하던것을 리펙토링하였다.
body: Column(
          children: <Widget>[
            Expanded(
                child: Row(
              children: <Widget>[
                Expanded(
                    child: GestureDetector(
                  onTap: () {
                    setState(() {
                      selectedGender = Gender.male;
                    });
                  },
                  child: ReusableCard(
                    colour: selectedGender == Gender.male
                        ? activeCardColour
                        : inactiveCardColour,
                    cardChild: IconContent(
                      icon: FontAwesomeIcons.mars,
                      label: 'MALE',
                    ),
                  ),
                )),
[129. [Dart] Functions as First Order Objects]
Function 객체에 대해 배웠다. 플러터는 함수형언어이기도 해서 함수도 변수처럼 할당할 수가 있다.
함수를 담을 수 있다.
기존의 GestureDector 클래스를 ReusableCard 커스텀 위젯에 넣어주고 생성자를 통해 메인에서 불러오게끔 리펙토링을 하였다.
플러터에서 위젯에 콜백을 구현한거같은데 되게 쉽게 구현할 수 있었다.
import 'package:flutter/material.dart';

class ReusableCard extends StatelessWidget {
  // @required로 색상값 매개변수 필요하다고 알려줌 (린트로 잡힘)
  ReusableCard({@required this.colour, this.cardChild, this.onPress});

  final Color colour;
  final Widget cardChild;
  final Function onPress;

  @override
  Widget build(BuildContext context) {
      return GestureDetector(
      onTap: onPress,
      child: Container(
        child: cardChild,
        margin: EdgeInsets.all(15.0),
        decoration: BoxDecoration(
            // 생성자로 받은 컬러 사용
            color: colour,
            borderRadius: BorderRadius.circular(10.0)),
      ),
    );
  }
}
body: Column(
children: <Widget>[
Expanded(
child: Row(
children: <Widget>[
Expanded(
child: ReusableCard(
onPress: () {
setState(() {
selectedGender = Gender.male;
});
},
colour: selectedGender == Gender.male
? activeCardColour
: inactiveCardColour,
cardChild: IconContent(
icon: FontAwesomeIcons.mars,
label: 'MALE',
),
)),
Expanded(
child: ReusableCard(
onPress: () {
setState(() {
selectedGender = Gender.female;
});
},
colour: selectedGender == Gender.female
? activeCardColour
: inactiveCardColour,
cardChild: IconContent(
icon: FontAwesomeIcons.venus,
label: 'FEMALE',
)))
],
[130. The Flutter Slider Widget]
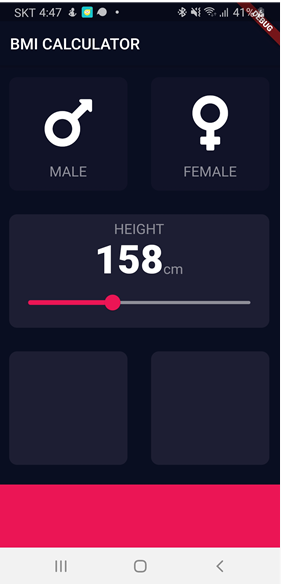
Slider Widget 사용법에 대해 배웠다.
https://api.flutter.dev/flutter/material/Slider-class.html
Slider class - material library - Dart API
A Material Design slider. Used to select from a range of values. The Sliders value is part of the Stateful widget subclass to change the value setState was called. To create a local project with this code sample, run: flutter create --sample=material.Slide
api.flutter.dev
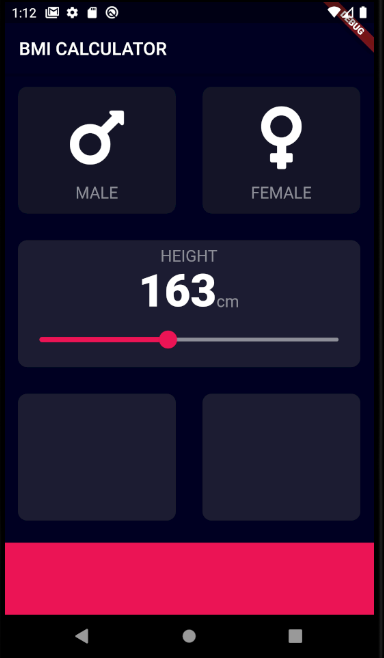
Expanded(
                child: ReusableCard(
              colour: kActiveCardColour,
              cardChild: Column(
                mainAxisAlignment: MainAxisAlignment.center,
                children: <Widget>[
                  Text(
                    "HEIGHT",
                    style: kLabelTextStyle,
                  ),
                  Row(
                    mainAxisAlignment: MainAxisAlignment.center,
                    crossAxisAlignment: CrossAxisAlignment.baseline,
                    textBaseline: TextBaseline.alphabetic,
                    children: <Widget>[
                      Text(height.toString(), style: kNumberTextStyle),
                      Text(
                        'cm',
                        style: kLabelTextStyle,
                      )
                    ],
                  ),
                  Slider(
                    value: height.toDouble(),
                    min: 120.0,
                    max: 220.0,
                    activeColor: Color(0xFFEB1555),
                    inactiveColor: Color(0xFF8D8E98),
                    onChanged: (double newValue) {
                      setState(() {
                        height = newValue.round();
                      });
                    },
                  )
                ],
              ),
            )),
그리고 상수는 다음과 같이 상수파일을 따로 만들어 관리하면 편리하고 앞에 k를 붙이는 컨벤션이 좋다고 한다. (구글에서도 전역적으로 사용하는 상수를 앞에 k를 붙여서 함께 검색하기 좋다)
import 'package:flutter/material.dart';

const kBottomContainerHeight = 80.0;
const kActiveCardColour = Color(0xFF1D1E33);
const kInactiveCardColour = Color(0xFF111328);
const kBottomContainerColour = Color(0xFFEB1555);

const kLabelTextStyle = TextStyle(
  fontSize: 18.0,
  color: Color(0xFF8D8E98),
);

const kNumberTextStyle = TextStyle(
  fontSize: 50.0,
  fontWeight: FontWeight.w900,
);
[131. Customising Widgets with Themes]
SliderTheme에 대해 배웠다.
SliderTheme(
                    data: SliderTheme.of(context).copyWith(
                        inactiveTrackColor: Color(0xFF8D8E98),
                        activeTrackColor: Colors.white,
                        overlayColor: Color(0xFFEB1555),
                        thumbColor: Color(0x29EB1555),
                        thumbShape:
                            RoundSliderThumbShape(enabledThumbRadius: 15.0),
                        overlayShape:
                            RoundSliderOverlayShape(overlayRadius: 30.0)),
                    child: Slider(
                      value: height.toDouble(),
                      min: 120.0,
                      max: 220.0,
                      onChanged: (double newValue) {
                        setState(() {
                          height = newValue.round();
                        });
                      },
                    ),
만약 이 슬라이더 테마를 공통모듈로서 사용하고 싶다면 밑과 같이 메인 MaterialApp()에 넣어주면 된다.
class BMICalculator extends StatelessWidget {
  @override
  Widget build(BuildContext context) {
    return MaterialApp(
      theme: ThemeData.dark().copyWith(
        sliderTheme: SliderTheme.of(context).copyWith(
            activeTrackColor: Colors.white,
            overlayColor: Color(0xFFEB1555),
            thumbColor: Color(0x29EB1555),
            thumbShape:
            RoundSliderThumbShape(enabledThumbRadius: 15.0),
            overlayShape:
            RoundSliderOverlayShape(overlayRadius: 30.0)),,
        primaryColor: Color(0xFF0A0E21),
        scaffoldBackgroundColor: Color(0xFF0A0E21),
      ),
      home: InputPage(),
    );
  }
}
[132. Composition vs. Inheritance - Building Flutter Widgets From Scratch]
클래스 상속을 통해 둥그런 커스텀 아이콘 클래스 위젯을 만들었다. RoundIconButton
import 'package:flutter/cupertino.dart';
import 'package:flutter/material.dart';
import 'package:font_awesome_flutter/font_awesome_flutter.dart';
import 'constants.dart';
import 'icon_content.dart';
import 'reusable_card.dart';
enum Gender { male, female }
class InputPage extends StatefulWidget {
@override
_InputPageState createState() => _InputPageState();
}
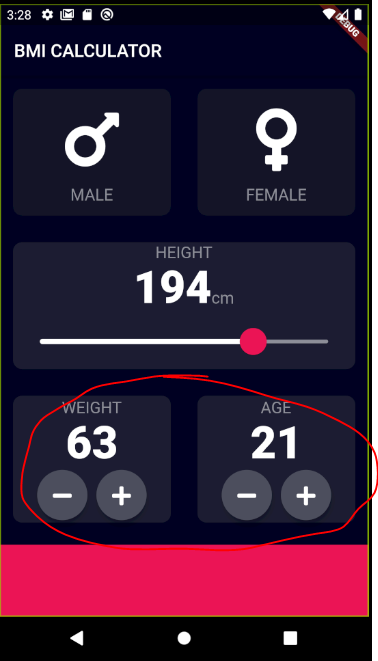
class _InputPageState extends State<InputPage> {
Gender selectedGender;
int height = 180;
int weight = 60;
int age = 20;
@override
Widget build(BuildContext context) {
return Scaffold(
appBar: AppBar(
title: Text('BMI CALCULATOR'),
),
body: Column(
crossAxisAlignment: CrossAxisAlignment.stretch,
children: <Widget>[
Expanded(
child: Row(
children: <Widget>[
Expanded(
child: ReusableCard(
onPress: () {
setState(() {
selectedGender = Gender.male;
});
},
colour: selectedGender == Gender.male
? kActiveCardColour
: kInactiveCardColour,
cardChild: IconContent(
icon: FontAwesomeIcons.mars,
label: 'MALE',
),
)),
Expanded(
child: ReusableCard(
onPress: () {
setState(() {
selectedGender = Gender.female;
});
},
colour: selectedGender == Gender.female
? kActiveCardColour
: kInactiveCardColour,
cardChild: IconContent(
icon: FontAwesomeIcons.venus,
label: 'FEMALE',
)))
],
)),
Expanded(
child: ReusableCard(
colour: kActiveCardColour,
cardChild: Column(
mainAxisAlignment: MainAxisAlignment.center,
children: <Widget>[
Text(
"HEIGHT",
style: kLabelTextStyle,
),
Row(
mainAxisAlignment: MainAxisAlignment.center,
crossAxisAlignment: CrossAxisAlignment.baseline,
textBaseline: TextBaseline.alphabetic,
children: <Widget>[
Text(height.toString(), style: kNumberTextStyle),
Text(
'cm',
style: kLabelTextStyle,
)
],
),
SliderTheme(
data: SliderTheme.of(context).copyWith(
inactiveTrackColor: Color(0xFF8D8E98),
activeTrackColor: Colors.white,
overlayColor: Color(0xFFEB1555),
thumbColor: Color(0xFFEB1555),
thumbShape:
RoundSliderThumbShape(enabledThumbRadius: 15.0),
overlayShape:
RoundSliderOverlayShape(overlayRadius: 30.0)),
child: Slider(
value: height.toDouble(),
min: 120.0,
max: 220.0,
onChanged: (double newValue) {
setState(() {
height = newValue.round();
});
},
),
)
],
),
)),
Expanded(
child: Row(
children: <Widget>[
Expanded(
child: ReusableCard(
colour: kActiveCardColour,
cardChild: Column(
mainAxisAlignment: MainAxisAlignment.center,
children: <Widget>[
Text(
'WEIGHT',
style: kLabelTextStyle,
),
Text(
weight.toString(),
style: kNumberTextStyle,
),
Row(
mainAxisAlignment: MainAxisAlignment.center,
children: [
RoundIconButton(
icon: FontAwesomeIcons.minus,
onPressed: () {
setState(() {
weight--;
});
},
),
SizedBox(
width: 10.0,
),
RoundIconButton(
icon: FontAwesomeIcons.plus,
onPressed: () {
setState(() {
weight++;
});
},
),
],
)
],
),
)),
Expanded(
child: ReusableCard(
colour: kActiveCardColour,
cardChild: Column(
mainAxisAlignment: MainAxisAlignment.center,
children: <Widget>[
Text(
'AGE',
style: kLabelTextStyle,
),
Text(
age.toString(),
style: kNumberTextStyle,
),
Row(
mainAxisAlignment: MainAxisAlignment.center,
children: [
RoundIconButton(
icon: FontAwesomeIcons.minus,
onPressed: () {
setState(() {
age--;
});
},
),
SizedBox(
width: 10.0,
),
RoundIconButton(
icon: FontAwesomeIcons.plus,
onPressed: () {
setState(() {
age++;
});
},
),
],
)
],
),
))
],
)),
Container(
color: kBottomContainerColour,
margin: EdgeInsets.only(top: 10.0),
width: double.infinity,
height: kBottomContainerHeight,
)
],
));
}
}
class RoundIconButton extends StatelessWidget {
RoundIconButton({@required this.icon, @required this.onPressed});
final IconData icon;
final Function onPressed;
@override
Widget build(BuildContext context) {
return RawMaterialButton(
child: Icon(icon),
onPressed: onPressed,
elevation: 6.0,
constraints: BoxConstraints.tightFor(
width: 56.0,
height: 56.0,
),
shape: CircleBorder(),
fillColor: Color(0xFF4C4F5E),
);
}
}
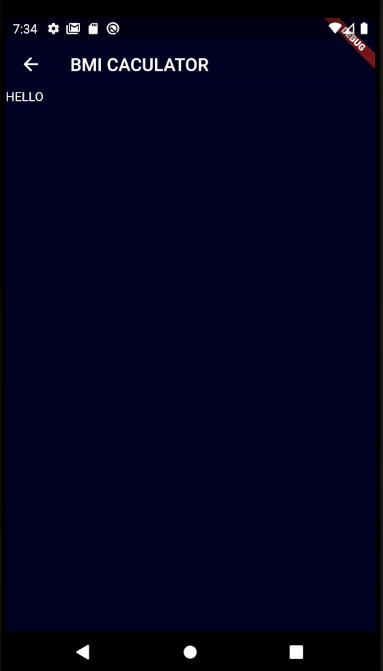
[133. Multi-Screen Apps Using Routes and Navigation]
화면을 이동하는 방법에 대해 배웠다.
이동할 화면을 먼저 만들어줬다.
import 'package:flutter/material.dart';

class ResultsPage extends StatelessWidget {
  const ResultsPage({Key key}) : super(key: key);

  @override
  Widget build(BuildContext context) {
    return Scaffold(
      appBar: AppBar(
        title: Text('BMI CACULATOR'),
      ),
      body: Text('HELLO'),
    );
  }
}
이후 메인에서 가장 하단 빨간색 버튼을 클릭하면 화면이 이동되게끔 구현하였다.
Navigator.push(context,
MaterialPageRoute(builder: (context) => ResultsPage()));
를 사용하면 된다.
GestureDetector(
              onTap: () {
                Navigator.push(context,
                    MaterialPageRoute(builder: (context) => ResultsPage()));
              },
              child: Container(
                child: Text("CALCULATE"),
                color: kBottomContainerColour,
                margin: EdgeInsets.only(top: 10.0),
                width: double.infinity,
                height: kBottomContainerHeight,
              ),
자세한 사항은 다음 참고
https://docs.flutter.dev/cookbook/navigation/navigation-basics
Navigate to a new screen and back
How to navigate between routes.
docs.flutter.dev
[134. [Dart] Maps]
다트 Map 자료구조에 대해 배웠다.
https://api.dart.dev/stable/2.15.1/dart-core/Map-class.html
Map class - dart:core library - Dart API
A collection of key/value pairs, from which you retrieve a value using its associated key. There is a finite number of keys in the map, and each key has exactly one value associated with it. Maps, and their keys and values, can be iterated. The order of it
api.dart.dev
예시
void main() {
   var details = {'Usrname':'tom','Password':'pass@123'};
   details['Uid'] = 'U1oo1';
   print(details);
}
[135. Designing the Result Page]
ReslutPage 디자인을 구현했다.
그리고 앞서배웠지만 Exapnded 위젯에서 flex는 안드로이드로치면 weight 비율을 나타낸다고 보면 된다.
import 'package:bmi_calculator/components/bottom_button.dart';
import 'package:flutter/material.dart';

import '../components/reusable_card.dart';
import '../constants.dart';

class ResultsPage extends StatelessWidget {
  const ResultsPage({Key key}) : super(key: key);

  @override
  Widget build(BuildContext context) {
    return Scaffold(
      appBar: AppBar(
        title: Text('BMI CALCULATOR'),
      ),
      body: Column(
        mainAxisAlignment: MainAxisAlignment.spaceEvenly,
        crossAxisAlignment: CrossAxisAlignment.stretch,
        children: <Widget>[
          Expanded(
              child: Container(
            padding: EdgeInsets.all(15.0),
            alignment: Alignment.bottomLeft,
            child: Text(
              'Your Result',
              style: kTitleTextStyle,
            ),
          )),
          Expanded(
            flex: 5,
            child: ReusableCard(
              colour: kActiveCardColour,
              cardChild: Column(
                mainAxisAlignment: MainAxisAlignment.spaceEvenly,
                crossAxisAlignment: CrossAxisAlignment.center,
                children: <Widget>[
                  Text(
                    'Normal',
                    style: kResultTextStyle,
                  ),
                  Text(
                    '18.3',
                    style: kBMITextStyle,
                  ),
                  Text(
                    'Your BMI result is quite low, you should eat more!',
                    style: kBodyTextStyle,
                    textAlign: TextAlign.center,
                  )
                ],
              ),
            ),
          ),
          BottomButton(
              onTap: () {
                Navigator.pop(context);
              },
              buttonTitle: 'RE-CALCULATE')
        ],
      ),
    );
  }
}
Bottom 버튼도 따로 위젯으로 모듈화해주었다.
import 'package:flutter/material.dart';

import '../constants.dart';

class BottomButton extends StatelessWidget {
  final Function onTap;
  final String buttonTitle;

  @override
  Widget build(BuildContext context) {
    return GestureDetector(
      onTap: onTap,
      child: Container(
        child: Center(
          child: Text(
            buttonTitle,
            style: kLargeButtonTextStyle,
          ),
        ),
        color: kBottomContainerColour,
        margin: EdgeInsets.only(top: 10.0),
        padding: EdgeInsets.only(bottom: 20.0),
        width: double.infinity,
        height: kBottomContainerHeight,
      ),
    );
  }

  BottomButton({@required this.onTap, @required this.buttonTitle});
}
그리고 다음과 같이 소스파일들을 분리 및 모듈화하였다.

[136. Adding the BMI Calculator Functionality]
BMI 계산하는 클래스를 만들어주었다.
import 'dart:math';

class CalculatorBrain {
  CalculatorBrain({this.height, this.weight});

  final int height;
  final int weight;

  double _bmi;

  String calculateBMI() {
    _bmi = weight / pow(height / 100, 2);
    return _bmi.toStringAsFixed(1);
  }

  String getResult() {
    if (_bmi >= 25) {
      return 'Overweight';
    } else if (_bmi > 18.5) {
      return 'Normal';
    } else {
      return 'Underweight';
    }
  }

  String getInterpretation() {
    if (_bmi >= 25) {
      return 'You have a higher than normal body weight. Try to exercise more.';
    } else if (_bmi >= 18.5) {
      return 'You have a normal body weight. Good job!';
    } else {
      return 'You have a lower than normal body weight. You can eat a bit more.';
    }
  }
}
바텀버튼에 이 생성자를 사용해줘서 결과페이지에 데이터를 전달해주었다.
BottomButton(
              buttonTitle: 'CALCULATE',
              onTap: () {
                CalculatorBrain calc = CalculatorBrain(height: height, weight: weight);
                Navigator.push(
                    context,
                    MaterialPageRoute(
                        builder: (context) => ResultsPage(
                              bmiResult: calc.calculateBMI(),
                              resultText: calc.getResult(),
                              interpretation: calc.getInterpretation(),
                            )));
              },
class ResultsPage extends StatelessWidget {
final String bmiResult;
final String resultText;
final String interpretation;
ResultsPage(
{@required this.bmiResult,
@required this.resultText,
@required this.interpretation});

이상 섹션 12 학습을 완료했습니다.
댓글과 공감은 큰 힘이 됩니다. 감사합니다. !!
[다음학습]
https://youngest-programming.tistory.com/692
[Flutter] Udemy 플러터 강의 섹션 13 학습 (학습중 3시간18분 강의) (Clima - Powering Your Flutter App with Live W
[이전학습] https://youngest-programming.tistory.com/685 [Flutter] Udemy 플러터 강의 섹션 12 학습 (BMI Calculator - Building Flutter for intermediates) [이전학습] https://youngest-programming.tistor..
youngest-programming.tistory.com


